
Hello there...
Hope you all had a wonderful weekend! Did you all watch Tim’s epic YouTube Live on Saturday? I hope you enjoyed the release of the brand new Stampers Anonymous stamps and stencils and the amazing new inks from Ranger Ink! It's definitely something we've all been waiting for and I can't wait to share my five samples, which actually includes a piece that I’m sharing with you all today. All the stamp sets are available to buy now at Simon Says Stamp, or if you need them all, then they have a special I WANT IT ALL bundle which includes FOUR free ink pads! Click HERE to buy.
But back to today, and this week's Simon Says Stamp Monday Challenge which is all about Red, White and/or Blue! There are so many interpretations for this challenge, and whatever you choose, then we hope you'll join us and play along.
With the 4th of July just around the corner, I thought this was the perfect time to celebrate all my friends in the US and that's exactly what I did with my US themed project using my favourite set from the Stampers Anonymous release. A couple of years ago I created an Etcetera tag that you can see here, and on this tag I used the Stars and Stripes theme as the base of the tag. So with this in mind, I chose to create today’s tag using a similar backdrop to the previous one but this time it would showcase the stamp set!


To begin with I used a mini Etcetera Tag and primed the surface with a coat of white gesso.
Once the gesso was dry, I then applied masking tape to mask off my stripes. From the top of the tag, I measured placed the first line of tape at 6.8cm, and then placed the remaining tape at 3.2cm intervals.
This creates 5 separate sections on the tag and I started by painting each section above the tape line.

I then applied my paint, starting with blue at the top. For this I used Dina Wakley's Night Acrylic Paint. This is the perfect blue for the top section of my stars and stripes. Dry the paint before removing the tape and placing this along the bottom line of the blue section.
Moving down the tag, I painted the next section with PaperArtsy Heavy Cream Chalk Paint. Once the paint was dry, I then used the dry brush technique to add Frayed Burlap Distress Paint over the top. You only need a light brushing of this paint, you don't want to obliterate the colour that is beneath.
Dry this section thoroughly before moving onto the next section and paint this with a combination of Candied Apple and Black Soot Distress Paint. Repeat the Heavy Cream and the combo of Candied Apple and Black Soot until the tag is painted.
To add the distressed look to the tag, I sanded the edges with sandpaper before then adding a coat of Matte Collage Medium over the top to seal the paintwork.
After drying the medium, I used Walnut Stain Distress Crayon and ran this around the edges of the tag before blending the colour with my fingertip.
Along the bottom edge of the tag, I placed two Etcetera Trims, one slightly narrower than the other. I painted the wider trim using the Night Acrylic Paint and then added Crackle Paste to the second trim. Once the crackle paste was dry and the cracks had appeared, I then applied Walnut Stain Distress Crayon over the top, blended it out with a semi dry baby wipe which will help to accentuate the crackles.

I attached the trims along the bottom with Matte Collage Medium.

To create the stars at the top of the tag, I used the Stars Mini Layering Stencils, which is from Set 37 and applied Grit Paste through the stencil. You will need to do this in two separate applications as the stencil doesn't extend across the width of the tag.

Allow for the paste to dry and whilst that's happening, I moved onto the stamping...
For this I used one of the characters from the Inquisitive Stamp Set and stamped the image onto Watercolour card using Black Soot Archival Distress Ink. I coloured the image with Polychromos Pencils and then fussy cut around the outline.

I then stamped the image once more but this time I'll only be using the hat which I embossed with clear embossing powder.
After fussy cutting around the outline of the hat, I attached it to my main image using foam pads.
I then cut a small strip of red card to add the band across the hat before attaching a Mirrored Star from my stash, which I altered with a little Mushroom Alcohol Ink.

Moving on to the circles and the 'bunting' which I created using the Bullseye 🎯 from the stamp set. I stamped three separate targets in Barn Door Archival Ink onto card that I inked with Old Paper and Frayed Burlap Distress Ink. I then stamped the next layer 3 separate times in Faded Jeans Archival Ink, again onto paper inked with Old Paper and Frayed Burlap DI. I repeated this a further couple of times.
You should now have 3 red bullseye and three blue.
Using a circle nesting die set from my stash, I cut the circles ~ all measurements are approximate and according which die set you use. Simon Says Stamp have a die set which would be perfect for this.
1 x red circle 7cm
1 x blue circle 6cm
2 x blue circles 5cm
2 x red circles 4cm
I then took the larger of the two circles and layered the blue circle over the top of the red using foam pads to form one circle. I matted the circles onto silver metallic kraft stash that I cut with the Sizzix Stitched Circle die by Tim Holtz that I again have in my stash.

With the remaining circles, I cut each of them in half to form four separate pieces and layered these with foam pads to create dimensional semi circles.
Using all the die cut circles, I arranged them onto my tag in a pyramid shape to form the look of bunting.

I mounted the large circle at the top and then adhered my Inquisitive gentleman in the centre of the red, white and blue circle.
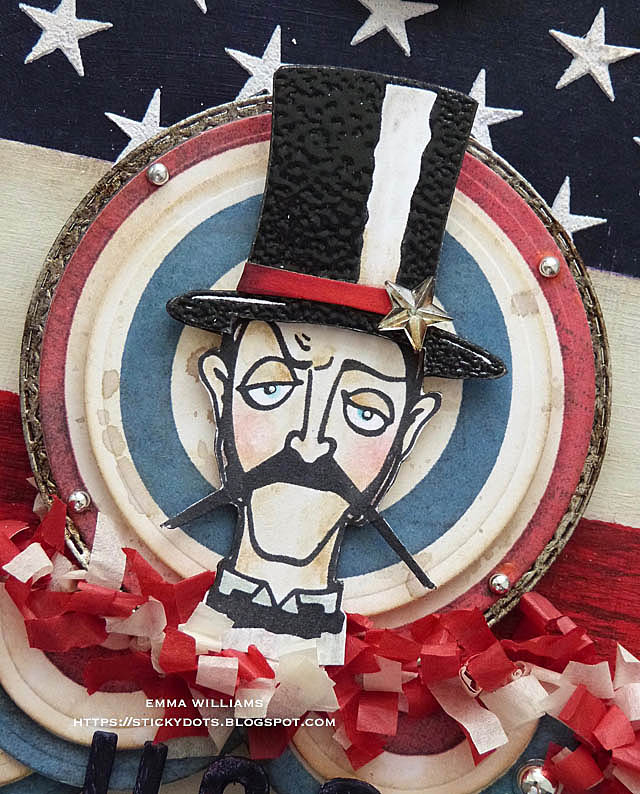
Along the top of the semi circles, I added some fringe trim that I had in my stash. This trim was released by Tim about 3 or 4 years ago...I think!!! I still have some in my box of goodies and thought it would work really well on this piece. If you don't have any of this in your stash, you can use red and white tissue paper which you can cut with scissors to form the ruffled fringe. It's a bit more time consuming but quite easy.

I attached the fringe with Collage Medium and also added some Silver Metallic Droplets. Four around the edge of the large circle, two in the centres of the outer semi circles that form the bunting.

We're nearly there and all that's left is to die cut the wording USA from card using the Alphanumeric Stretch Lower Thinlits Die Set.

I used Mixed Media Heavystock card for this and cut each letter five times before layering them to form thick substantial letters. I painted each letter with more of the Night Acrylic Paint and then attached them to my tag. They are placed to carefully balance along the trim and just attach to the bottom edge of the semi circles.

For the final details, I added a Flair Button at the top, placing it over the hole of the tag and also added a Stitched Scrap which I folded in half to form a loop and just stuck with a small amount of medium.
Finally, I added some Hardware Heads down the side of the tag, and onto either side of the trim and finished with two Adornment stars placed just beneath the semi circle bunting. These metal additions are all painted with Candied Apple Distress Paint.

So that completes this week's project which I hope you love and as always, if you make anything, or been inspired by anything that you've seen here on my blog ~ then please, let me know by tagging me on social media or leaving a comment here and I will be right over to take a look!
Don't forget that every week, one lucky random participant has the chance to win a $25 gift voucher from Simon Says Stamp and you can join in up to 5 times, which means you could have 5 chances to win. You have until Monday 8am Ohio time. 1pm UK time, 2 pm CET to join in and good luck....


Recipe for project:


Absolutely brillinat tag Emma!!! everything about this is just amazing!!! LOVE IT!! :-)
ReplyDeleteHope you have a great week!
luv
Lols x x x
This is absolutely gorgeous. I love everything about it.
ReplyDeleteAbsolutely brilliant Emma. The amount of detail of the bullseyes is stunning. I would never have seen the layering if I had not come to your blog. This is so awesome.
ReplyDeleteThis a so beautifully made. Love it!
ReplyDeleteThis is amazing, thank you for sharing.
ReplyDeleteA stunner!!! But your designs always are :-)
ReplyDelete