
This week our theme is called "E is for...?" and all we want you to do is create something that features the letter 'E' somewhere on your project.
For my project I chose to use 'E' for elephant, a beautiful creature and one that I always associate with strength ~ something I think we are all needing at the moment, and I combined this message with 'E' for embossing to create an etcetera (see where I'm going, lol) tag. Hope you love the piece I made and will read along to see how I used Tim Holtz products to bring this piece to life....

So, let's get started because it's time to share all the details of how I added some texture...


To begin with I took the Small Etcetera Tag and covered it with a panel taken from the Abandoned paper stash. I adhered the paper in place with Matte Collage Medium and then added some torn pieces of book paper to add some interest to the edges ~ you can see the paper on the left and right hand sides, sitting behind the frame. To seal the tag, I applied a coat of the medium over the top, allowing it to dry thoroughly.
Once dry, I applied some Crackle Paste around the edges, again let this dry and wait for the crackle to appear. Once that has happened, I then went in with some Translucent Texture Paste and applied this to the edges, paying particular attention to the corners, I want to make this piece look worn and textured.
Once the pasted areas were completely dry, I then took the Gathered Twigs Distress crayon and ran this over the top of the paste, using a water brush, or you can use your finger to blend the crayon to colour the paste, before adding a touch of Vintage Gold Alchemy Gilding Wax.

To complete the tag, I added the hole reinforcer which I painted with Candied Apple Distress Paint before applying a small amount of Black Soot Distress paint, dry brushed over the top. I also added a small Remnant Rub Sticker, No.84.

Moving onto the framed section and the centrepiece of this project...
...and I started by creating the background section. I wanted to create the look of iron fretwork and capture the feel of ancient India in times gone by and so after having a think of how to create the background, I thought the Doodle Art 2 Die would be perfect for this and used it to cut a panel of Mixed Media Heavystock Card. After removing all the little bits that get caught in the die, I then applied a good coverage of the Embossing Dabber over the top of the die cut before sprinkling with a combination of embossing powders ~ Emerald Creek Charred Gold and the Weathered Gold from the Seth Apter Trio. Apply each powder one at a time over random areas of the die cut, don't cover the entire panel, tap away the excess powder before then applying a second colour. Tap the second colour away and heat emboss. I repeated the process a further three times to create this thick enamelled effect onto the die cut.

The background that sits behind the die cut is a panel of inked card ~ I inked this with a combination of Cracked Pistachio and Broken China Distress Spray Stains, then added more colour into the mix using Mermaid Lagoon, Cracked Pistachio Oxide Sprays before finishing it with Twisted Citron Distress Spray Stain. I then stamped some script over the top, if you look real close you can just see that peeking through before attaching my embossed die cut panel over the spray inked background using Matte Collage Medium applied to the back of the die cut.
To create the framed panel, I used the black baseboard frame and sanded it lightly to create a more weathered effect. I then applied some more of the Translucent Paste around the edges to create a gnarly, crusty look. Once the paste is dry, and this really does need to be dry, I then applied some Black Soot Distress Paint over the top of the paste to colour it. Once again I dried it thoroughly and then applied Bronze Age and Vintage Gold Alchemy Waxes over the top to accentuate the pasted areas and make them pop.

I now have my frame ready and placed the embossed panel behind it before attaching the completed frame to the tag using foam pads.
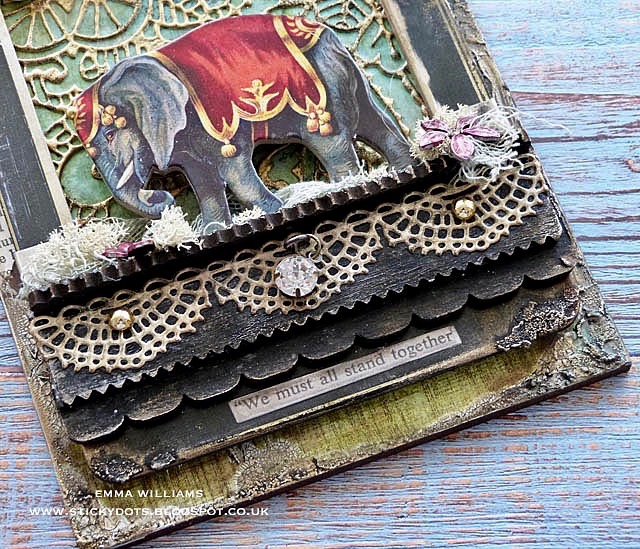
For the ledge that the elephant is standing on, I chose to use 2 Pinked Etcetera Trims and a Scalloped Etcetera Trim. All the trims are the same length but are two various depths. So after painting each of the three trims with Black Soot Distress Paint, I then lay the deepest Scalloped Trim in front of me, and attached the same depth Pinked Trim over the top overlapping them to create the illusion that the scalloped trim is deeper and shows beneath the pinked trim. I hope that makes sense but hopefully you can see from the image what I've done.

Taking the final Pinked trim, I attached this horizontally over the top to form the ledge. I then sanded the edges of the painted trims before applying some more of the waxes and attaching the completed ledge to my frame.

To create the lace effect underneath the ledge, I used the Crochet Die Set and cut a strip from Mixed Media Heavystock card. I then inked it with a blend of Antique Linen and Pumice Stone Inks before adding Walnut Stain to the edges. I adhered the crochet trim to the underside of the ledge with matte collage medium.

To complete the trim I added some gold Metallic Droplets and in the centre, I hung one of the new Tim Holtz Antiqued Gems, hung from a screw eye fixture.

Now to add my elephant and this is taken from the Junk Drawers Baseboard which are pieces of ephemera that are thick chipboard and can stand freely on their own. I attached the piece with foam pads and added some Mummy Cloth around the base of it's feet for texture. The cloth is dyed with a combination of Bundled Sage and Antique Linen Spray Stains.
As a finishing touch to the ledge, I added two Floral Adornments, that I coloured with a blend of Shell Pink and Gold Mixative Alcohol Inks. I placed these onto the ledge with some moss.

As a finishing touch to the ledge, I added two Floral Adornments, that I coloured with a blend of Shell Pink and Gold Mixative Alcohol Inks. I placed these onto the ledge with some moss.

As a finishing touch on the elephant, I added a Metallic Droplet to his forehead.


We're nearly there and we need to now add the message, Strength! The lettering is made up of letters from idea-ology Typography Findings, which I painted with a combination of Old Paper Distress Paint and Frayed Burlap before attaching directly to my fretwork panel using Matte Collage Medium.


I then attached a Clippings Sticker beneath the ledge to complete the message.
Finally, I added a Mirrored Star from stash, inked with Mushroom Alcohol Ink and attached to the top of the frame and then threaded torn pieces of silk ribbon through the hole reinforcer.


As you may know the lovely Heidi, and all the people working behind the scenes at the Simon Says Stamp Store are running on limited operations ~ they are still accepting orders but due to the current Coronavirus (Covid-19) situation, shipping times are going to be slightly longer than usual!
But due to the outbreak we have made the very difficult decision to suspend the $50 vouchers for now but we know that many people are staying safe at home and we would love it if you would continue to enter the challenges and have fun! We are all in this together!


Thank you so much for taking the time to stop by today and see you again soon. I just wanted to let you all know that I am reading all the lovely comments you're leaving me and please don't stop because I love them all and appreciate them so much but last week was one of those weeks ~ on Wednesday, my aunt was admitted to hospital with coronavirus, she's still there and at the moment we're taking each day as it comes but keeping everything crossed for her. Then to make it the perfect week, I broke my toe in a freak accident and I'm now hobbling around...so I just wanted to explain why I haven't replied to your kind comments, etc but to bear with me and I will get back to you asap! ❤️
Stay safe everyone and take care of yourselves and your loved ones...
....love, care, believe ~ Emma
xxx
Recipe for project:
Tim Holtz/Sizzix: Doodle Art 2, Crochet
Tim Holtz/Stampers Anonymous: Small Etcetera Tag, Pinked Etcetera Trims, Scallop Etcetera Trims
Distress Paint: Candied Apple, Black Soot, Old Paper, Frayed Burlap
Distress Ink: Antique Linen, Pumice Stone, Walnut Stain
Distress Spray Stains: Bundled Sage, Antique Linen, Cracked Pistachio, Twisted Citron, Broken China.
Oxide Sprays: Mermaid Lagoon, Cracked Pistachio
Distress Crayons: Gathered Twigs
Alcohol Inks: Mushroom, Shell Pink, Gold mixative
Tim Holtz Idea-ology: Antiqued Gems, Specimen Remnant Rubs, Metallic Droplets, index Clips, Mummy cloth, Typography Findings, Vignette Findings, Clippings Stickers, Junk Drawer Baseboards, Floral Adornments
Embossing Powders: Emerald Creek Charred Gold, Seth Apter Wow Metalz Embossing Powder Trio
Embossing Powders: Emerald Creek Charred Gold, Seth Apter Wow Metalz Embossing Powder Trio
Mediums: Matte Collage Medium, Embossing Dabber, Transluscent Texture Paste, Crackle Paste, Platinum Stickles Glitter
Prima Marketing Wax: Bronze Age, Vintage Gold
Prima Marketing Wax: Bronze Age, Vintage Gold
Surfaces: Mixed Media Heavystock Card


Gorgeous panel Emma :-) I just love the elephant and all of the layers and details are absolutely fabulous!! Beautifully done ;-)
ReplyDeleteHope you have a good week!
Luv
Lols x x x
I just love the magic you bring to your projects Emma. Especially this one. All the textures and layers bring this piece alive. The details are amazing.
ReplyDeleteSending hugs your way my lovely friend. Stay safe
Love Christina
A fabulous make, Emma. Beautifully done. Love all details and love reading your post. I really must get some of that translucent texture paste!
ReplyDeleteSorry about your aunt and your accident. Wishing you both a speedy recovery.
Lisa xx
Fabulous, love the elephant, and all the details are just perfect!
ReplyDeleteBeautiful panel Emma! I love the elephant, frame and all the details. I hope you will have a good week. I hope your aunt will recover soon and that your toe will get better. Hugs!
ReplyDeleteFabulous worn layers... it's like a lost piece of circus memorabilia, but with such a strong message underlying it all.
ReplyDeleteAlison x