
Hello friends...
Today, I'm back to share my third project from Tim Holtz's Sizzix booth and once again I combined dies from the Chapter 1 and Chapter 2 releases to create my Lost World Framed Panel and I think you'll agree that these dies are a match made in heaven and just work together so well when combined together.
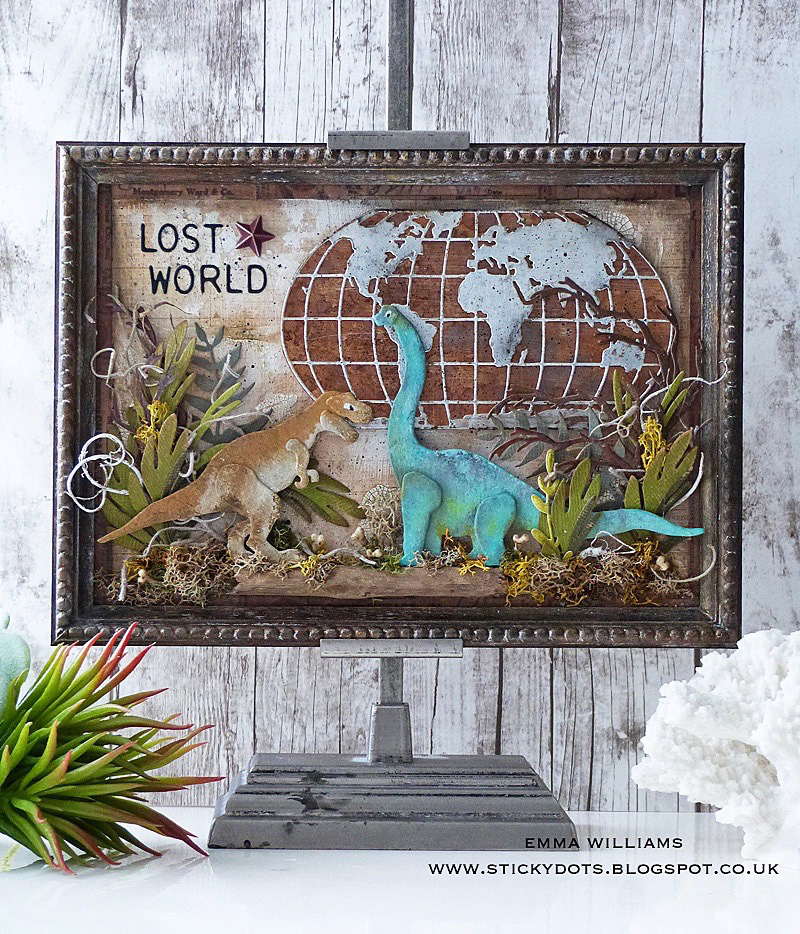
So, let's begin and I welcome you to the lost world of Dino and Rex...

We'll start with the frame and I used one of Tim's Framed Panels which comes in two separate pieces, the backboard and the frame itself. Taking the frame, I applied a coat of gesso over the surface to prep the wood and the edge of the back board and once it was dry, I started to layer the paints to create the look of an old wooden frame.
When layering the paints, I alway dry between layers as you want each paint to appear as an individual colour, not end up with a muddy mess of colours that have all blended together ~ so starting with Walnut Stain Distress Paint, I covered the entire frame and also painted the edges of the back board. Once dry, I then took a paintbrush and picked up a small amount of Black Soot paint from my glass mat, brushing off the majority of the paint onto a clean kitchen towel before dry brushing the frame with paint. Once again, I dried the paint layer and then continued to do this with Antiqued Bronze. If you need to add any of the colours again, just go ahead until you're happy with the look.
Once I'd achieved the colour I wanted I then used my fingertip to add a small amount of Picket Fence Paint which I rubbed over the beading, wiping away any excess paint from the surface. Heat dry thoroughly and then I applied a small amount of gold gilding wax over the top, again this will accentuate the beadwork around the outside of the frame.
We now have both pieces of the frame ready and you can set aside the frame to work on the backboard and create the background for your scene.
For this I cut a panel of paper from the Collage Paper Stash and adhered it to my board using Matte Collage Medium. I also applied a layer of the medium over the top to seal the paper. Once it was dry, I also applied some Design Tape around the edges to create an inner border to my frame ~ this can be any tape of your choice, it doesn't need to be one of a particular design as long as it suits the final scene.
To create the crackled background, I used a palette knife to randomly apply some Crackle Paste ~ just add layers of paste onto the background, varying the thickness to create different sizes of crackle.
Using the Gathered Twigs and Pumice Stone Distress Crayons, I ran each of them around the outside and then using a semi dry baby wipe, I blended the inks over the entire background, allowing some of the colour to sink into the crackles and applying more to areas that needed to be more intense in colour.

When the background is complete and dry, I used Matte Collage Medium to attach my frame to the backboard, placing a heavy book over the top so that it would weight it down and the frame would adhere.
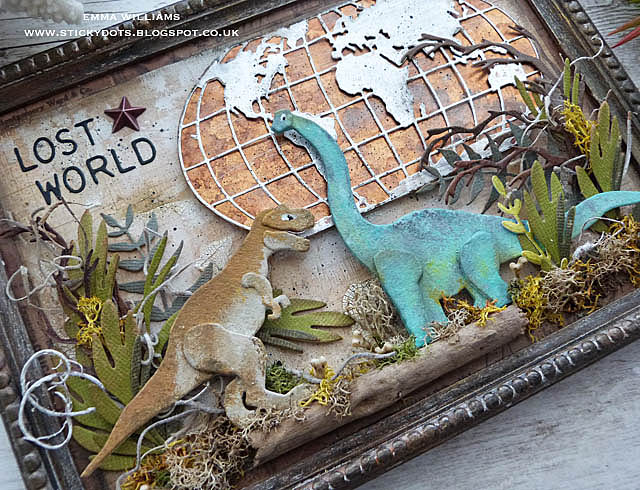
We're now ready to make up the scene and we'll start with the Destination globe, which I LOVE! I've used the original Globe die from Tim in so many of my past projects, so to have this new shape, is going to be so useful and I can see so many possibilities with this die in future projects!
I cut the globe from silver metallic kraft card (keep hold of the piece you die cut as you will need this later) and once the shape was cut, I lightly sanded the edges and surface of the die cut before inking it with Gathered Twigs and applying a light splatter of Black Soot over the top.
Taking the piece of silver card that you kept on one side, place it over the top of a piece of copper metallic card from the 2nd paper stash and using a pencil, trace around the outline of where the Destination piece was cut from. Taking a pair of scissors, I then cut around the pencil line to give me a solid shape that will form the backing to the die cut.

Sand the copper card lightly and again splatter with ink before mounting the silver die cut over the top, using foam pads to add some dimension to the piece.
Moving onto the dinosaurs ~ I used two of the dies from the Prehistoric set, which has 3 dies in total and using a fairly thick piece of card, (I took it from some old packaging), I cut each of the dinosaurs together with all the layered pieces that include the legs, arms and heads and cut them from the card three times. I then layered the pieces over the top of one another to create a really solid figure that has a substantial thickness and when layered, creates dimension to the body. I then applied a layer of gesso over the top ready to paint.

The T-Rex is painted with a combination of Gathered Twigs, Walnut Stain, Vintage Photo, Frayed Burlap, Antique Linen and Picket Fence. The Brachiosaurus was painted with Peacock Feathers, Twisted Citron, Hickory Smoke, Picket Fence and Cracked Pistachio.
To add some more definition and shading to each dino, I just used Distress Crayons in the same combination of colours. To complete my dinos, I added an eye to each with a little dab of paint.

We can now start to build the scene and after placing the Destination globe in the top right hand corner using foam pads on the back to add some height. I used the Large Funky Floral die to die cut a selection of foliage and twigs, which I arranged along the bottom of the frame together with a piece of driftwood and various types of moss.

In the photos below, you can see the depth to this project, which is achieved by all the various textures, dies and by using foam tape.


I then placed my dinosaurs onto some more foam pads (I always vary the depths of the pads to add different dimension) and attached Dino and Rex to the scene, standing them on the driftwood piece. To add a little fun element to the piece, I placed some boneyard findings into the moss.
To complete the frame, and all that's left to do is add my title and lettering, which is cut from black card using the Alpha Numeric dies. I placed the Lost World wording in the top left corner, together with a painted star adornment.

Thank you so much for taking the time to stop by and say hello to Dino and Rex today and I'll see you again soon with my 4th project from the Sizzix booth, a sneak peek of which you can see in Tim's video HERE.
Love Emma xxx
Recipe for project:
Tim Holtz/Sizzix Dies: Funky Florals Large, Prehistoric, Chapter 2 dies coming soon ~ Alpha Numeric, Destination
Distress Paint: Black Soot, Picket Fence, Antiqued Bronze, Walnut Stain, Frayed Burlap, Vintage Photo, Gathered Twigs, Cracked Pistachio, Twisted Citron, Peacock Feathers, Antique Linen, Hickory Smoke
Distress Ink: Gathered Twigs
Distress Crayon: Black Soot, Pumice Stone
Distress Ink: Gathered Twigs
Distress Crayon: Black Soot, Pumice Stone
Heat Gun
Alcohol Ink Applicator Tool
Palette Knife
Paint Brushes
Big Shot Plus
Spanish Moss, moss and driftwood from my own stash
Alcohol Ink Applicator Tool
Palette Knife
Paint Brushes
Big Shot Plus
Spanish Moss, moss and driftwood from my own stash


This is just so cool, I have a couple of Nephews that would love something like this to display in their room...
ReplyDeleteEmma, your prehistoric scene is just so wonderful! I love the way you’ve painted the dinosaurs their colors are just as I’d imagine a dino to be and adding the moss and driftwood to the panel really brings it all to life, especially with the die cut foliage. I just pulled out one of my frames to work with and now have a wonderful reference for achieving a beautiful finish! Thank you for sharing your talents and inspiring me! xx
ReplyDeleteSeriously Emma...from your imagination, to your creativity, your additions, to making it all come to fruition, IT IS ALL FABULOUS! You are amazing, and this dino scene is beyond amazing and will sell a ton of these dies. A WOW!!!!
ReplyDeleteWow, amazing prehistoric scene!!! I love every detail!!!
ReplyDeleteThis is absolutely fantastic , Emma . You really have captured a sense and feel of the prehistoric world with Dino and Rex taking lead roles. Love it and I also know a certain little boy who would absolutely adore this - He's mad crazy about dinosaurs and even though he's only 4 he can tell you anything you want to know about them.
ReplyDeleteBig hugs and thanks for the extra smiles this week :) x
This is gorgeous
ReplyDeleteWonderful! Thank you for giving detailed step by step directions, I know it must take a lot of time.
ReplyDeleteI have to say, this is the greatest scene I have ever seen. I am going to make one for my grandson. I hope to make it at least 1/2 as cool as yours, then I will feel successful. Yours is a masterpiece--no joke!
ReplyDeleteOh my goodness Emma, my grandsons would love to have this in their rooms! I love it and I know they both would as well. You have done an amazing job on this piece!
ReplyDelete