
It's hard to believe that Halloween is just around the corner, where is October going? But as we start the final countdown, I wanted to share another of my Tim Holtz Halloween projects with you all. This is something that I had in mind ever since I saw the Etcetera Tombstone Overlays from Tim Holtz and Stampers Anonymous and something I've been working on in between my DT projects but I am so thrilled with how it's turned out and now, I can now finally welcome you to Dr. T Bones crypt...a forgotten place covered with undergrowth from years of neglect ~ a place that only the bravest will visit!


With this piece, I wanted to make the project freestanding, so that it would sit perfectly amongst my Halloween decorations and wouldn't keep falling down. So, I started by constructing the base and used the Medium sized Tombstone Overlay and also a piece of thick board, which measured, 11.5 x 17cm.
I attached all my overlay pieces directly onto the tag, using Matte Collage Medium and then gessoed the surface of both the tag and the separate board that will become the base, applying the gesso to the front and back of the Overlay pieces ~ the back is going to be on show once you've finished this piece. When the gesso is thoroughly dry, I then applied some Grit Paste onto the front of the tag, varying the thickness of the paste I was adding ~ thicker around the edges and the joins and a very light layer across the centre. At this stage, I also added the paste to the rectangular base section.

Spooky story about the photo below, is that when I took this image, the face recognition actually kept picking up on a couple of "grinning faces" in the centre of the tombstone, not once or twice ~ every single time I tried to focus and if you do look hard ~ you can actually see the effigy of a face!!!! Very spooky.....

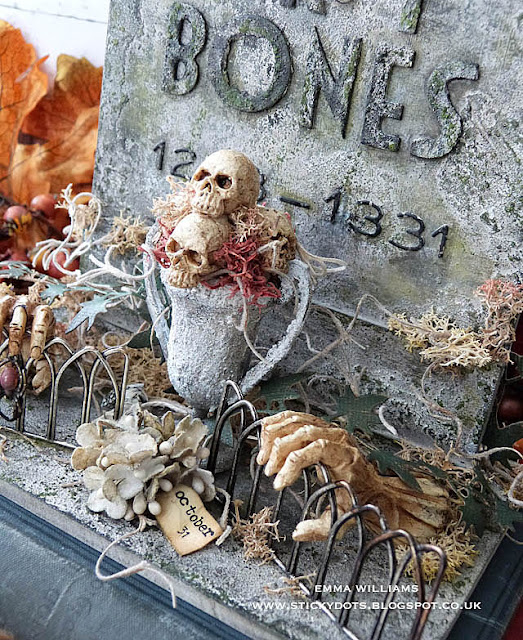
I then added the wording and for this I used the Deco Alpha Die to cut the name from thick chipboard and the Alphanumeric Thin Die to cut Mixed Media card for the remaining letters and numbers. Attach the wording onto the central section of the tag using Matte Collage Medium. I added some more Grit Paste over the chipboard lettering. The wording reads: In Memory Of Dr T Bones, 1253 - 1331....

Allow the paste to dry thoroughly before moving on and don't be tempted to add paint until the paste is dry. Once the paste was dry, I then repeated the process on the back of the tag, again varying the thicknesses before setting it aside to dry ~ this is where you test your patience!
****cup of coffee, answered emails, clean down the desk and drying time later****
I applied a coat of Pumice Stone Distress Paint over all the pieces, including the base and back and front of the tag. Once again, you need to ensure it's thoroughly dry before moving on and you can use a heat tool to speed up this process but only gentle heat, moving the tool around as you go.
It's now time for another layer of paint and for this I dry brushed Black Soot Distress Paint over the surface ~ you don't need to go in too heavy with your paint at this stage, you want light touches and have very little paint on your brush, just enough to kiss the surface and i would suggest that you start work on the back of the tag before applying paint to the all important front section of the tag.
Allow the paint to dry and then using a sponge or scrunched up tissue paper, pick up some Picket Fence Distress Paint from your glass mat or craft sheet and just pounce the paint over the surface. I repeated this process using the Pumice Stone and Black Soot until I created the look of stone ~ all done with Distress Paint. More drying time....
To add some more layers and character to my tombstone, I then went in with Distress Crayons, Peeled Paint, Black Soot and Ground Espresso and just added colour directly onto the surface to accentuate the textures and blending out any harsh lines with my fingertips. I also added crayon to accentuate the wording.
As the final part to this section, I used a Halloween Vignette piece, placed vertically down the top section of the tombstone and added a skull and crossbones in the centre. These metal pieces were altered with a little Picket Fence Paint and a gold metallic wax before they were attached. I also placed some moss behind the vignette piece.
 I also attached two Vignette Accent pieces to each corner of the tombstone, covering them with a light coverage of Grit Paste and then adding Black Soot and Peeled Paint Distress Crayon over the top of the paste once it was dry. To finish this section the tombstone, I added a screw fixing to each side and hung some chain.


To attach the completed tombstone to the base, I used Matte Collage Medium applied along the bottom edge of the tag and then placed the upright section onto the base. I added plenty of support, bottles etc to ensure the tag remained perfectly upright and straight and then just walked away and left it to dry in position overnight.
In the morning, it was absolutely 100% solid and upright and now that the hard work is all done, I can now move onto building up the scene!

I won't go into this too much as you can see what I've done...the main technique here is probably the Trophy Cup that you can see in the centre and for this, I painted the surface with gesso before allowing it to dry and then adding Grit Paste over the top. Once the paste was dry, I then added the same colours I used on the tombstone and just set it aside...

When my stone trophy cup was ready, I placed some foam inside the cup so that it would give me a solid surface for me to attach my arrangement of skulls. Once again, I attached the skulls with Matte Collage Medium, this stuff really does stick anything and then placed moss in between before attaching the urn to my base.

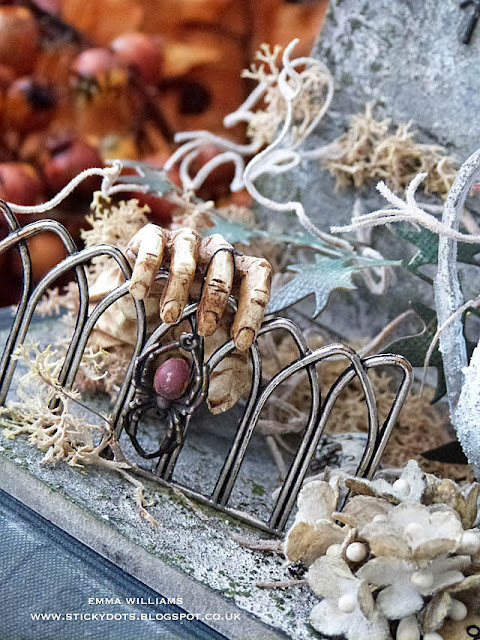
I attached the metal fences with Matte Collage Medium and placed these at the front of the base to appear as if they were being opened by the zombie hands, which are wrapped around the gates.
 I also attached a spider adornment to one of the fingers of the zombie hand.
 I added regular moss and Spanish Moss and I also took this around the back, making that as attractive as the front.


You'll also notice on the back, I added the 'Undertaker' Remnant rub...

As a final touch I added some die cut ivy, cut from Classic Kraft Cardstock and inked with Ground Espresso DI. I left a floral bouquet, dyed with Pumice Stone and Antique Linen Distress Spray Stain and hand wrapped in Collage Paper, tied with twine and complete with a small tag that I hand cut from inked card, quoting the date.

Thanks so much for stopping by today and I hope you've enjoyed this wander through the undergrowth to visit Dr T Bones' crypt ~ may he now rest in peace!
See you again very soon ~ love Emma x
See you again very soon ~ love Emma x
Recipe for project:

Distress Paint: Black Soot, Picket Fence, Pumice Stone
Distress Spray Stain: Pumice Stone, Antique Linen
Distress Crayons: Black Soot, Peeled Paint, Ground Espresso
Distress Spray Stain: Pumice Stone, Antique Linen
Distress Crayons: Black Soot, Peeled Paint, Ground Espresso
Idea-ology: Skulls, Metal Gate, Halloween Adornments, Bouquet Findings, Halloween Remnant Rubs, Halloween Vignette Accents, Zombie Hands, Trophy Cup, Vignette Findings
Surfaces: Classic Kraft Stash, Halloween Collage Paper
Structure: Medium Etcetera Overlay
Surfaces: Classic Kraft Stash, Halloween Collage Paper
Structure: Medium Etcetera Overlay
Heat Gun
Moss and idea-ology Trophy Cup from my own stash
Moss and idea-ology Trophy Cup from my own stash


Just had to see the project up close after the IG post. It is totally spectacular and creepy! Just the right vibe for Halloween. Your attention to detail (tiny bouquet with tag) and the texture and color of the tombstone is perfect!
ReplyDeleteThis is just amazing...goth gorgeous!!! :). I have all this just waiting for me and now I’m super excited to get started! Thank you!!
ReplyDeleteAmazing...product Queen alive and well!! Could say more... but stiff face planted this A.M. just beginning to feel all the stiffness YUK !😒
ReplyDeleteOk I've had a chance to rest and Ice my injuries ... I am too old and fat to be falling... it was crazy and happened so fast !
ReplyDeleteDr. T Bones... WOW such amazingness going on the hands on the gate hahaha; creepy texture on the tombstone you worked this !!!
Ooooo! Amazing does guite hit that top note. It is incredible. I am so enjoying finding the little surprises like the hands. Love it Emma!
ReplyDeleteJust amazing. Every week gets better and better!
ReplyDeleteAbsolutely Incredible!!! Your masterful creativity and tip top execution has brought your tome stone to life. Dr T Bones will be remembered for a long time! ♥ x
ReplyDeleteThat is nothing short of spectacular. Love the tombstone!
ReplyDeleteEmma this is such an awesome project made with the new Halloween 2021 release. The inspiration is so greatly appreciated!
ReplyDelete