Showing posts with label mixed media. Show all posts

Monday, 22 August 2022

Doctor, Doctor...

Happy Monday friends...

As we head into a new week, it's time for the brand new Simon Says Stamp Monday Challenge but before I share all the details, I just wanted to say a very big thank you to everyone who contacted me about my idea-ology projects! I was blown away by your response and I'm thrilled you loved them so much ~ it's the feedback from you, that always makes the hard work that goes into these makes, so worthwhile! So from the bottom of my heart...thank you, and for those who haven't caught up with Tim's LIVE, then just click here for the replay and for all the amazing makes from the makers.

Now, back to today and the new Monday challenge which this week is all about ~ MIXED MEDIA!

I will admit that my first plan was to go down the paint, collage and ink route but then I was so inspired by Tim's new Halloween idea-ology products that I decided to create an assemblage piece that uses many different techniques and mediums. So let me introduce you to Dr Lane, the creepy doctor who seems to have a few skeletons in his closet....


TAG

We'll start with the background and I used a Mini Etcetera Tag, which I twisted round to create a horizontal base. I made this project, so that the tag will be freestanding, (click on the photo below to enlarge the image) and can be displayed on a shelf, and you can read all about how I created the stand using Etcetera Trims, a little further down this post.

I prepped the tag by applying a layer of black gesso over the surface and once dry, I sanded the back the paint to reveal the core of the tag. I then used two designs from the Halloween Backdrops Papers and cut the main panel down to size so that it would fit down the centre of the tag, and cut two smaller panels which I will adhere either side.

I used Matte Collage Medium to attach the side panels and applied some Halloween Design Tape down either side to give me a nice neat finish. I then ripped and distressed the edges of the central panel before machine stitching down either side. Adhere the central panel into position and apply a coat of Matte Collage Medium over the surface to seal the papers.

Taking my Gathered Twigs Distress Crayon, I ran this around the edges of the papers and then blended out the colour to create an aged look to the edges.

On the left hand side of the tag, I used one of the hinges from the new Clippings Sticker Book and wrapped this around the edge of the tag. I then added three small Hardware Heads, which I altered with a  little Rust, Pitch Black and Mushroom Alcohol Inks.

I also added two Hardware Heads on the opposite side and punched a small hole through the tag.

To complete the tag, I added a shelf that will sit across the central panel to hold all the tiny curiosities.

For this I used the largest sized Pinked Etcetera Trim that I painted with Black Soot Distress Paint. I then attached the trim to the tag, using Matte Collage Medium and allowed for the glue to dry and the shelf to be set in place.

After a few light flicks of Black Soot Distress Paint, the tag is now ready for the embellishments...

BOTTLES

To make this a little easier to follow, I'll break it down into sections and we'll start with the bottles...

I have featured tutorials for these bottles many times on my blog but it always helps to recap and it's such an easy process. I used a combination of the Tiny Corked Vials and Corked Vials and applied a layer of Matte Collage Medium over the surface of the glass.

After allowing it to dry thoroughly, I then applied Translucent Crackle Paint over the top.

As soon as you see those cracks and the medium is dry to the touch, I then dropped alcohol inks over the surface of the bottles. I used Sage, Mushroom, Rust, Espresso and dripped each of the individual colours onto the bottles to create the different glass effects.

The bottles are now ready to have their labels added and I used Curator Snippets Ephemera pieces, applying each label with Matte Collage Medium, adding a few tears and creases and then rubbing some Walnut Stain Crayon over the top to age them.

Cut a length of twine and after spritzing it with Walnut Stain Distress Spray Stain, I wrapped it around the necks of each bottle. For the corks, I actually burnt these by holding them over a naked flame ~ please be careful when you do this, as they do tend to catch fire quite quickly and I don't want to cause any accidents. You literally need to show them the flame and blow it out quickly.

Pop the corks into the bottles, and seal them with collage medium.

SKULLS

Now for the skulls and I used a combination of this year's larger skulls and the smaller ones from last year.

I used my finger to add a fine layer of Grit Paste over the skulls to create more of a lumpy bumpy texture and then once it was dry, I rubbed the Black Soot Crayon over the surface, blending it out so it still shows the original colour in places.

BOOKS

I made a whole library of these books ready for Halloween, and this was one of the books that I had leftover from my LIVE make.

To build this book, you will need either old book pages, or you can use some of Tim's idea-ology papers ~ I do tend to use book pages, because they are easier to manipulate when building the pages, but the choice is yours and both work ok!

Taking the book covers from the Halloween Ephemera Pack, I scored the book to create the back and front and a spine and folded along the scorelines. I then cut my book pages to size ~ for this you will need to measure the front cover, width and height and then double the measurement to give you the pages that fit inside the book cover.

Once you've cut enough pages to fill the book and you do want to make sure it's really full, then fold each of them in half and then start adhering them inside the cover. I used Matte Collage Medium.

When the pages are all fixed into place and the secure, I scuffed the edges of the book pages, and then dipped my finger into some paint, and with the book closed, I rubbed the paint along the scuffed edges to add that gorgeous look of an old book.

I tied some twine around the book and added a Clippings Sticker to the spine to complete it.

We now have the bottles, the skulls and book, but I now have to introduce you to the Doctor...

PAPER DOLL

I LOVE this image, you might remember it from a previous project a couple of years ago....HERE and I decided he was perfect for this make and he's one of many who are returning as a Paper Doll Cast Member for 2022!

I applied a coat of clear gesso to the paper doll, and once dry, I colour tinted the image with Distress Crayons. You can choose your colours, but as a guide, I used Peeled Paint for his coat, Faded Jeans for his waistcoat, Gathered Twigs for trousers and hair and then his face and hands were coloured with pens that I have in my stash and are the perfect skin colour tones.

CANDLE

We're nearly there and just need to make that drippy candle come to life...

I used the largest sized candle and hot glued it onto my shelf.

I then took the hot glue gun and dripped the glue around the base of the candle, dripping it off the shelf. You don't need a lot of glue at first, and just small controlled drips, then you can start building and adding as much as you want. Once the glue has hardened, I painted the hot glue drips with Antique Linen Distress Paint, allowed it to dry and then stippled some Frayed Burlap Paint over the top. On the candle wick I added some Stickles Copper Glitter Glue and then allowed it all to dry.

ASSEMBLING

Right we're ready to start assembling the piece and I started by attaching the bottles, leaving a space for my Doctor.
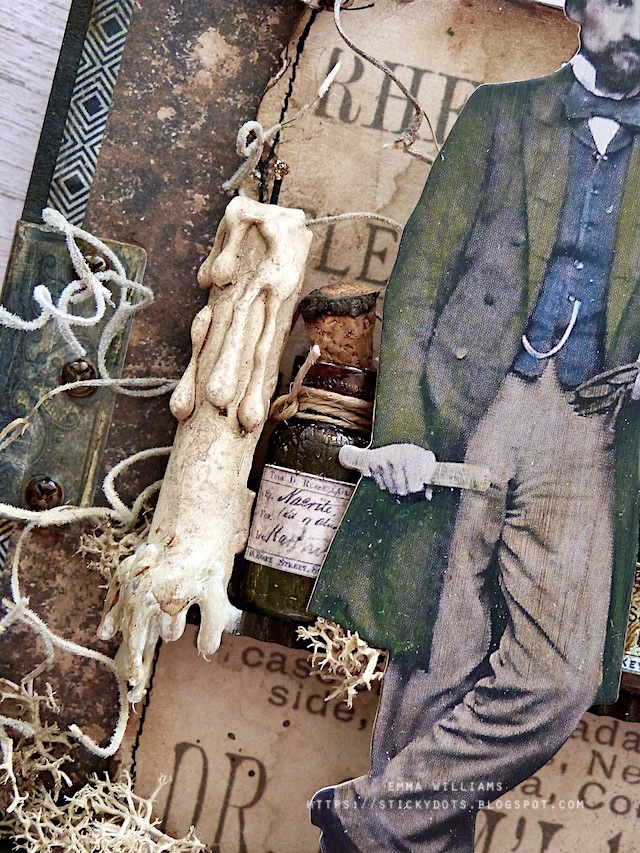
I actually placed an acetate bracket onto the back of the paper doll figure so that it will add 'invisible' support from behind to the figure and then I attached him to my tag.

Place the book and skulls onto the shelf and finally I added some moss and boneyard findings into the arrangement.

We're nearly there and all that's left are is the base that I added to the bottom of the tag.

To complete the scene, I added a Halloween Baseboard piece, "WARNING MAY BE HABIT FORMING", and attached it to the tag with foam pads and also adhered two bats from the Halloween Ephemera pack onto the background.

ENTOMOLOGY CHARM

The final touch was the charm hanging from the side of the tag and for this I used a padlock from the Lock and Keys Adornments, which I altered with some Black Soot, Crackling Campfire and Ground Espresso Distress Paint and then I adhered a beetle from the Entomology Adornments set, and attach this onto the lock.

I altered the beetle with some alcohol inks ~ Villainous and Pitch Black and then attached the finished charm to a swivel clasp which I clipped to the tag.

BASE

Once again, I used two Pinked Etcetera Trims and cut them to size to fit along the base of the tag. After painting them with Black Soot Distress Paint, I attached them along the bottom of the tag to form the base. You will need to be patient while these take hold and probably add something to hold them in place whilst they dry, just to make sure it remained upright and in position.

With my base ready, I just added some more moss and that's my tag complete and ready to add to my display for Halloween.

As always, if you make anything, or if you've been inspired by anything that you've seen here on my blog ~ then please, let me know by tagging me on social media or leaving a comment here and I will be right over to take a look and if sometimes I miss it ~ just keep nudging me!

Don't forget that every week, one lucky random participant has the chance to win a $25 gift voucher from Simon Says Stamp and you can join in up to 5 times, which means you could have 5 chances to winYou have until next Monday at 8am Ohio time. 1pm UK time, 2 pm CET to join in and good luck....


Thank you so much for taking the time to stop by today ~ stay safe and keep well.
Love Emma xxx

Monday, 20 December 2021

Holly Jolly Christmas...

Hey everyone...

Hope you've all had a wonderful weekend and ready for the final push ahead of the big day! There's still plenty to be done here but with the year we've all had, I just want to make sure that this Christmas is going to be a safe and happy one for my family.

But back to today and as always on a Monday, it's time for the Simon Says Stamp Monday Challenge and this is the last challenge of this year! I can't quite believe how fast 2021 has flown by but the DT are going to have a couple of weeks off and then will be back again on the 3rd January!

Our theme for this challenge is all about PARTY and even though here in the UK I don't think there will be many Christmas parties because of the latest outbreak of Covid, I'm sure we'll all try to celebrate the best we can and if you are going to a party or small gathering, then I thought it would be the perfect time to make some handmade gift wrap, a present topper and tags…because every celebration, needs some pretty gift wrap!


So let's get started...

So for this gift wrap and tag set, I used plain white kraft gift wrap which I had in my stash and three sets of Stampers Anonymous stamps by Tim Holtz ~ Bold Tidings Mini, ChristmasTime 3 and Holiday Things.

GIFT WRAP

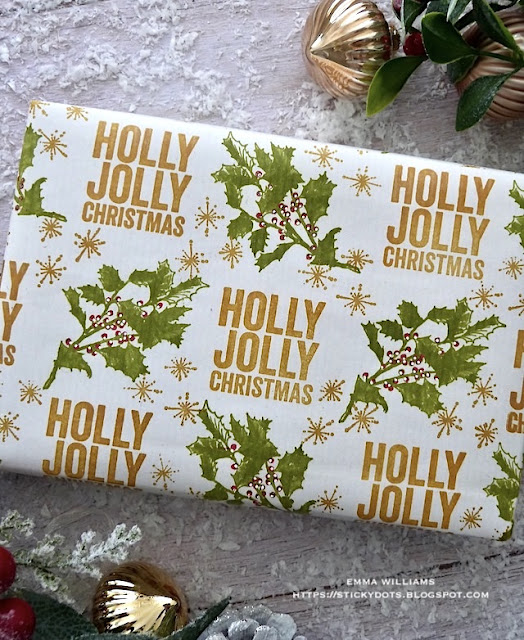
With the paper in front of me, I started stamping the pattern and began with the Holly Jolly Christmas sentiment from the Bold Tidings set.

I inked the stamp with Stazon Metallic Gold Ink and stamped it in a continuous pattern on the paper, leaving enough space in-between for the second image, the holly stamp from the Holiday Things stamp set.

With the sentiment stamping complete, I then stamped the holly. I inked this stamp with Fern Green Archival Ink and again repeatedly stamped across the paper. I used a red pen to add the berries to the holly.

Finally, I used the starbursts from the ChristmasTime 3 stamp set and stamped these in gold onto the white spaces between the holy and sentiment, and this completes the pattern.

The paper is now ready for wrapping up the gift...

WREATH TOPPER

But this present definitely needs a topper and to make this I used Funky Wreath Die which will form the base. This die set has ten separate pieces, five of the dies make up the twiggy wreath, which I cut from Mixed Media Heavystock card spritzed with Gathered Twigs, Ground Espresso and Walnut Stain Distress Spray Stains, and the remaining dies create the leafy wreath, which I cut from card spritzed with Peeled Paint, Iced Spruce, Rustic Wilderness and the  Frosted Juniper Mica Spray.

Once both my wreaths are assembled and I'd added all the extra little die cut pieces, I then layered the leafy green wreath over the top of the twiggy one to form my topper. At this stage, I cut a few more of the singular pieces of twigs and leaves which I added to make the wreath a little 'fluffier'.

To give the wreath a frosty finish, I used my finger to smear some Matte Collage Medium over the top and then sprinkled the Rock Candy Glitter over it. Tap away the excess and allow to dry.

I then tied two strips of candy cane twine around the wreath topper. These will be used to tie the finished topper onto my present.

SENTIMENT SEAL

To create the seal in the centre of the topper, I used the Seal Thinlits Die and Switchlits Embossing Folder to cut and emboss a piece of card from my scrap box that I had previous stamped with the same holly design as on the paper. I then cut a circle from Mixed Media Heavystock, slightly smaller in size than the seal and stamped the Holly Jolly Sentiment onto the centre in the same gold metallic ink as before.

I attached the sentiment onto the centre of the seal using foam pads, before attaching the completed layers to the centre of my wreath and adding four gold metallic droplets around the circle.

FLOWERS

The flowers are all die cut from card inked with Candied Apple, Barn Door and Peppermint Stick Mica Spray, using the small spiky flower die in the Funky Nordic Thinlits Die set by Tim Holtz.

I then assembled each of the flowers, which comes in two die cut sections and gave them a dusting of Rock Candy Distress Glitter before attaching them to my wreath topper.

I completed the wreath by adding drops of Tonic Nuvo Crystal Drops, placing them in the centres of the flowers and onto the wreath itself.

Attach the topper to the gift using the candy cane twine that I attached to either side of the wreath.

TAGS

Now that the gift is wrapped, I decided to also make some tags to match the paper. I stamped the tags using the same holly and starburst stamps as I used on the gift wrap and then stamped different sentiments from the Bold Tidings set onto Mixed Media Heavystock. I layered the sentiments onto gold metallic kraft card before attaching them to my tags with foam pads and mounting the tags onto glitter card.

I added small drops of the Tonic Crystal drops into the centres of the stamped starbursts and used a red pen to add the berries to the holly.

To complete the tags, I added small bows die cut from the same card as I inked for the flowers, and using the bow die from the Christmas Vault Series die set.

Shape the tiny paper bows before attaching them to the tags and adding some more candy cane twine.


So that completes my final project of 2021...it's been a really busy making season but I've enjoyed every single minute and hope you've enjoyed everything I've made! Thank you to everyone who has left me comments and for all the love you've shown me and my work ~ it really has meant the world!


As always, I hope you love the card I've made and the techniques I've used and if you make anything, or if you've been inspired by anything that you've seen here on my blog ~ then please, let me know by tagging me on social media or leaving a comment here and I will be right over to take a look!

Don't forget that every week, one lucky random participant has the chance to win a $25 gift voucher from Simon Says Stamp and you can join in up to 5 times, which means you could have 5 chances to winYou have until next Monday at 8am Ohio time. 1pm UK time, 2 pm CET to join in and good luck....


Thank you so much for taking the time to stop by today ~ stay safe and keep well.
Happy Christmas everyone and hope 2022 brings us peace and happiness!
Love Emma xxx

Recipe for project:

Distress Ink: Gathered Twigs, 
Distress Spray Stain: Rustic Wilderness, Iced Spruce, Candied Apple, Barn Door, Iced Spruce, Walnut Stain, Ground Espresso
Tim Holtz Idea-ology: Metallic Droplets
Twine, red marker pen and gift wrap from my stash

Monday, 7 June 2021

Happy In Her Heart...

Hello friends...

Hope you've all had a good week and the sun has shone wherever you are! As the new week begins, it's time for the brand new Simon Says Stamp Monday Challenge and this week our theme is all about Mixed Media! The DT are also showcasing Dina Wakley products within their projects, something that you don't necessarily have to do to play along with us but if you are a fan, then this is your chance to put those amazing products to great use!

For my project, I was inspired by my Grandmother Ethel ~ she was such a wonderful woman, anyone who knew her, loved her and I have so many fond memories of the time we spent together. But the one thing I will always remember is her beautiful garden, which was the pride and joy of both my grandparents and I spent many happy summer holidays playing in that garden, which is why I chose to create this page....

....and with this in mind, I used Dina's Media Journal for my vintage style layout and combined Dina's products with a few of Tim Holtz's, including a vintage photo, Distress Paint, collage paper and some ephemera pieces.

So let's get started ~ it's time for this week's challenge!


To begin with I cut a strip of the Botanical Collage Paper and flipped it over so that the printed side is facing down. You'll probably have seen Tim demo the next stage where you use Distress Paints to paint on the reverse of the tissue paper to add colour to the images and if you want to check it out again, then click HERE

The colours I chose to use on my flowers were a combination of Picked Raspberry, Crackling Campfire, Tumbled Glass, Peeled Paint and Candied Apple and below are close ups of each of the individual painted images once I've adhered them onto the pages of the layout. 

When the paint has thoroughly dried on the reverse of the collage tissue, I flipped it back over to the right side and used a water brush to apply a very narrow line of water around the areas that I wanted to remove and use on my pages. By doing this it will create a much smoother outline to your image when you finally adhere it onto the page. Also, if you choose, you could use the whole sheet if you want to, but I just wanted certain placement flowers to pop off the page. Set these to one side whilst moving onto the next stage...

With the journal open in front of me, the watercolour paper on the left hand side, the canvas page on the right, I began to prep my pages. I wanted to create several layers of different textures to this layout...so, I began by cutting the left hand watercolour page in half, which then revealed the burlap page underneath. To create the next layer, I cut the burlap so that it was slightly wider than the watercolour paper and would show underneath.

These cuts mean that I now have three separate, layered pages on the left hand side that overlap one another.

Now to adhere the painted Collage Paper flowers and leaves.

I used Matte Collage Medium and applied this with the Distress Collage Brush before carefully adhering each of the tissue flowers and leaves into place. You can see that I arranged these to run along the bottom of both pages.

I also added one flower to come in from the central spine of the journal and added the fern leaves in the corner of the left hand page.

Down the spine of the journal, I added some strips of Design Tape. I randomly tore these strips and layered them side by side across both pages. I then scraped some gesso over the top of the tape strips, allowed for this to dry and added some Walnut Stain Distress Crayon over the top, blending out the harsh lines with my finger.

I finished the pages with a splatter of Black Soot Distress Paint, allowing the splatters to fall across all the sections.

Before I move onto the photo, there is one last layer to create and this is the crochet embellishment down the left hand side. for this I used the Sizzix Crochet Thinlits die to cut Mixed Media Heavystock card and after inking the crochet strip with Antique Linen and Frayed Burlap Distress Inks, I attached the strip to the burlap page, using Matte Collage Medium. I then attached my watercolour page over the top, sandwiching the crochet die cut between the layers and just allowed for the pages to dry thoroughly....

...and whilst that's doing it's thing, I moved onto the photo.

The photo of this beautiful lady taken from Tim Holtz's Found Relatives Photos is going to be the centre piece, I have so much love for this photo ~ she is gorgeous and reminds me of my Grandma Ethel, which is why I've added the name in the top left of the photo, using Clippings Stickers and outlining the stickers with a black pen.

I used this image as the main focal point and after applying a coat of Dina's clear gesso over the image, allowing for this to dry ~ I then colour tinted the image with Distress Crayons and a water brush.

Colours used: Picked Raspberry, Peeled Paint, Spun Sugar, Gathered Twigs, Broken China, and Faded Jeans

I creased the corners and edges of the photo to create more of a vintage feel and then added some stitching around the edges.

I mounted my photo onto a piece of linen that I have in my stash. For this layout I wanted a very natural, organic look to the overall project and cut the linen to create raggedy edges, nothing too uniform or straight edged.

I then added some machine stitching to the linen...

...before I attached the photograph in the centre.

Now to mount the photo onto my journal page and if you're really clever I'm sure that you can hand stitch this onto the page, attach it with fabric glue or some other sort of fusible bonding but because I don't have any of those things to hand I have actually pinned the panel using safety pins and decorative pearl headed pins.

This actually holds everything in place, and I even overlapped the corners of the photo with the pins so that is also really secure and doesn't lift.

I placed the photo in the centre of the linen canvas page, arranging it to sit in the centre of the flowers in the top left and right hand corners.

I completed this section by adding some ephermera pieces from the Field Notes Ephemera set, that I tucked underneath and around the photo and also added a Salvaged Tag, slightly scrunched for more of a vintage feel and inked with Walnut Stain Distress Ink. I also threaded some twine through the hole, leaving this to hang down loosely.

Finally, I threaded some buttons with cotton and attached these to my layout with Matte Collage Medium.

To complete this page, I stitched a Stitched Scrap to the top right hand corner...

So, that's my journal layout complete and I hope you've enjoyed the process of how I created these pages, all inspired by a very special lady!

As always, if you make anything, or been inspired by anything that you've seen here on my blog ~ then please, let me know by tagging me on social media or leaving a comment here and I will be right over to take a look!

Don't forget that every week, one lucky random participant has the chance to win a $25 gift voucher from Simon Says Stamp and you can join in up to 5 times, which means you could have 5 chances to winYou have until Monday 8am Ohio time. 1pm UK time, 2 pm CET to join in and good luck....


Thank you so much for taking the time to stop by today ~ stay safe and keep well.
Love Emma xxx


Recipe for project:

Dina Wakley products: Media Journal, Clear Gesso, White Gesso
Sizzix/Tim Holtz: Crochet
Distress Paint: Black Soot, Picked Raspberry, Crackling Campfire, Tumbled Glass, Peeled Paint and Candied Apple
Distress CrayonsPicked Raspberry, Peeled Paint, Spun Sugar, Gathered Twigs, Broken China, and Faded Jeans
Distress Inks: Antique Linen, Frayed Burlap, Walnut Stain
Powered By Blogger

Total Pageviews