Showing posts with label insects. Show all posts

Monday, 22 January 2024

Wrapped Up In Books...

Hello everyone...

Hope you've all had a great weekend and you're now ready for the brand new week ahead! As always, the start of a new week, means that we have a brand new Simon Says Stamp Monday Challenge and this week we are asking you to RECYCLE! 

So whatever you choose to use, whether it's old packaging, tins and jars, or just recycling an old technique that you've forgotten about...we hope you'll join us and play along.

For my make, I chose to use an old sketch book that has been in my cupboard for a while and if you know what I mean, it wasn't something I would want to leave out on my desk. So, with this in mind and with my love of stationery firmly set in my mind, I transformed the cover of the book into something that is a little more 'me' and a book that I would definitely have on my desk. I also wanted to have a play with Tim's brand new, and sadly last Distress Colour, SCORCHED TIMBER. This beautiful shade of brown was perfect for what I wanted, and is the perfect backdrop for my book cover and also, I’ll show you how creating different folds on the rosette, will give a different look to the finished piece!

So let's begin and here's how I breathed new life into an unwanted sketch book that had seen better days!

The sketchbook measures 8.5' x 6', had a hardboard cover with a large design on the front cover.

SKETCHBOOK COVER

To begin with I painted around the edges of the front cover, and the inside back cover with Scorched Timber Distress Paint, and I also painted the inside cover and the back cover before allowing the paint to dry.

I then cut a panel of Distress watercolour card, slightly smaller in size than the cover. I then applied Black Opaque Texture Paste through the Stampers Anonymous Rosettes Stencil to cover the entire panel of card. This will take two applications and I would recommend you allow for the first application to dry before applying the second.

I then took a combination of the following Distress Sprays and Oxide Sprays:

DISTRESS SPRAY STAINS: SCORCHED TIMBER, ANTIQUE LINEN, CRACKLING CAMPFIRE

DISTRESS OXIDE SPRAYS: SCORCHED TIMBER, TUMBLED GLASS

After misting the panel of card with a water, I applied the layers of sprays to build up the colour, applying one at a time and just dabbing away any pools of spray that would oversaturate the card.

Once happy, I dried the cardstock and then splattered the surface with Tumbled Glass Oxide Spray and added a strip of design tape along the top and bottom of the panel, placing it about 1cm from the edges.

When the panel was thoroughly dry, I stitched the inky panel onto a piece of felt that I cut with pinking shears and machine stitched a border around the outside edge and then adhered the panel onto the front cover.

In the top left hand corner, I stitched and then attached a Numbers Snippet and added a Mini Pin.

Below is a photo of the back cover which I had painted with the Scorched Timber Distress Paint and then mounted a piece of Tim's paper from an older paper pad to cover it.

TAG

Now for my tag, and once again I used Scorched Timber Distress Spray but this time combined it with Speckled Egg Oxide Spray and Antique Linen.

The sprays are applied in exactly the same way as I applied them to the background panel and once dry, I began stamping some layers over the top.

With the tag in a landscape position, I placed it into my stamp platform and using the numbers stamp from the Tim Holtz Inquisitive Stampers Anonymous stamp set, I inked the stamp with Scorched Timber Oxide Ink.

I stamped the numbers across the bottom of the tag, and removed the tag from my stamp platform. Don't remove the stamp at this point. I then misted water over the numbers to slightly blend them into the background and heat dried the ink before I placed the tag back into stamp platform in the same position as before and then stamped once again but this time using Vintage Photo Archival Ink, ensuring that the stamp will be in exactly the same position as the first time.

Now to add more layers, and I used the border stamp, "Claims For Error...." from the Inspector set, inked in clear embossing ink and stamped this above the numbers, before sprinkling with gold embossing powder and heat setting until molten.

I then used the alphabet stamp from the same set, and stamped this across the top section of the tag, again using clear embossing ink and gold embossing powder.
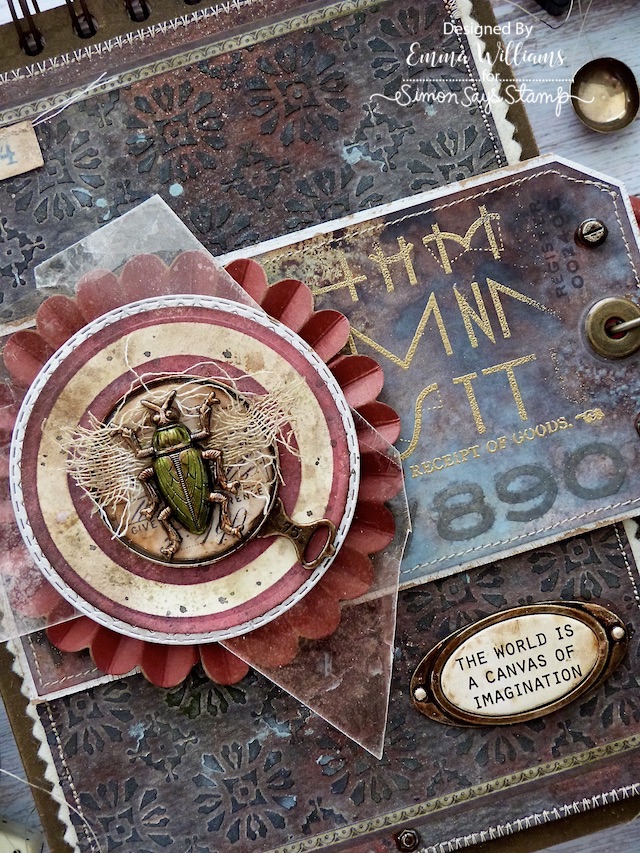
Finally, I stamped "Register 002408" in the top right hand corner of the tag using black Archival Ink.

After inking the edges of the tag, I cut a piece of silver metallic kraft stash card, used a sanding tool to sand the edges, which I then inked with Scorched Timber Distress Ink and then mounted the tag itself onto the metallic panel.

Using a Crop A Tile Tool, I punched a hole in the tag, then attached an eyelet over the hole before using foam pads to attach the tag across my sketchbook cover, leaving the end to slightly overhang the edge of the cover.

ROSETTE and TARGET LAYERS

For the focal point of the cover, I began with the Rosette, and cut red kraft stock card three times using the Vault Rosette Die. I attached the three pieces to form one long strip and then folded along the scorelines, valley and mountain folds before attaching the two ends to form the circle.

If you pop over to last week’s blog post, HERE, you will notice that I used, and folded the rosette as it was designed to be, (there is a subtle difference) but for this make, I wanted to create more of a bottle top feel, with a fluted edge to the rosette, so when I folded along the score lines, I folded the opposite way opposite way and then pushed down on the centre of the rosette, added hot glue in the centre and attached the seal to secure the rosette.

After lightly sanding and inking the edges of the rosette, I attached it to my tag, placing it on the left hand side.

For the next layer, I used the target from the Inquisitive Stamp Set. I stamped it onto the centre of the card panel using a combination of Barn Door and Black Soot Archival Inks. I always stamp using Tim's Stamp Platform and this allows me to use two colours on one image. Just ink up the image with Barn Door, stamp and then re-ink very lightly, not a complete coverage, with Black Soot and stamp again.

I then spritzed the card with Frayed Burlap and Lost Shadow before I inked the edges with Walnut Stain Distress Ink. 

I used a 7cm Layering circle die to cut the target and then matted it onto a silver metallic die cut, cut using one of Tim's older die sets, Stitched Circles.

I then mounted the circle onto a piece of mica tile and attached this to my rosette.

INSECTS and OPTICAL LENSES

Using one of the insects from the Entomology Adornment pack, I painted it with Alcohol Inks, Sublime, Smolder and Envy. I also applied a hint of Mushroom alcohol ink over the top for more of a vintage feel to the metal.

For the optical lenses, I used a combination of Mushroom, Rust and Pitch Black alcohol inks to alter the metal and create a rusty appearance. Over the top of the inks, I applied a small amount of Statue Foundry Wax, literally just lightly touching the metal, not adding a solid coverage.

I then heat set the wax with a heat gun. Finally, I added drops of Mushroom alcohol ink to the glass, dabbing away any excess ink and just leaving a slight aged appearance.

Behind the glass lens, I cut a circle of scrap paper and after inking the paper and creating foxing marks, I attached them to my lens by adding a small amount of Matte Collage Medium around the edge to seal the paper.

I attached the lens to the centre of the target and then layered the insect over a piece of Mummy Cloth that I had in my stash, already colour tinted with Distress Inks.

We're nearly there and all that's left is to add the quote.

QUOTE and FRAME

The Quote Label Chip that i used was just perfect for my book and I placed this inside the Label Frame. These chips are made for the frames and fit perfectly.

I then added a touch of Statue Gilding Wax over the metal, which I heat set and attached the finished quote to my cover.

FINISHING DETAILS

For the final details, I added Hardware Heads, altered with Distress Paint to create more of a rusty finish.

I placed three along the bottom of the cover and added two to the right of the tag.

To complete the cover, I added a Mini Book Ring through the hole in the tag and clipped a Hook Clasp onto it, before adding the Word Key to the end.

The metal of the word key is altered with Statue and Sterling Foundry Wax and I applied the Statue Wax first, then heat set the wax before applying a lighter layer of Sterling, not creating a block coverage ~ you want the previous layer to show beneath. I heat set the silver wax and then used trickled Rust, Pitch Black and Mushroom Alcohol Inks over the surface to create the rusty effect.

That's my make finished and I hope you love this piece and it's transformation from an old, tired sketchbook to a brand new one.

As always, if you make anything, or if you've been inspired by anything that you've seen here on my blog ~ then please, let me know by tagging me on social media or leaving a comment here and I will be right over to take a look!

Don't forget that every week, one lucky random participant has the chance to win a $25 gift voucher from Simon Says Stamp and you can join in up to 5 times, which means you could have 5 chances to winYou have until next Monday at 8am Ohio time. 1pm UK time, 2 pm CET to join in and good luck....


Thank you so much for taking the time to stop by today...see you all again very soon!

Love Emma xx


Recipe for project:

Tim Holtz for Stampers Anonymous: InquisitiveFaded TypeThe InspectorRosette Layering Stencil
Distress Spray StainLost Shadow, Speckled Egg, Frayed Burlap, Scorched Timber
Oxide SpraySpeckled Egg, Tumbled Glass and Scorched Timber
Distress Inks: Walnut Stain
Alcohol Pearl Inks: Smolder, Envy, Sublime and Intense
Alcohol Inks: Mushroom, Rust and Black

Monday, 27 February 2023

Fragile ~ Handle With Care

Hello friends...

Where has February gone? I swear that this year is going quicker than last, and that's saying something ~ it is flying! Anyway, I hope you all had a wonderful weekend and you're ready for a brand new Simon Says Stamp Monday Challenge which this week is all about THINGS WITH WINGS!

Now there are many interpretations for this theme, from birds and butterflies to angels and airplanes and we can't wait to see what you create and hope you'll join us and play along.

For my make, I decided to go with insects, and I created some specimen pockets using the Entomology Adornments as the focal point and I also had a play with Lost Shadow for the first time. My parcel went on an around the world trip, so it's a little late arriving but this colour is stunning, so it's better late than never! I've had so much fun making these and I'm really hoping to build upon them as the week's go by and create a collection that I will then store in a file box. Keep watching this space, to see the next instalment.

So back to this week, and here's how I created this set of specimen pockets...


ENVELOPE POCKETS and SLIDE FOLDERS

To begin with I made the envelopes and for this I used the Collector and Specimen Thinlits Die Sets to create my bases I cut each of the 3 envelopes and the slide folder from Mixed Media Heavystock Card and once I had all three cut, I then started to add my colour. I used the following Distress Spray Stains and Oxide Sprays:

DISTRESS SPRAY STAIN: Lost Shadow, Speckled Egg, Frayed Burlap

DISTRESS OXIDE SPRAY: Lost Shadow

I spritzed each envelope with the sprays and then misted them with water to create a blend that I was happy with. I then heat dried each piece and assembled my pocket envelopes and slide folder.

After inking the edges of each of them, I put them to one side to move onto the next stage, the insects and optical lenses.

INSECTS and OPTICAL LENSES

I used four of the insects from the pack and painted each of them with Alcohol Inks, Smolder, Tranquil, Envy and Intense. I also applied a hint of Mushroom alcohol ink over the top for more of a vintage feel to the metal.

For the optical lenses, I used a combination of Mushroom, Rust and Pitch Black alcohol inks to alter the metal and create a rusty appearance. Over the top of the inks, I applied a small amount of Statue Foundry Wax, literally just lightly touching the metal, not adding a solid coverage.

I then heat set the wax with a heat gun. Finally, I added drops of Mushroom alcohol ink to the glass, dabbing away any excess ink and just leaving a slight aged appearance.

Behind each lens, I cut a circle of paper, which is from the Backdrops Vol 1 pack and after inking the paper and creating foxing to each circle, I attached them to my lens by adding a small amount of Matte Collage Medium around the edge to seal the paper.

We're now ready to build those pockets and slide folder.

POCKET ENVELOPE 1

For the panel on the front of this envelope, I cut a piece of Mixed Media Heavystock slightly smaller in size than the envelope and then using the target from the Inquisitive Stamp Set, I stamped it onto the centre of the card panel using a combination of Barn Door and Black Soot Archival Inks. I always stamp using Tim's Stamp Platform and this allows me to use two colours on one image. Just ink up the image with Barn Door, stamp and then re-ink very lightly, not a complete coverage, with Black Soot and stamp again.

I then spritzed the card with Frayed Burlap and Lost Shadow before I inked the edges with Walnut Stain Distress Ink. After machine stitching my card, I matted it onto silver metallic kraft stash and mounted it onto my envelope.

After tying a piece of twine around the handle of the lens, I attached it in the centre of the target and then adhered the insect to the glass, all using Matte Collage Medium. 

In the top right hand corner, I adhered a Curator Snippets ephemera piece.

The final touch for this envelope is a plaque that sits beneath the lens. I cut my layers from metallic kraft stash using the Specimen Die Set and adhered each layer over the top of one another to create the plaque and a frame to sit around it.

I then cut the "Filed" lettering from the same silver card and adhered this to my plaque. To age the plaque, I applied a coat of Black Soot Distress Paint over the top and wiped away the excess. I then added a small amount of Crackling Campfire paint, followed by Ground espresso and finally Antiqued Bronze.

After attaching the completed plaque to the envelope, I added Hardware Heads to either end and again altered the metal with the paints.

ENVELOPE 2

Using Lost Shadow, Ground Espresso, Speckled Egg and Frayed Burlap Distress Sprays, I spritzed a panel of Mixed Media Heavystock card  and then added a final spritz of Lost Shadow Oxide.

This background has crackle paste applied through the Plus Layering Stencil, and once dry, I machine stitched around the edge, matted it onto silver Metallic Kraft card and mounted it on my envelope.

On this envelope, I attached the lens over the top of a circle of silver card and then added the metallic plaque, which I made exactly the same as the previous envelope, but this time added numbers.

ENVELOPE 3

For the final envelope, I used the same spray stains and oxides as I used on the background and once dry, I used stamps...Faded Type and Mini Glitch, to stamp the layers on the inked background.

I attached the lens and insect to the envelope and then hung a Hook Clasp from the handle of the lens.

After adding a Curator Snippet in the top left hand corner, I applied a 'Fragile' Remnant Rub in the top right corner....

...and the No.3 in the bottom right hand corner.

SLIDE FOLDER

I placed a piece of the same Backdrop paper as I used on the lens, and placed this in the window aperture of the slide folder. I then attached a Numbers Snippet, No.1040, along the bottom edge of the folder.

I adhered a piece of mica sheet to the slide, placed some linen from my stash over the top and then attached the insect. Finally I added a clip to the top and four mini fasteners to each corner.

So that's it from me for today and I hope you're inspired by my makes and love what I've created.

As always, if you make anything, or if you've been inspired by anything that you've seen here on my blog ~ then please, let me know by tagging me on social media or leaving a comment here and I will be right over to take a look!

Don't forget that every week, one lucky random participant has the chance to win a $25 gift voucher from Simon Says Stamp and you can join in up to 5 times, which means you could have 5 chances to winYou have until next Monday at 8am Ohio time. 1pm UK time, 2 pm CET to join in and good luck....


Thank you so much for taking the time to stop by today...see you all again very soon!

Love Emma xx


Recipe for project:

Tim Holtz for Stampers Anonymous: InquisitiveFaded Type, Mini GlitchPlus Layering Stencil
Distress Spray StainLost Shadow, Speckled Egg, Frayed Burlap
Oxide Spray: Speckled Egg
Distress Inks: Walnut Stain
Distress Paint: 
Alcohol Pearl Inks: Smolder, Tranquil, Envy and Intense
Alcohol Inks: Mushroom, Rust, Pitch Black
Powered By Blogger

Total Pageviews