Hope you all had a lovely weekend and for those celebrating VE Day, I really hope that despite the difficult times we're living in at the moment, you managed to enjoy the celebrations and salute all those who fought so bravely in WW2...
Today, we have a brand new challenge starting on Simon Says Stamp Monday Challenge Blog and this week our theme is called, It's A Dog's Life and of course, the clue is in the title ~ it's all about those furry friends and we can't wait to see how you'll interpret the challenge!
For my project, I chose to create a tag that uses a Tim Holtz Paper Doll and is all about a girl, her beautiful dog and best friend and the adventures that are yet to come! I also decided to include a background that I created using one of the techniques that Tim Holtz shared in a recent FB live ~ the gorgeous glass effect that you can create using Translucent Texture Paste and the new Embossing Glazes. After playing along with Tim's demos, I found that I had so many tags that I'd made and needed to be used and this was the perfect one for this piece.

So, let's get started because it's time to share all the details of how I created my vintage style tag, packed full of layers and texture...

I'll begin by explaining the smaller sized tag and for this I used a Size 8 tag and started by adding some colour using Distress Spray Stains and Oxide Spray Stains ~ these are the colours I chose to use:
Weathered Wood Distress Spray Stain (from my own stash) and Oxide Spray
Chipped Sapphire Oxide Spray
Crushed Olive Distress Spray Stain
Rusty Hinge Distress Spray Stain
Antique Linen Distress Spray Stain
After layering my colours and blending them together with a little misted water, I heat dried the tag and then inked the edges with Walnut Stain and Vintage Photo Distress Inks. I then gave one last spritz of water before ensuring that the tag was completely dry.
Now that I have my background, I applied the Translucent paste through the Floral Layering Stencil from the Mini Layering Stencil Set 25 ~ arranging the stencil to create a pattern of flowers that would sit comfortably behind the paper doll. After carefully removing the stencil, I then applied my glazes ~ Fossilized Amber, Peeled Paint and Weathered Wood ~ sprinkling each of the glaze colours onto the individual areas to accentuate the stencil details.
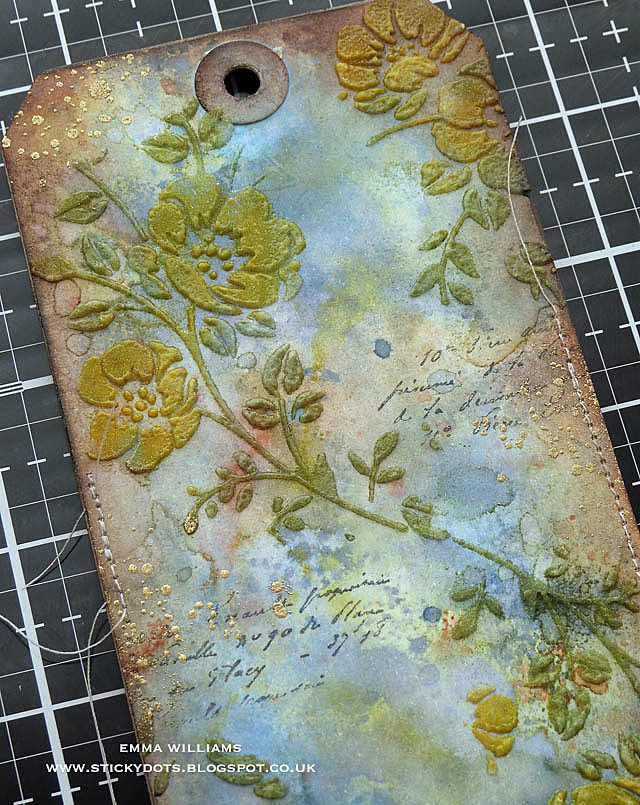
Allow for the paste to dry and then heat emboss with a heat tool until you see the glaze change in appearance and become glossy and molten. At this point, don't overheat the paste as it will bubble...
To complete the tag, I added some stamped detail, a little text in Black Soot Archival Ink from the Tiny Toadstools stamp set and then, I used the "splatter stamp" from the same set, inked with clear embossing ink and stamped this randomly onto the background, before sprinkling with gold embossing powder and heat embossing until molten and shiny.

After adding some stitched detail, I mounted my tag onto a Size 8 Etcetera Tag. At the top of the tag, I added a Stitched Scrap, which I looped around the top of the tag, attaching it to the front and back to secure it into place. I then attached a Mini Plaquette, 79 to the bottom of the canvas scrap.

Moving on ~ I took the Mini Etcetera Tag and covered this with a piece of the Worn Wallpaper, which I machine stitched around the outside. I adhered the paper into place using Matte Collage Medium. I also applied a layer of the medium over the top.

To create a vintage feel to the paper, I applied some Crackle Paste around the edges and once the paste was dry and the crackles had appeared, I coloured it with the Walnut Stain Distress Crayon, blending out the colour with a damp fingertip and allowing the crayon pigment to sink into the crackles. I also applied some of the same crayon directly onto the paper, to take some of the 'clean' colour away and create that aged feel.

I then flicked some Black Soot Distress Paint across the surface of the tag, allowed to dry before attaching my smaller tag over the top, slightly offsetting the tag to the left and using foam pads to create some height.
 Underneath the tag, I wanted to add some more layers and you can see these poking out on the right hand side ~ for this I used some torn book paper, tucking it underneath. I applied some Vintage Collage Medium over the top and used the Walnut Stain Distress Crayon to blend the paper edges into the worn wallpaper.


I also added a label from the Field Notes Ephemera set and layered a Field Label piece, this time from the Field Notes Snippets Ephemera. To complete this side section, I added a Mini Clip, altered with a little Gold Mixative and Mushroom Alcohol Ink.

After choosing my photo from the set, I added some colour tinting using Distress Marker Pens and placed foam pads on the back. I then arranged the photo, together with a Milk Cap piece, and a toadstool taken from the Field Notes Ephemera set and placed these onto my tag.

To ground my image and not have it floating in thin air, I added a Theories Quote Chip. To give this more of a worn feel and a tint of colour, I applied an Embossing Dabber over the surface, sprinkled Embossing Glaze over the top and after tapping away the excess, I heat embossed the glaze. I then attached the chip underneath the feet of my little girl and her furry friend, attaching some moss and a little torn piece of Mummy Cloth for texture. On the right hand side, I attached a Hardware Head.
To tell the story, I added a Clippings Sticker to the photo ~ the wording, 'my friend".

Around the image, I added some die cut hearts that I had left over on my desk from a previous project ~ these are just cut from red card, using the Falling Hearts Die and then attached to the tag using Matte Collage Medium.

 You might have noticed that I've added a couple of little stitched details in the top and these are actually die cuts! I used the Media Marks die set to cut some stitches from black card and just popped them into place on my tag, using Matte Collage Medium ~ but don't they look cool?!? I love these as small accents to a project.


For the scruffy bow, I cut a strip of Crinkle Ribbon from my stash and spritzed the ribbon with Antique Linen and Frayed Burlap Distress Spray Stain. After scrunching the ribbon up into a ball, I left it to dry, or you can heat dry this, before tying into a bow and attaching to my project. I then placed a Floral Adornment to hide the knot ~ to colour the metal piece, I used the Gold Mixative and Mushroom Alcohol Inks that I used on the Mini clip.
In the centre of the flower, I added some Platinum Stickles Glitter Glue and allowed it to dry.

So, that's it from me for today and I hope you've enjoyed the techniques and how I've used some of Tim's inspiration within my project.
As you may know the lovely Heidi, and all the people working behind the scenes at the Simon Says Stamp Store are running on limited operations ~ they are still accepting orders but due to the current Coronavirus (Covid-19) situation, shipping times are going to be slightly longer than usual!
But due to the outbreak we have made the very difficult decision to suspend the $50 vouchers for now but we know that many people are staying safe at home and we would love it if you would continue to enter the challenges and have fun! We are all in this together!


Thank you so much for taking the time to stop by today and see you again soon.
Stay safe everyone and take care of yourselves and your loved ones...
....love, care, believe ~ Emma
xxx
Recipe for project:
Tim Holtz/Stampers Anonymous: Mini Layering Stencil Set 25, Mini Etcetera Tag, Size 8 Etcetera Tag
Distress Spray Stain and Oxide Spray: Antique Linen, Frayed Burlap, Weathered Wood Distress Spray Stain and Oxide Spray, Chipped Sapphire Oxide Spray, Crushed Olive Distress Spray Stain, Rusty Hinge Distress Spray Stain
Distress Paint: Black Soot
Distress Ink: Vintage Photo, Walnut Stain
Distress Crayons: Walnut Stain
Alcohol Ink: Gold Mixative, Mushroom
Embossing Glaze: Weathered Wood, Peeled Paint, Fossilized Amber
Distress Marker Set
Distress Spray Stain and Oxide Spray: Antique Linen, Frayed Burlap, Weathered Wood Distress Spray Stain and Oxide Spray, Chipped Sapphire Oxide Spray, Crushed Olive Distress Spray Stain, Rusty Hinge Distress Spray Stain
Distress Paint: Black Soot
Distress Ink: Vintage Photo, Walnut Stain
Distress Crayons: Walnut Stain
Alcohol Ink: Gold Mixative, Mushroom
Embossing Glaze: Weathered Wood, Peeled Paint, Fossilized Amber
Distress Marker Set
Tim Holtz Idea-ology: Clippings Stickers, Mummy Cloth, Hardware Heads, Paper Dolls, Field Notes Snippets, Field Notes Ephemera, Mini Plaquettes, Theories Quote Chips, tiny clips, Stitched Scraps, Milk Cap