Hello everyone...
Hope you've all had a wonderful weekend and as always on a Monday, we have a brand new Simon Says Stamp Monday Challenge and this week, we want you to HAVE FUN WITH STENCILS. As always on the first week of the month, the DT are showcasing STAMPERIA in their makes.
For my makes, I was actually inspired by the Stamperia Stencil, that I chose to use. The stencil is called Coffee and Chocolate Daily News and I thought with Valentine's Day just around the corner, I would use the stencil as my background and combine it with Tim Holtz, Sizzix and Ranger Ink products to create a trio of gift holders ~ a pillow box, a small bag for a gift card and an envelope, all made using the new Distress Colour, Scorched Timber.

So let's begin and here's how I made this week's projects!

For these makes, I used the Vault Pillow Box and Bag and Collector Thinlits Dies to die cut and create the bases from Mixed Media Heavystock card for the pillow box and bag, and Black Heavystock Card for the envelope. For the pillow box and the bag you need to cut two of each of the shapes to make one of each piece.
I'll also take you through how I made the cups and the backgrounds before sharing the details of each individual make later in this post.

BACKGROUND
For the background, I used a piece of Mixed Media Heavystock card cut to the same size as the stencil. I applied Grit Paste through the stencil and after carefully removing the stencil, I allowed the paste to dry before applying the sprays.
Once the paste was touch dry and had set, I misted water over the surface and then spritzed with the following Distress Spray Stains:
Scorched Timber, Crackling Campfire and Antique Linen
I always apply one colour at a time, heat dry and then move onto the next colour, adding a mist of water in between to blend the sprays.
Once I was happy with the blend, I heat dried the piece thoroughly and set this to one side whilst I moved onto the next stage....the cups and saucers.
In the photos below, you can see how I cut the large, stencilled background panel into smaller background panels that I’ll use on the pillow box, and also on the envelope and bag.


PAPERCUT CAFE CUPS AND SAUCERS

Now for the cups and saucers, and I used two colour palettes ~ teal and red. I cut two panels of Mixed Media Heavystock and spritzed each one with the following colours of Distress Spray Stain, making sure that there are various shades of the colour, (dark and light), so that I can build up the layers once I die cut the pieces:
TEAL/AQUA ~ Peacock Feathers, Cracked Pistachio, Antique Linen
RED ~ LumberJack Plaid, Barn Door (this inky card is also used for the hearts)
For all three makes, I used the Tim Holtz Papercut Cafe Die Set from Sizzix and cut five cups and three saucers, all various shapes ~ four cups in teal, 3 saucers in teal and one cup in red.
TOP TIP: Place adhesive sheets on the back of the card to help you build your layers easier.
After I assembled each of the cups, layering the due cut pieces over one another, I went on to cut my plumes of steam. This again uses the Papercut Cafe die set and I cut each piece from white Distress Watercolour Card. I then pounced the Embossing Dabber over the top of each of the assembled steam plumes before sprinkling cream embossing powder over the top. Tap away the excess powder and then heat emboss until molten.

I then ran Pumice Stone Distress Crayon around the edge, blending out the colour with my fingertip.
HEARTS

Moving on to the hearts and I used the Tim Holtz/Sizzix LoveBirds die set to cut all the hearts from the inky red card that I used for the red cup. I used the smallest and middle sized hearts for these makes and once cut, inked the edges with Walnut Stain Distress Ink.
I now have all the pieces ready to make my three projects.
PILLOW BOX
Taking the pillow box die cut from earlier, I spritzed both pieces with a combination of the Scorched Timber, Crackling Campfire and Antique Linen Distress Spray Stains and blended the colours with a light misting of water.

After heat drying each of the die cuts, I folded along the score lines and then joined the pieces together by applying strong adhesive tape onto each of the tabs that run down the sides of the die cuts. Fold along the curved scoreline to form your domed box.

To add the embellishments and cover the box front, I would collapse the top and bottom flaps, and take them down to use the box flat ~ this will be so much easier.

Taking the large background panel that I created earlier, I cut a section of this panel that will fit the front of my box. I used the section that has the coffee stain, which I placed on the left hand side.

I wanted to accentuate the stain from the rest of the embossing so for this, I used Statue Foundry Wax that I painted over the area I was concentrating on and then heat set the wax until it become molten.

After machine stitching around the edges, I attached the small panel to the front of my box.
Using two of Papercut Cafe cups, I placed one inside the other and attached these to the saucer, before I then adhered my cups to the front of my box, using foam pads to build up the one side. This will enable the cups to lie flat ~ I didn't want to follow the curves of the box.

I placed the steam plume inside the cups, and added two hearts ~ one small and one medium size.
I then attached three more hearts to the box, placing them in the top right hand corner.

For the sentiment, 'in my heart", I used the Tiny Text Stampers Anonymous stamp set. I stamped the sentiment onto Mixed Heavystock card, using a combination of Black Soot Archival Ink and Barn Door Archival Ink and then cut the wording down to size.

After inking the edges of the sentiment, I attached them to my box.
Finally I added some Mummy Cloth beneath the saucer. This was dyed with Frayed Burlap Distress Spray Stain and then I shredded the cloth before sticking it to complete my make.

ENVELOPE
The envelope is cut from black cardstock and as with the pillow box, I took the embossed panel that I made earlier and cut a piece to fit the front of the envelope.

For this envelope, I chose the section that shows the word "news" running along the top.

After cutting my panel, I machine stitched and inked around the edges before attaching the panel to my envelope front.
As a fastener for the envelope, I used an eyelet and punched a hole in the flap using a Crop-A- Dile tool and then placed and fastened the eyelet into position before threading twine through the hole and attaching a heart adornment to the end of the twine.

In the centre of the heart adornment, you will notice that it's red and for this, all I did was use Lumberjack Plaid Distress Paint and painted it directly onto the red heart to accentuate it.

With my envelope ready, I can now decorate it and used two cups ~ one red, one teal, a saucer and a steam plume. I assembled my cups, placing them inside one another and attached with foam pads to the front of my envelope.
On this cup, I added a small drip....
For this I used an older Tim Holtz/Sizzix die from my stash ~ Candlelight Colorize and using the drip die that is in the set, I cut the tiny drip from brown card.
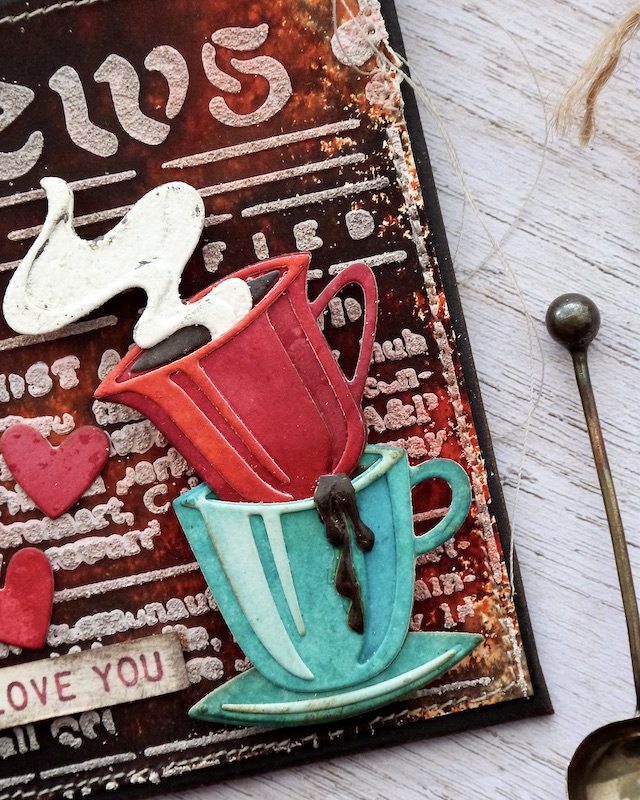
After shaping the die cut and cutting it down to fit my cup, I attached it and then added some glossy accents over the top and allowed for the medium to dry.
Finally, I added some of the smaller red hearts around the cups and to complete this envelope, I used the Tiny Text stamp set, and stamped "Love You" using the same colours as before, inked the edges of the sentiment strip and placed this in the bottom left hand corner.

BAG
To add colour to the bag, it really follows the same techniques as the pillow box and I used the same colours of Distress Spray Stain. I then assembled the bag, by sticking the two tabs together and once again, I cut a piece from the larger embossed panel, inked the edges and attached it to the front of my bag.

I added the cup, saucer and the steam plume before tucking a heart into the cup and adding a couple more to the background.
I complete the make with some shredded Mummy Cloth underneath the saucer and then...

...flip the bag over and I placed a metallic sticker on the back, "I LOVE US".


So that's my projects all finished and I hope you love what I've made and it will give you some inspiration for your Valentine's makes...

As always, if you make anything, or if you've been inspired by anything that you've seen here on my blog ~ then please, let me know by tagging me on social media or leaving a comment here and I will be right over to take a look!
Don't forget that every week, one lucky random participant has the chance to win a $25 gift voucher from Simon Says Stamp and you can join in up to 5 times, which means you could have 5 chances to win. You have until next Monday at 8am Ohio time. 1pm UK time, 2 pm CET to join in and good luck....


Recipe for project: