Showing posts with label Carabelle Studio. Show all posts

Monday, 3 January 2022

Happy New Year...

Happy New Year friends!

Well, I can't quite believe how fast Christmas seemed to go!!! It's crazy to think that it's two weeks since we were all so excited and now, it's all over and it's time to take all the decorations down and pack them away! 2021 was definitely a year that many of us will never be able to forget, one where we saw so much change in how we go about our daily lives and for some of us, it was a very challenging year. I just hope that 2022 brings everyone much more happiness and joy!

So with a brand new year, comes a brand new year of Simon Says Stamp Monday Challenges and here we go with the first challenge of 2022! This week our theme is called, Something New and the DT are showcasing Carabelle Studio products within their projects, which is something that you don't have to do to join us and play along.

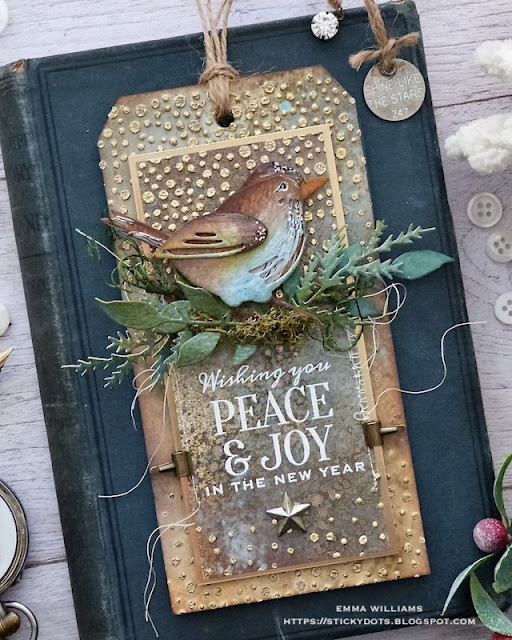
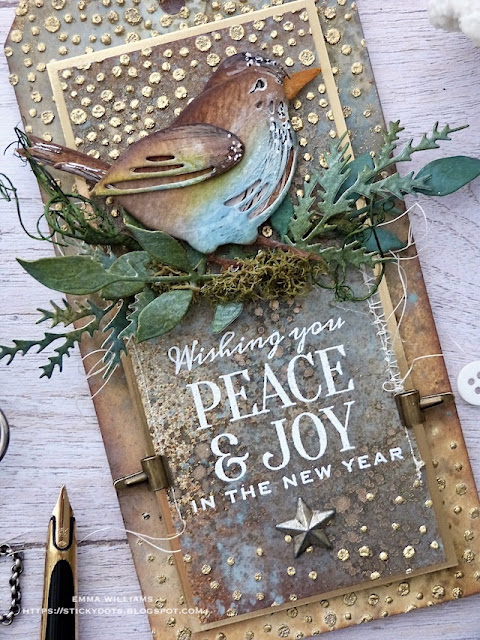
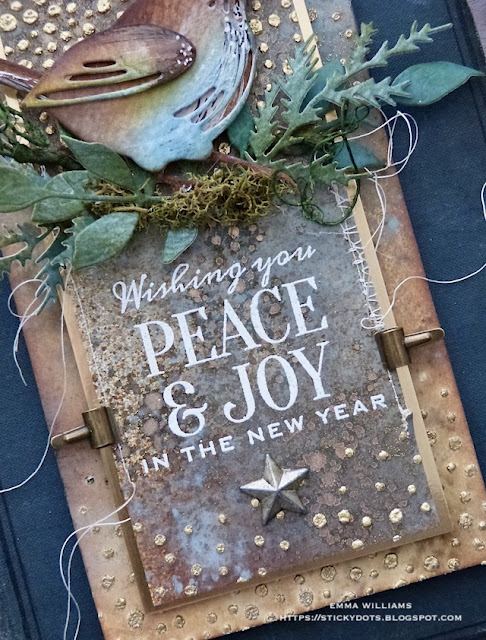
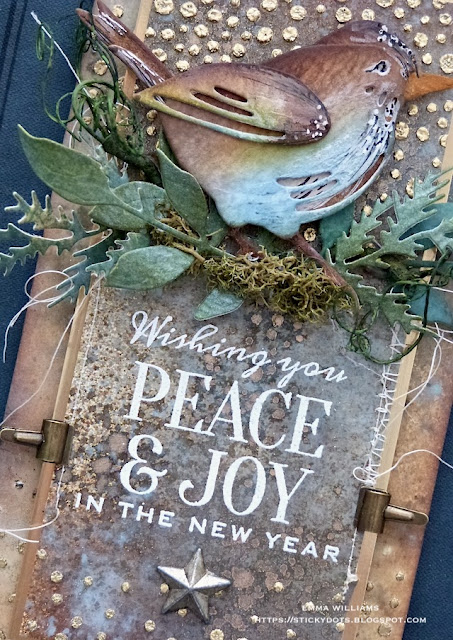
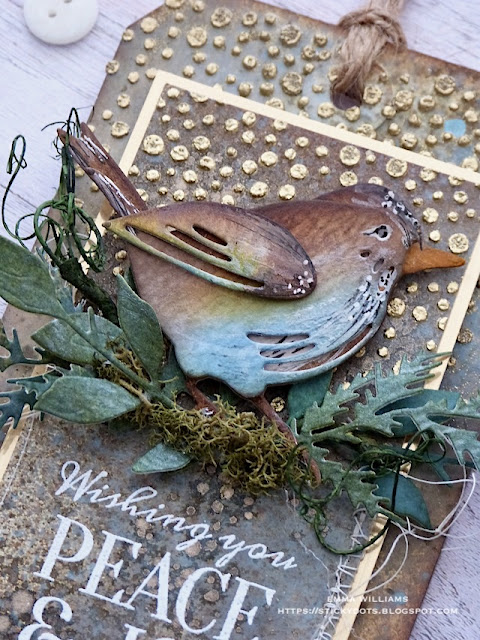
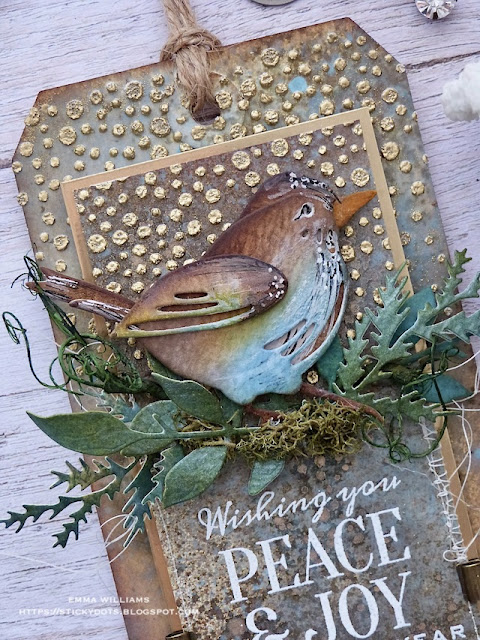
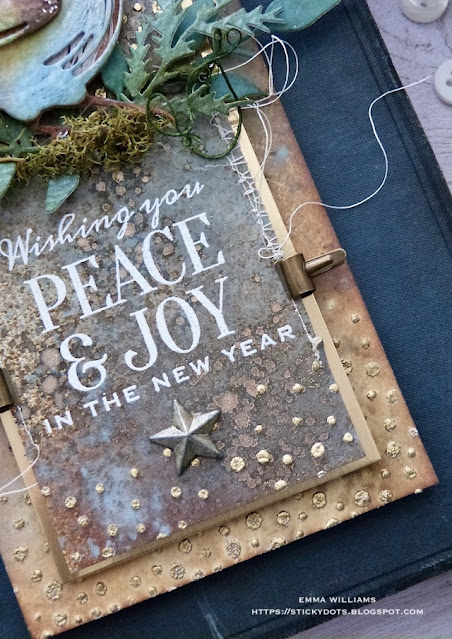
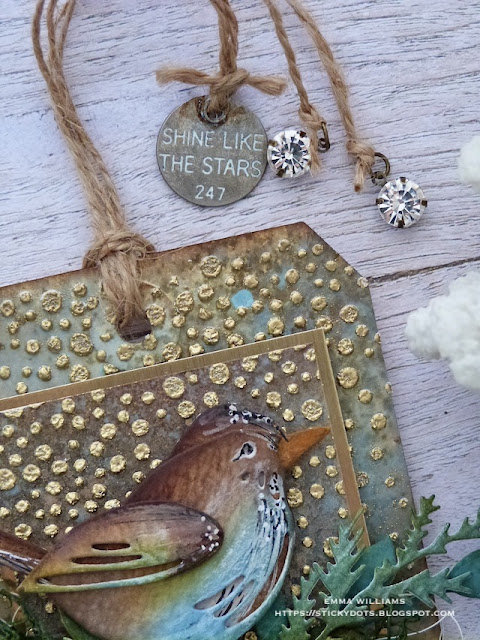
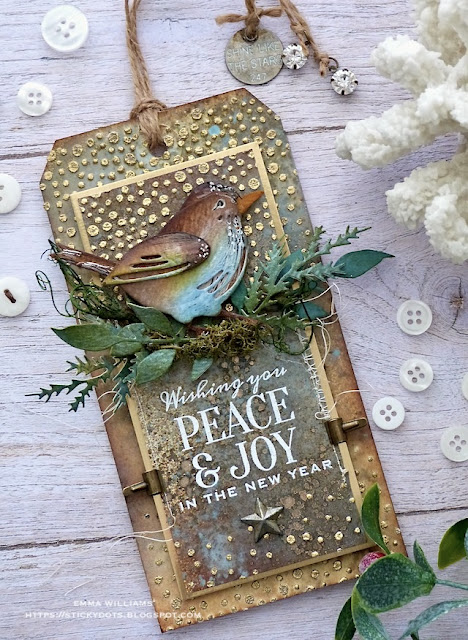
For my tag, I wanted to celebrate what I hope will be a very happy and safe new year and used a stencil from Carabelle Studios, together with Tim Holtz and Simon Says Stamp products to make a project to wish all my followers Peace & Joy in the year to come!

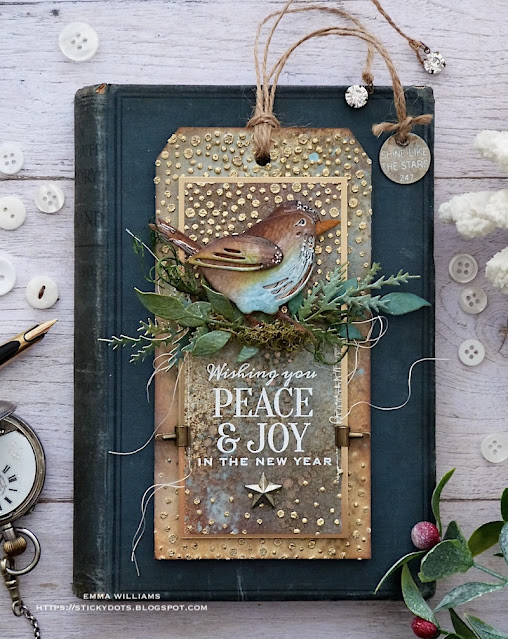
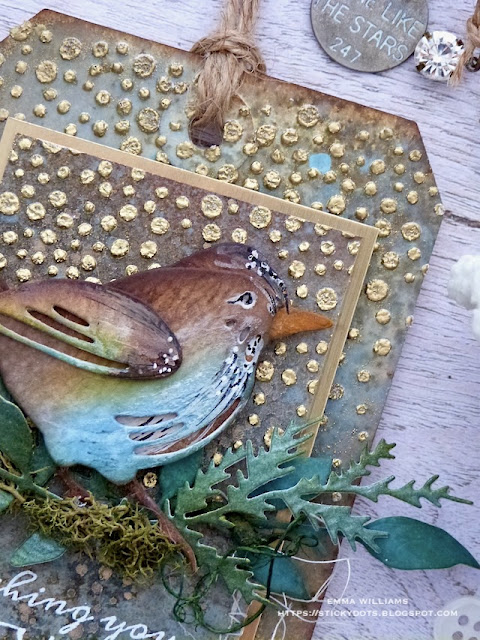
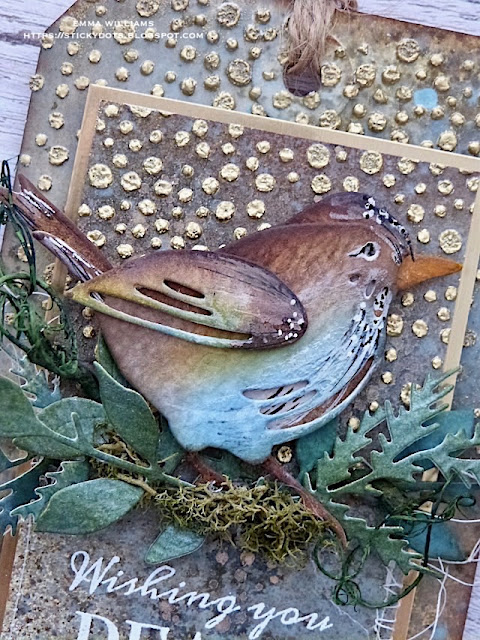
So let's get started and here's how I created my tag that features a little bluebird of hope...

To begin with I took a Size 8 tag that I used as a base, misted it with a light shower of water and then used the following Distress Spray Stains and Oxide Sprays to add colour:

Old Paper, Antique Linen, and Pumice Stone Distress Sprays

Speckled Egg Oxide Spray

I added more water to blend the inks before I heat dried them ready for the next stage.

After placing the Constellation Stencil onto my tag, I used the straight part of the stencil, not the circular section, I applied Grit Paste at the top and bottom of the tag, using a palette knife. Whilst the paste was still wet, I sprinkled gold embossing powder over the top and then set the tag to one side, allowing the paste to dry and the powder to set slightly.

Once the paste is finger dry, I then heated the embossing powder ~ you need to do this very carefully, as you don't want to overheat the paste as this will cause it to bubble and the powder to disperse.

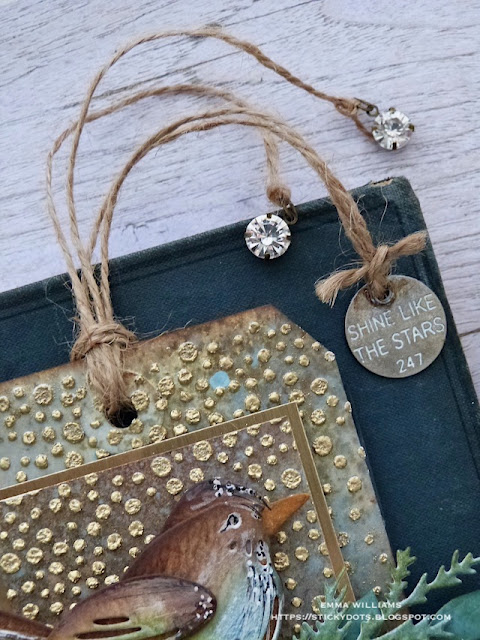
Once the gold embossing powder has become molten and shimmery, I inked the edges with Walnut Stain Distress Ink.

Moving onto the panel in the centre...

I inked a piece of Mixed Media Heavystock card using:

Speckled Egg Distress Spray Stain

Ground Espresso Distress Spray Stain

Antique Linen Distress Spray Stain

Frayed Burlap Distress Spray Stain

Tumbled Glass Oxide Spray

Speckled Egg Oxide Spray

A misting of water will blend the sprays and once the panel was thoroughly dry, I machine stitched down the sides of the panel and inked the edges with Walnut Stain Distress Ink.

Making sure the panel is complete dry, I stamped the sentiment with clear Versamark Ink, using the Festive Overlay Stamp Set and then sprinkled white embossing powder over the top before I heat embossed the powder until molten.

To complete the panel, I applied some more Grit Paste through the Constellation Stencil, again adding it to the top and bottom of the panel before sprinkling gold embossing powder over the top and repeating the same technique as I used on the tag.
I matted the panel onto a layer of gold card, before I mounted it onto the centre of my tag using foam pads.

On either side of the panel, I clipped two Tiny Clips.
For the adorable little birdie, I used the smaller bird from the Sizzix Feathered Friends Thinlits Dies by Tim Holtz. After cutting the pieces, I inked them to create my little blue bird of hope using Gathered Twigs and Rusty Hinge combined with Broken China and Stormy Sky. I inked the beak with Spiced Marmalade and then added highlights to the little birdie with a white pen.
Once I'd assembled the bird and attached the wing in place, I cut some foliage for him to sit on using the Festive Bouquet Die set. I cut my greenery from card that I had previous inked with various shades of green Distress Sprays. I always ink more card than I need and then have these spare pieces left over ready for another project and from memory, I think I used Peeled Paint, Rustic Wilderness and Evergreen Bough Spray Stains.
With my pieces, cut I arranged them underneath the birdies feet and added some moss to complete his little nest.
In the photo below, you can see how I shaped the foliage to create the dimension.

As the finishing touches, I added a Star Adornment underneath the sentiment, which I inked with Foundry Alloy Alcohol Ink and attached with Matte Collage Medium....
...and finally, I threaded some twine through the hole in the tag and attached some idea-ology embellishments from the ends of each piece. These included a Thought Token, "Shine Like The Stars", which I inked with a little Rust Alcohol Ink and then highlighted the wording with Picket Fence Distress Crayon, and two Antiqued Gems.
...and that completes my project for this week's Simon Says Stamp Monday Challenge!

As always, I hope you love my make this week, and enjoyed all the techniques I've used. If you make anything, or if you've been inspired by anything that you've seen here on my blog ~ then please, let me know by tagging me on social media or leaving a comment here and I will be right over to take a look!

Don't forget that every week, one lucky random participant has the chance to win a $25 gift voucher from Simon Says Stamp and you can join in up to 5 times, which means you could have 5 chances to winYou have until next Monday at 8am Ohio time. 1pm UK time, 2 pm CET to join in and good luck....


Thank you so much for taking the time to stop by today ~ stay safe, keep well and Happy 2022.
Love Emma xxx

Recipe for project:

Carabelle Studio: Constellation Stencil
Stampers Anonymous: Festive Overlay
Distress Ink: Walnut Stain, Gathered Twigs, Rusty Hinge, Broken China, Stormy Sky, Spiced Marmalade
Distress Spray Stain: Rustic Wilderness, Iced Spruce, Peeled Paint, Evergreen Bough, Speckled Egg, Antique Linen, Pumice Stone, Old Paper
Distress Oxide Spray: Speckled Egg Oxide Spray

Monday, 1 February 2021

Come Rain or Shine ~ Love With All Your Heart

Happy Monday friends and welcome to the brand new Simon Says Stamp Monday Challenge!

With Valentine's Day just around the corner, our theme for this week is all about LOVE and HEARTS and the DT are also showcasing Carabelle Studio products within their projects.

I decided to create a card this week because let's face it ~ I think most of us need those very important and extremely special handmade cards at this time of year and I wanted to celebrate the feeling of love in the air! So, I used a Carabelle Studio stencil to create a subtle backdrop for a cascade of hearts that are about to be captured in an umbrella...because come rain or shine, you should love with all your heart! I also couldn't resist using the umbrella, which is something Tim knows that I'm so excited to see, umbrellas are my thing, and I've been wanting an umbrella die for a while and now I have three to choose from ~ i'm in heaven!

Let's get started ~ it's time for the brand new challenge to begin!

I began by creating the background which started life as a panel of white Heavystock card, 12.5 x 16.5cm and a smaller panel, 12.5 x 4.5cm. To add colour to both pieces of the card, I used a combination of Weathered Wood, Speckled Egg, Pumice Stone, Frayed Burlap and Old Paper Distress Spray Stains, together with Speckled Egg Oxide Spray and a touch of Vintage Photo Oxide Spray, around the edges. I usually spritz the card with a light misting of water and then apply the sprays until I'm happy with the blend. For the Vintage Photo around the edges, I sprayed the oxide ink directly onto my glass mat, spritzed with water and just dipped the edges into the inks.

To add layered detail to the background, I added some stamped imagery using the calligraphy stamp and the Registered stamp from The Poinsettia stamp set ~ this is such a useful stamp to own and it's not just for Christmas, it's one of those that can be used all year round.

I also ripped some book pages and attached these around the edges using collage medium, before then applying some Crackle Paste, dragging the paste over random areas of the inked card and allowing it to dry and the crackles to appear.

Once the card was completely dry, I inked the edges with a little Walnut Stain Distress Ink and then machine stitched a border around each panel of card, leaving loose threads of cotton thread, then I moved onto the next step ~ adding the texture through the stencil. I used the Constellation Stencil from Carabelle Studio and applied Transluscent Grit Paste through the stencil with a palette knife, applying it to the right hand side and leaving some clear areas on the left.

After carefully removing the stencil, and whilst the paste is still wet I sprinkled Speckled Egg Distress Glaze over the top and tapped away the excess. Set the card panel to one side for the paste to dry before heat embossing the glaze with a heat tool, creating this beautiful glassy effect to the background.

So, I've got my background which I matted and layered onto champagne coloured metallic kraft stash, followed by Blackout Kraft Stash. I then mounted the layers onto a black card blank and finally mounted my smaller inked panel across the card.

I now have the basic card and we can move onto the umbrella...

For this I used another of my favourite dies from Tim's recent Chapter 1 release from Sizzix ~ The Gent. I will be sharing a project that showcases all the dies from this set very soon but for today, I'm just using the umbrella.

I started by die cutting three separate umbrellas from heavystock card and then layered them together to create one solid die cut the thickness of chipboard. I painted the umbrella using Distress Paints: Black Soot for the main body and handle and Brushed Pewter on the stick

Once I was happy, I then added some shading and detail to accentuate the umbrella and also a touch of gilding wax applied over the top to give a little more shimmer.

I attached the finished umbrella to my card front using foam pads to add some height and dimension to the card, which you can see in the photo below.

The hearts are all die cut using the Falling Hearts die and cut from cardstock that I painted a vintage red colour using an application of Candied Apple Distress Paint, followed by a very light layer of Black Soot, which I applied using the dry brushing technique over the top of the red paint.

After cutting the various sized hearts, I then glazed the larger hearts. For this I used the Embossing Dabber applied over the top of each heart and then sprinkled Fired Brick Embossing Glaze over the top. 

After heat embossing the glaze, I attached a cascade of hearts down the card, starting in the top left and finishing in the bottom right.

Finally, I added my quote and used a Theories Quote Chip ~ 'love with all your heart" and after sanding the edges and adding a couple of Hardware Heads, I adhered it to my card with matte collage medium.

For the finishing touches, I clipped a couple of Index Clips to either side of the panel, both painted with Distress Paints to create a rusty effect and added Hardware heads to complete them...

...and also added an Air Mail and Pointy Finger Ephemera Snippet to the top left corner.

So that see's this week's project completed and I hope you've enjoyed the walk through of how I created it! As always, if you've been inspired by anything that you see here on my blog, please just tag me on my social media or leave a message so I can pop by to take a look ~ I always love to see your work!

Don't forget that every week, one lucky random participant has the chance to win a $25 gift voucher from Simon Says Stamp and you can join in up to 5 times, which means you could have 5 chances to winYou have until Monday 8am Ohio time. 1pm UK time, 2 pm CET to join in and good luck....


Thank you so much for taking the time to stop by today ~ stay safe and keep well.
Love Emma xxx

Monday, 5 February 2018

Love Is In The Air...

Hi everyone...

Hope you all had a great weekend and ready for the week ahead and also, I hope you're all ready for a brand new Simon Says Stamp Monday Challenge because this week, the team are showcasing Carabelle Studio products and combining it with our theme ~ LOVE IS IN THE AIR! So, however you choose to interpret this challenge we can't wait to see what you create and hope you'll play along!

For my project, I created a panel that features the quote "Follow Your Heart" and it inspired me to design this project all about a little boy, who has a heart full of love and plenty of dreams for the future...
So, let's begin...it's time for the new challenge and here's how I created this piece!

To begin with I cut a panel of canvas card, 20 x 16cm and began to create my textured background. I started with some randomly torn strips of tissue tape, which I applied to the central area of the card and then brushed some Matte Collage Medium over the top. I then added some colour using Distress Crayons, scribbling the Victorian Velvet, Black Soot and Vintage Photo Crayons directly onto the taped area and blending them out with my fingertip and a semi dry wet wipe. 

To create more layers, I then inked up the stamp from the Entomology Stamp Set and stamped this onto random areas of the background.

Once I was happy with the colour, I then applied Grit Paste through the Constellations Stencil to create the texture. I allowed the paste to dry before adding some more colour using watercolour paint, that I applied directly over the top of the paste using the Metallic Accents Paint set and always concentrating in the central area of the background. I also added some flicks of paint to the background using the same colours from the palette, together with Black Soot Distress Paint.

Gently heat dry the painted area, do not overheat as this might bubble the paste.

Once dry, I inked the edges of the card and added some torn strips of Design Tape and a Clippings Sticker to the corners. I then matted the background onto black card, followed by kraft card.
I now have my background to layer the details onto and to start I created a tag, using the tag die from the Side Kick Starter Set and inking the tag with Vintage Photo, Frayed Burlap, Antique Linen Distress Oxide Ink Pads. I stamped the Love definition quote from the Love Struck Stamp set onto the tag, added some twine through the hole reinforcer and then matted it onto kraft card and then mounted it onto the central area of my background, using foam pads for dimension.

I then used the Industrial die to die cut some gears from chipboard which I covered with Metal Foil Tape. Once I had enough gears, I used Rust, Gold Mixative and Pitch Black Alcohol Inks to alter the surface to create a rusty appearance. 
I then layered my gears across the page and at this stage, I also added some metal embellishments, Sprocket Gears and Rustic Gears which I thought complimented the die cuts perfectly.
To complete this section, I also added some nails from my tool box that I altered in colour using some more of the alcohol inks and some Tim Holtz Hex Fasteners, together with some knobs and some mini hardware pieces from Prima.
For the heart that I've used, I covered some more chipboard with metal foil tape and then used the Heartfelt die to die cut the heart. I then ran the die cut through my machine in the Rivets Embossing Folder before adding colour using Red Pepper and Mushroom Alcohol Inks. To create a more worn look to the metal work, I then sanded the raised areas and inked the edges with Black Soot Distress Crayon.

I mounted the heart onto my tag and then attached an Arrow Adornment, altered with alcohol inks, and placed this across the heart before attaching my little boy (this image is in the brand new set of Paper Dolls) which I colour tinted with Distress Marker Pens.

I finished my layout by adding a quote chip ~ Follow Your Heart, some star adornments and a couple of Nailhead findings which I added to the corners.
So, that completes this week's project and as always, I hope you'e enjoyed the creative process and loved the piece I've designed!
You can find more inspiration from my talented teamies over on the challenge blog and don't forget that every week, one lucky random participant has the chance to win a $50 gift voucher from Simon Says StampYou have until Monday 8am Ohio time. 1pm UK time, 2 pm CET to join in and good luck....


Thank you so much for stopping by today and I'll see you very soon!

Love Emma xxx


Recipe for project:

Carabelle Studios: Constellation Stencil
Tim Holtz/Sizzix: Heartfelt, Industrial, Rivets and Diamond Plate Texture Fade
Tim Holtz Stamps: Love Struck, Entomology
Distress Paint: Black Soot
Distress Oxide Ink Pads: Vintage PhotoFrayed BurlapAntique Linen
Distress Crayons: Victorian VelvetVintage Photo and Black Soot
Heat Gun
Canvas card and sisal fibres from my own stash


Powered By Blogger

Total Pageviews