
Hello friends and Happy STAMPtember!
As another week has flown by, it's time for the brand new Simon Says Stamp Monday Challenge and this week, to celebrate this special month, our theme is called STAMP IT and the DT are showcasing Simon's very own products within their projects!

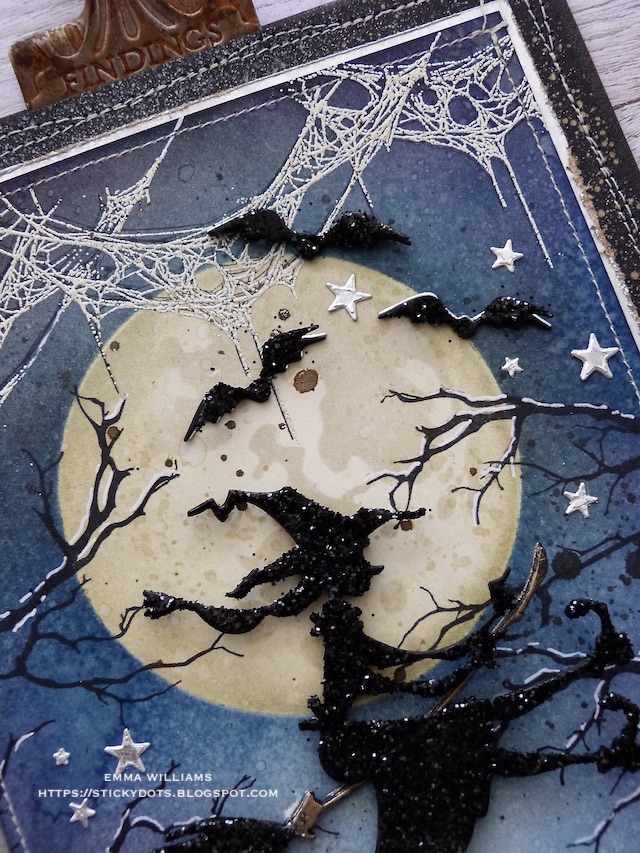
For my project and whilst I’m still in the mood for Halloween, I was inspired by a quote from the SSS STAMPtember Love That Student set, and used one of the sentiments to create a magical scene of the 'Witch Academy', a place that all good witches graduate from, set against a moonlit sky and surrounded by stamped tangled webs and shadowy twigs.


To begin with, I created the moonlit sky and I've received so many lovely messages and comments about the sky that I created on a recent card for the Tim Holtz Stampers Anonymous live launch of Halloween 2021 ~ I thought I would recreate a similar sky on this make to show you how that background was created. It's really simple once you know how and it's just a matter of building up colour, shading and intensity to make the perfect moon set in a dark blue sky.
I cut a panel of card, 12 x 16cm and using the second size of the Moon Masks from the set of 3, I placed the solid circle onto my card panel. You will notice that I didn't place it directly in the centre, I lifted it slightly towards the top edge of my panel.
Holding the moon mask in place, take a blending tool and using Prize Ribbon Distress Ink, ink up the tool and then start blending the ink from the edges of the mask to the edges of the card panel.
Keep going until the whole card panel is covered with ink and if you feel you want to create light and dark areas, just apply more ink where you want shadows to appear and less where you want highlights.
Once I was happy with the intensity of the blue, and with the mask still in place, I then inked up a blending tool with Dusty Concord DI and added this over the top of areas of the panel. I just wanted touches, not a solid coverage.
Repeat the inking with Black Soot Distress Ink and with the mask still in place, very lightly ~ VERY lightly blend the ink over the top but this time blend from the edges of the card towards the centre.
Remove the mask and then taking the second mask, same size but this time with the moon surface design, place that directly over the circle on your card panel and using Antique Linen, ink through the mask. You might not think much is happening but keep checking as it will be transferring the ink onto the card.

Once I was happy, I removed the mask and added just a touch more Antique Linen around the outside edge of the moon, just to add a few more shadows. I then spritzed a light mist of water over the entire panel, and dabbed away any excess with a kitchen towel. Heat dry the panel.
Now the panel is ready for adding some atmosphere and the next stage is branches.

For this I used the stamp from the Mr Bones set and from approximately 1/3rd of the way down from the top edge, I started stamping the branches around the edge of my panel in Black Soot Archival Ink.
I added white pen work to the branches to add some shimmery highlights.

Now for the webs across the top of the panel and for these I began by stamping the webs with Black Soot Archival Ink and stamped them straight across the top in three separate goes. This creates a dark shadow for the next stage of the white embossed webs.
For this, I inked up the webs once more but this time used clear embossing powder and stamped the web over the top of the previous black webs but slightly offsetting each image.
I then sprinkled Bone Mixed Media Embossing Powder over the top before heat embossing the powder until molten.

After adding a few tiny splatters of Crooked Broomsticks Mica Stain over the background, I added a machine stitched border around the edge and then matted it onto silver metallic kraft card, followed by a panel of black card, which I spritzed with Crooked Broomsticks and Empty Tomb Mica Sprays and then once again, I added a machine stitched border around the edge. You can see the little speckles of Mica goodness down the side and I thought these added just that touch of atmosphere to the whole project.

To complete the layers, I mounted the panel onto a final layer of black chipboard, slightly larger in size than the panel itself.
It's now time to create a scene and for this I used the Toil & Trouble Thinlits Die set and cut the flying witch, her broomstick and the bats three separate times from black card, before layering each piece to create one solid die cut of each image.

I then applied Glossy Accents over the top of each piece and sprinkled Nightfall Glitter over the top, tapping away the excess and leaving the die cuts to dry.
Once they were dry, I attached each die cut piece to my midnight sky using foam pads behind the witch and adding the bats, shaping their wings and attaching them so they're flying around her.
I finished the background with some small silver die cut stars, that I had leftover from a previous project.
Now for the sentiment, which is from the Love That Student SSS stamp set and I stamped and embossed this onto black card, in clear embossing ink and white embossing powder.

I then cut the card into a banner shape, matted it onto silver metallic kraft stock and machine stitched a zig zag border down the edge before attaching it with foam pads to my background.
We're nearly there and all that was left was to add the hanging section. This is a piece of black card that I lightly spritzed with Crooked Broomsticks Mica Stain and once it was dry, I then used the Label Thinlits die set to die cut the letters for Witch Academy. These are cut from silver metallic kraft stash and then attached to the black card.
I then attached the strip to a Pinked Etcetera Trim that I painted black, added some Hardware Heads to either side...

...and then attached it with hook and eyes from my sewing stash, and adhered these to the bottom edge of my panel using Collage Medium.


I then placed a Rusty Clip to the top so that I can hang it, come Halloween....

So, that's it from me for this week and I hope you've been inspired by my Halloween project...

...as always, if you make anything, or been inspired by anything that you've seen here on my blog ~ then please, let me know by tagging me on social media or leaving a comment here and I will be right over to take a look!
Don't forget that every week, one lucky random participant has the chance to win a $25 gift voucher from Simon Says Stamp and you can join in up to 5 times, which means you could have 5 chances to win. You have until Monday 8am Ohio time. 1pm UK time, 2 pm CET to join in and good luck....


Recipe for project:


Stunning card. Anesha
ReplyDeleteEmma, you have created such a beautiful background and moon! Love the clever addition of the sewing hook and eyes, too. Thanks as always for such a great tutorial.
ReplyDeleteWow, love LOVE this card. So amazing. Thank you so much for such detailed info on items used and also how you made it. I definitely added some items to my wishlist! Loved this. very awesome
ReplyDeleteSaw this project on PINTEREST and had to take a closer look...the spider webs really caught my attention! Thank you for this wonderful tutorial...easy to follow and understand. Off to make a mess on my table!
ReplyDelete