Showing posts with label treat bags. Show all posts

Monday, 12 June 2023

You Can Leave Your Hat On...

Hello friends and welcome to a new week over on the Simon Says Stamp Monday Challenge!

This week the DT are embracing all things MASCULINE with our challenge theme and for my project I used products from Tim Holtz and Sizzix to created a couple of gifting ideas for Father's Day which will be perfect for all those Dad's out there.

These treat boxes and bags are ideal for popping little gifts inside, and mine will be containing something very special for my Dad, as I'll be placing a ticket to see a show that he's wanted to see for a long, long time inside the box, adding some chocolate treats to the bag.

So let's get started, it's time to share all the details of how I made these...


To create either of these makes you need either the Treat Box Thinlits Die or the Curio Box Die and if you're lucky enough to have both, then your luck is in because you can make both. Of course, if you don't want to make these, then the ideas can be used for cards.

So let's get started and I began by cutting my Treat Bag and Box.

The bag is really easy to cut from Black Heavystock Card using the Treat Box Die and once assembled, I stuck the tab with red line tape and punched a hole on either side for the rope that I threaded through.

The box uses the Curio Box Die from Tim and Sizzix and I cut the base from Mat Board, which I then painted with Black Soot Paint before forming the box, attaching the side panels to each other with Collage Medium. The top of the box is cut from the Black Heavystock Card and once again, I attached the tabs with red line tape for added security.

TREAT BAG

Now to decorate the bag and I began by covering the front and back panels. For this I cut three pieces of patterned paper from the Backdrops Vol 2 pack. I machine stitched a border around the first panel of paper, matted it onto gold metallic kraft stash which I've sanded back around the edges using Tim's Sanding Disks and Blending Tool. I then inked the edges of the metallic card using Walnut Stain Distress Ink and mounted this panel onto the back of the bag.

For the front piece, take the remaining two panels of patterned paper and on the first panel, rip and tear around the edges of the paper and ink with Walnut Stain Distress Ink. Adhere this panel to the second panel, which is flipped over to show the reverse side of the double sided paper uppermost and then machine stitch around the edge. You can make the tears more defined at this point before attaching it to the gold metallic kraft panel and then mounting it onto the front of the bag.

DECORATING THE BAG

Both pieces are decorated using the Tailored Die Set by Tim Holtz, which has different dies to create different look and even though both my pieces feature hats, a boater on one and a top hat on the other, the treat bag features more of a summer outfit to compliment the box which has more of a elegant, sartorial feel. All the die cut pieces are cut from Mixed Media Heavystock Card coloured with the following inks and spray stains:

Boater: Peeled Paint, Frayed Burlap, Bundled Sage Spray Stains

Band on hat: Brushed Corduroy and Ground Espresso Distress Ink

Jacket: Old Paper, Antique Linen Distress Spray Stains

Shirt and Tie: Speckled Egg Distress Ink

Once I'd assembled the jacket, I added a tiny Bouquet Findings flower to the lapel and added white pen detail to the shirt. I also purposely wanted the collar to remain white, against the blue body of the shirt itself.

To create the texture on the boater die cut, I placed it in the Woven Texture Fade and ran this through the embossing machine. I then accentuated the embossing with a little Walnut Stain Distress Ink and then added the band to the hat.

Now to assemble my pieces and I took a Junk Drawer Baseboard piece, and applied a little Statue Foundry Wax around the raw edge of the board. I heat set the wax and then placed the piece in the centre of the bag with foam pads.
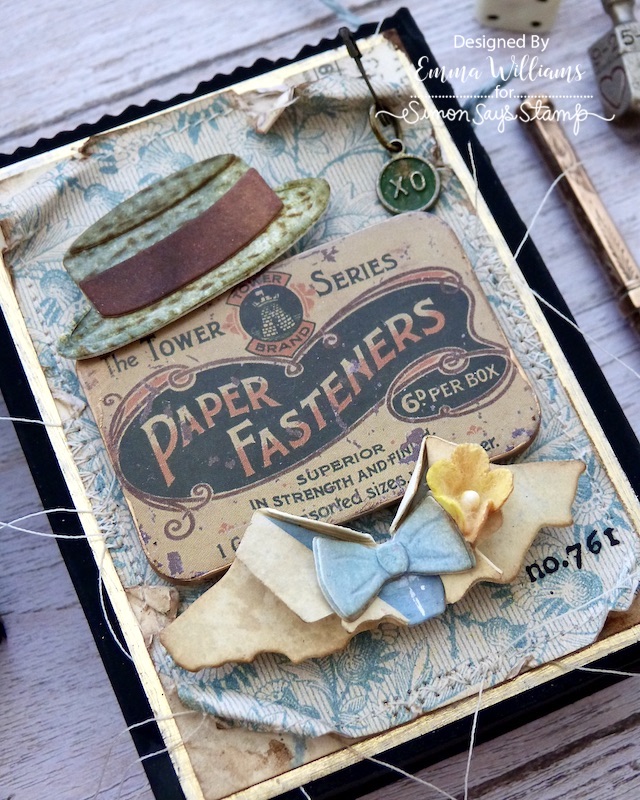
I then attached the boater and the jacket to my bag.

To complete this treat bag, I used a tiny Remnant Rub in the bottom right hand corner....

...and clipped a Mini Pin to the top right hand corner. I then hung a Word Tag that I painted with Rustic Wilderness Paint before accentuating the raised 'xo' message with a little gilding wax from my stash.

DECORATING THE BOX

Now for the box and to begin with I covered the sides using the same design of paper that I used on my treat bag, cut into panels and adhered with matte collage medium.

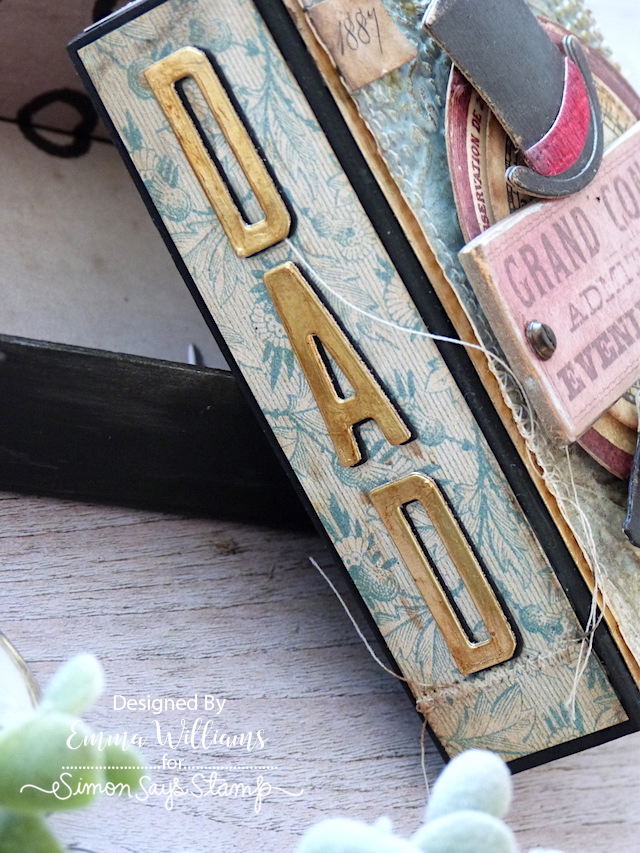
On the left hand side of the box, I added the word DAD. I cut each letter three times from gold metallic kraft card, and layered each piece to create the thickness of chipboard before attaching them vertically down the side of the box.

On the opposite side, I applied the number '1' remnant rub, which I then sanded for a more distressed look. 

On the front of the box, I chose to emboss a panel of heavystock card using the Damask Texture Fade Embossing Folder.

To begin with I applied Speckled Egg, Frayed Burlap, Antique Linen and Tumbled Glass Distress Spray Stains to my card panel. Once dry, I then ran it through the embossing machine in the folder.

To accentuate the embossed detail, I applied a touch of Gilded Foundry Wax over the top and then heat set the wax.

I added a machine stitched border around the outside edge before matting it onto gold metallic kraft stash card, and then mounting it onto the front of my box.

Inside the base of the box, I adhered panels of cut paper from Backdrops Vol 4, and then added the Sentiment Label Sticker, 'It's Your Day" and a pointy finger.

The next layer is some stamped imagery, and I used the circular gauge stamp from The Inspector Stamp Set. I stamped the image twice, once in Barn Door Archival Ink and once in Black Soot Archival Ink before cutting each piece to create two circles, the black one slightly smaller in size than the other.

I layered the circles using foam pads and then mounted them to the front of my box.

I cut the Top Hat, Suit and Tie from the following colours:

Hat and Jacket: Black Kraft Card sanded around the edges.

Shirt: White Cardstock

Hat Band and Bow Tie: Mixed Media heavy stock inked with Candied Apple Spray Stain and embossed with Woven Texture Fade

I assembled the suit and hat piece and then added a small metal stud in the centre of the tie.

After attaching the pieces to the front of the bag using foam pads and placing them top and bottom of another Junk Drawer Baseboard Piece and then added the Limited Edition Metallic Sticker beneath the arrangement.

FINISHING DETAILS

On either side of the Junk Drawer piece, I attached hardware Heads, altered with a little Crackling Campfire and Black Soot Distress Paint to create a more vintage, rusty feel to the metal.

Finally I added the 1887 snippet number ephemera piece in the top right hand corner.

That's my project finished for this week and I hope you love what I've made. All that's left for me to do is fill them them with treats and gifts, ready to give to my Dad.

As always, if you make anything, or if you've been inspired by anything that you've seen here on my blog ~ then please, let me know by tagging me on social media or leaving a comment here and I will be right over to take a look!

Don't forget that every week, one lucky random participant has the chance to win a $25 gift voucher from Simon Says Stamp and you can join in up to 5 times, which means you could have 5 chances to winYou have until next Monday at 8am Ohio time. 1pm UK time, 2 pm CET to join in and good luck....


Thank you so much for taking the time to stop by today ~ stay safe and keep well.
Love Emma xxx

Recipe for project:

Stampers Anonymous/Tim Holtz: The Inspector
Distress Spray Stain: Speckled Egg, Brushed Corduroy, Antique Linen, Peeled Paint, Bundled Sage, Old Paper
Distress PaintBlack Soot, Rustic Wilderness, Crackling Campfire
Distress Inks: Walnut Stain, Candied Apple, Black Soot

Monday, 11 April 2022

Sweets for my Sweet...

Hello friends and Happy Monday...

Hope you all had a wonderful weekend and you're now refreshed and ready for the week ahead and a brand new Simon Says Stamp Monday Challenge! This week our theme is all about SWEET TREATS and with Easter only a week away, this challenge couldn't have come at a better time! So with this theme in mind, we'd love for you to come and join us and play along!

For my make, I created some 'sweet' little Easter treat bags and used dies some of the new Chapter 1 dies from Tim Holtz and Sizzix and combined these with older dies that you might have in your stash already.

So let's get started and here's how I created these little bags ready for Easter....


TREAT BAGS

To make the bags themselves, I used the Sizzix Treat Bag die from Tim to cut a panel of Kraft cardstock. Once cut, I assembled the bags and adhered the join using red line adhesive tape.

After inking the edges of each bag with Walnut Stain Distress Ink, I moved onto the panels that I attached the front and back.

For these I used Distress Watercolor Card and inked the sheet with a combination of Old Paper, Saltwater Taffy, Speckled Egg and Frayed Burlap Distress Inks, and Antique Linen Oxide Inks. I applied the inks individually to my media mat and then spritzed each of them with water until it beaded. I then dipped my cardstock into the inks, drying each layer before adding the next.

Once I was happy, I then cut panels of the inked card that would fit inside the Quilted 3D Texture Fade and embossed each individual piece in my Big Shot Foldaway. At this stage, I also used the inked card to cut a Switchlits Seal Dies and Embossing Folder and I will be using this on the bunny bag.

After cutting the panels to fit the fronts and backs of each of my bags, I then machine stitched a border around the edges before inking the paper edge with Walnut Stain Distress Ink. I also lightly went over the top of the raised embossed areas, so it would highlight the stitching.

I fixed each panel to the treat bags, using Matte Collage Medium.

On each bag, I added some rope as a handle and after punching a small hole in each side, I threaded the rope through and secured it with a knot.


BUNNY GAMES BAG

I cut the sitting bunny using the Bunny Games die from watercolour card and then inked the various pieces using Antique Linen and Pumice Stone Distress Inks for the body and the pink areas are inked with Spun Sugar and Picked Raspberry. The facial details are cut from Black Kraftstock.

To bring bunny to life, I drew whiskers on his little face, and added tiny white pen details.

I also added a tiny bow tie to my bunny, and this is cut using the Sizzix Hip Haunts Thinlits Die Set. It's the one that is used on the cat but if you don't have this set, then you can cut a bow tie shape from a piece of card or you could use ribbon or twine and tie it into a small bow.

In this scene the bunny is holding a kite and this is taken from The Park. I cut my kite piece from card that I have in my stash ~ I never throw any card away as even the smallest of pieces can be used for these tiny dies.
After assembling the kite, I attached this in my bunny's paw and then used foam pads to attach both pieces to the Switchlits Seal that I cut earlier.

I mounted the seal onto the front of the bag using foam pads.

For the foliage around the bunny, I used the Modern Floristry die set but you can use any foliage dies you choose. I cut all my foliage from card inked with a combination of Peeled Paint and Bundled Sage Distress Inks and then inked the edges with Forest Moss Distress Ink.

I arranged the foliage around the base of the bunny and seal before I added a little Mummy Cloth that I dyed with Antique Linen and Frayed Burlap Distress Spray Stains.

I cut a few daisies, which are from the Bunny Games die set and attached them before I then die cut a small pink heart using the Stacked Hearts Thinlits Die Set and more of my inked cardstock in my 'save for later stash' and placed the heart in the bunny's paw.
To complete this bag, I added a Metallic Sticker ~ Sweet Life and attached this underneath the bunny and finally a piece of linen, that I attached to the top right hand corner of the bag using a Mini Pin.


PAPERCUT CHICKS BAG

Using the Papercut Chicks Thinlits Die Set, I cut my chicks from card that I coloured with Mustard Seed, Fossilised Amber and Wild Honey Distress Inks and then assembled the layers to form the two little chicks. Once again, I added a little accessory to this bag, the umbrella. This is once again from The Park die set and after cutting the umbrella from more leftovers in my card stash, I attached it to one of the chicks, tucking it underneath the wing so it appears that the chick is holding it.
Next to the chicks, I added a little egg ~ this is cut from a further piece of cardstock inked with Speckled Egg Distress Ink and the layers are then assembled.

Attach the chicks to the green base, which again is from the Papercut Chicks Die set and cut from the same green card that I inked for the foliage on the previous bag.
Using foam pads, I attached my chicks to stand on the green base, and then attached the egg next to them, together with a couple of sprigs of foliage and some Mummy Cloth. 

I completed the scene with some more of those little daisies.

I added a Special Delivery Remnant Rub, 'special delivery' to the top left hand corner and also cut another of those little pink hearts using the Stacked Hearts die set and placed this to the left of the chicks.
On the back of this bag, I added another heart and the "Love You" Metallic Sticker.
Finally, I cut a tag complete with a daisy and attached this to the rope handle before filling the bags with some chocolate/candy ~ there might also be a few leftovers for the maker as a treat!

So, that completes this week's make for the challenge and I hope you've loved what I've created and been inspired to make some of your own.

As always, if you make anything, or if you've been inspired by anything that you've seen here on my blog ~ then please, let me know by tagging me on social media or leaving a comment here and I will be right over to take a look!

Don't forget that every week, one lucky random participant has the chance to win a $25 gift voucher from Simon Says Stamp and you can join in up to 5 times, which means you could have 5 chances to winYou have until next Monday at 8am Ohio time. 1pm UK time, 2 pm CET to join in and good luck....


Thank you so much for taking the time to stop by today ~ stay safe and keep well.
Love Emma xxx

Recipe for project:

Distress InkAntique Linen, Frayed Burlap, Ground Espresso, Walnut Stain, Antique Linen, Spun Sugar, Speckled Egg, Peeled Paint, Bundled Sage, Forest Moss, Saltwater Taffy, 
Tim Holtz Idea-ology: Mini Pin, Mummy Cloth, Metallic Sticker Book, Special Delivery Remnant Rubs
Rope from my own stash
Powered By Blogger

Total Pageviews