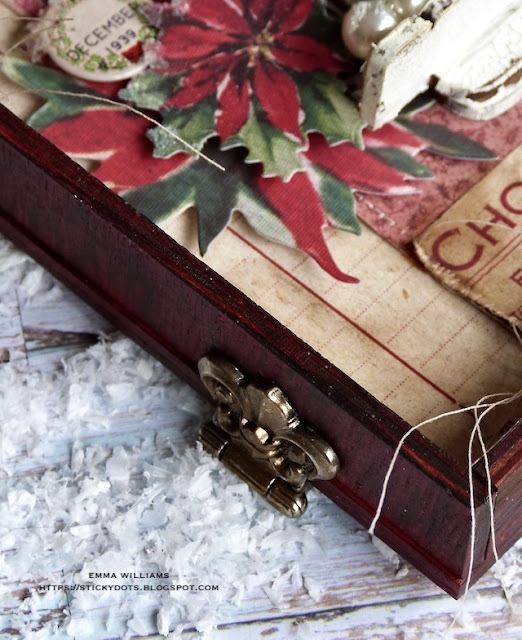
Showing posts with label home decor. Show all posts

Sunday, 22 December 2024

Christmas Greetings Vignette for Simon Says Stamp

 Happy Sunday everyone!

Today, I'm so happy to be back on the Simon Says Stamp Store blog to share a very special Christmas project with you all and if you love the sneak peek below and would like to see more of this piece, then you can head over to their blog, CLICK HERE to check out the step by step process of how I created my make!

Thanks so much for stopping by today and see you soon with some more creative inspirations!
Have a great Sunday!
xx


Monday, 24 October 2022

A Taste of Poison...

Hello everyone...

Hope you've all had a wonderful weekend and as we head into another week, it's time for a brand new Simon Says Stamp Monday Challenge and this week our theme is HOME DECOR.

As we head into the final week of October and the witching hour is nearly upon us, I chose to squeeze in one more Halloween project. This was actually something I started way back in August, but it got put on the back burner because I was carried away making other projects and I found it sitting on the shelf in a cupboard, just waiting for me to complete it. So, with this in mind, it made it's way out onto my desk and I thought now was as good as time as any to finish what I started, ready for the most spooktacular night of the year.

So let's get started and welcome to the creepy laboratory, a place of wicked things and spooky findings...if you dare enter, then just follow the glowing green light to explore and see what's been happening here!


To begin with, I made my structure ~ this consists of the middle sized square vignette box, and the two smallest sizes of rectangular vignette boxes.

BUILDING THE STRUCTURE

I attached my boxes with Matte Collage Medium, placing the larger of the two rectangular boxes that I chose to use, on top of the square one and then, the smaller box was adhered to the right hand side. Once the adhesive is dry and the boxes are stuck, I added Halloween Design Tape Trim around the front edges and then applied some Translucent Grit Paste to give a gnarly, crusty finish to the wood.

After letting the paste dry thoroughly, I painted the sides and the back of completed structure, with Black Soot Distress Pain and once the paint is dry, I applied some Sterling Foundry wax to accentuate the crusty areas. Heat set the wax with a heat gun.
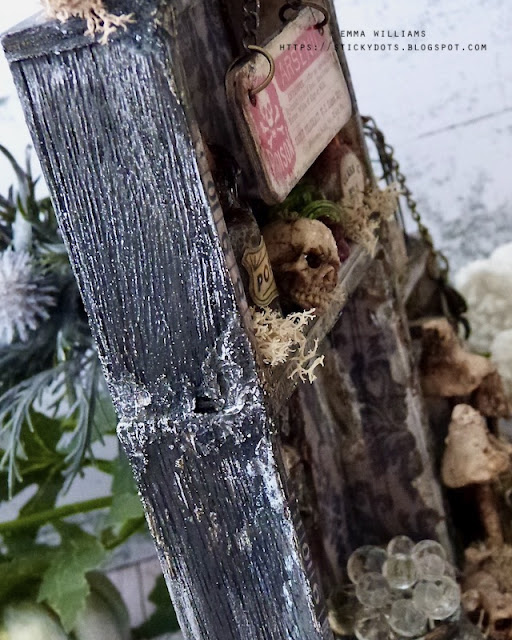
On the inside of the box, I covered each surface, and also the tops of the boxes on the outside, with Halloween Worn Wallpaper, adhering the panels with Matte Collage Medium. I then applied some crackle paste, adding it to the corners of the boxes to make it look old. Once the paste is dry and the crackles appear, I used Hickory Smoke and Walnut Stain Distress Crayons to accentuate and colour the areas.

With the structure ready, I made a base and for this, I adhered two smaller vignette panels together to form one long panel. I applied a coat of Black Soot Distress Paint to the base and then covered the top section with a panel of Halloween Backdrops before I attached the vignette boxes to it.

To complete the box, I used a Web Trim, painted black and attached this along the top of the tall part of the structure, adhering a halloween Mini Flair in the centre.

My structure is now ready for all those Halloween goodies...

CAULDRON SECTION

...and we'll start by adding the cauldron with it's glowing green bubbles.

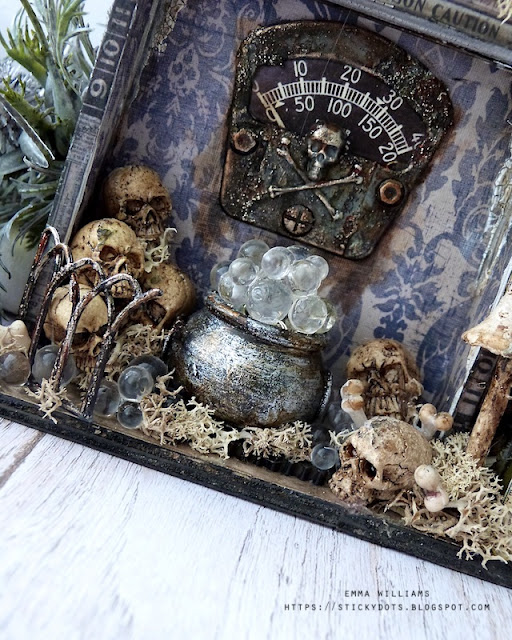
I began by boring a small hole from the back of the box, through to the front and then threaded the green string of Halloween Tiny Lights through. Taking one of the cauldrons, I placed a wood chip in the bottom and attached it to the centre of my square box. I then ran the light string up the back of the cauldron and into the base, attaching it with a dab of hot glue. If you find you have too many lights, just cut away the excess ~ they will still work as long as the remainder of the wire is attached to the battery box. I then filled the lit pot with the bubbles, placing them one by one and attaching them with Glossy Accents, making sure that I didn't cover or block out any of the lights.

Once all the bubbles are fixed into place, walk away and let the adhesive set.

GAUGE FRAME

Whilst the bubbles are setting, I moved onto the Gauge Frame that sits on the back wall and started by attaching a skull adornment to the gauge, before applying some Translucent Grit Paste to the metal surface. Leave the paste to dry before painting the metal with a combination of Black Soot Distress Paint, followed by a layer of Crackling Campfire, Ground Espresso and Antiqued Bronze and once again, leave to dry. Once the paint is dry, I then added a smear of Statue and Sterling Foundry Wax over the top, and again gently heat set the wax.

Behind the aperture of the Gauge Frame, I added a Gauge Dial and then attached the completed piece to the back wall of the box.

SKULLS and FENCE
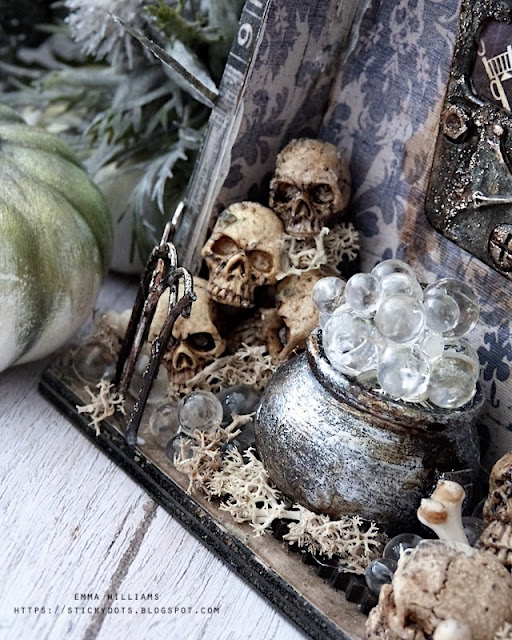
I used a selection of idea-ology skulls, some of the new ones and some of the older ones as I wanted all different sizes. I arranged all my skulls on either side of the cauldron, attaching them with a scattering of bubbles and boneyard findings that can be found in amongst them.

To complete this section, I attached a metal fence to the left hand side, again using the same technique as I used on the gauge, to add crusty goodness to the metal. I attached the frame with Matte Collage Medium and placed clumps of moss in and around the skulls and fence.
BOOK SHELF

For the book shelf, I added a small off-cut of an Etcetera Trim and stuck this in the middle of the box.

I then made two of the tiny books. The covers for the books are in the Halloween Ephemera pack and I used old book pages to create, the old book pages that I made for the insides of these miniatures. As some of my regular followers will know, I've made these books many times before and if you want to see how I create them, click HERE.

After adding Curiosities Stickers to the spines and aging them with Walnut Stain Distress Crayon, I attached them to my shelf.

Underneath the shelf, I made tiny scrolls, again I've featured these in previous projects, one of them can be seen HERE. I attached these scrolls to my project with hot glue to secure them.

Next to the scrolls is a bottle of toadstools. I used a Corked Vial, complete with a Curator Ephemera Label attached to it. I then attached two toadstools inside the vial, and adhered the vial onto the base....

...attaching a third toadstool next to the bottled toadstools.

On top of the bookshelf, are a couple more bottles. These are crackled with Rock Candy Crackle Paint and then I dripped alcohol inks onto the crackles to add colour before adding Curator Ephemera Labels and twine around the necks of each. I attached the bottles to the shelf and then placed the birdcage, filled with boneyard findings next to it.

I added a piece of chain to the birdcage, and hung the spider adornment, complete with painted red body to the end of the chain.

To finish this section, I added more moss.

TOP SECTION

The top section of the box, houses some more moss, bottles and skulls. The tiny bottle lying down is spilling out some poisonous potion, which is made by applying hot glue, allowing the glue to set and dry before painting it with Distress paints.

To finish this section, I hung the arsenic sign. This is a Halloween Baseboard piece and I just made it look more vintage by adding crackle paint around the edges and tinting it with Walnut Stain Distress Crayon. I then punched two holes in either side of the sign, and added some chain. I hung the sign from a Nail Tack that I hammered into the front of the box.

We're nearly there and all that's left is the key that sits on the side. Again, I altered the metal in exactly the same way as I altered the other metal pieces and then I just attached the key to the side of the box....

...and that is the finishing touch to my halloween make, which I hope you love and will be inspired by because it's such a fun piece to make and will be perfect to use as a home decor piece for Halloween.

As always, if you make anything, or if you've been inspired by anything that you've seen here on my blog ~ then please, let me know by tagging me on social media or leaving a comment here and I will be right over to take a look and if sometimes I miss it ~ just keep nudging me!

Don't forget that every week, one lucky random participant has the chance to win a $25 gift voucher from Simon Says Stamp and you can join in up to 5 times, which means you could have 5 chances to winYou have until next Monday at 8am Ohio time. 1pm UK time, 2 pm CET to join in and good luck....


Thank you so much for taking the time to stop by today ~ stay safe and keep well.
Love Emma xxx

Recipe for project:

Stampers Anonymous: Bat Web Trims
Distress Ink: Walnut Stain, Hickory Smoke
Distress Paint: Black Soot, Candied Apple, Crackling Campfire, 
Alcohol Inks: Mushroom, Rust, Pitch Black, Envy Pearl Alcohol Ink
Various sized idea-ology skulls from my stash

Wednesday, 22 December 2021

A Merry Christmas and A Happy New Year...

Hello friends...

Today, I'm sharing my final Christmas idea-ology make that I created for Tim Holtz's YouTube Live Launch! If you didn't see the LIVE or like me, you just want to watch the replay again, and again...then you can catch up with it HERE!

This project was created using the quite a few of the new Christmas products from Tim and included the fabulous new Vignette Plaque, which measures 8" square and is the perfect base for so many different projects ~ I know I'll definitely be stocking up on these!
So let's begin and I'm just going to take you through a few of the techniques I've used starting with the plaque, which I flipped over so that I could use it as a shadow box but you can use it the other way too, which Tim had done and wow, that project is amazing ~ so definitely take a look!
So with the box flipped over, I painted the back and sides of the plaque with a combination of Candied Apple, Aged Mahogany and Black Soot Distress Paint. I started with Candied Apple and then dried the painted surface before adding a dry brushing of Black Soot and the Aged Mahogany over the top. This helps to knock back the brightness of the red and gave me the vintage look I wanted.

On either side of the box, I added Hinges ~ these aren't functional but just decoration to create the look of a hinge.
I lined the box with papers from the Christmas Backdrops set and cut these into panels, stitched a border around the edge of each and after adding a few rips and tears, I attached them to the plaque with Matte Collage Medium. I always add a coat of the medium over the top of the papers to seal them and I also ran Walnut Stain Distress Crayon around the edges, so that it creates an aged look to the papers. 

What I love about these papers is the fact they all work so well together and you don't need to use a full sheet, just use panels and splice them together as I've done here. Even the Chocolate Phalier Douell panel is cut down from the papers and then collaged.


The focal point is the framed sections and I layered a Baseboard Frame over the top of a Vignette Frame that I painted with Speckled Egg Distress Paint and this creates depth to the piece.
In the centre of the aperture of the baseboard frame, I used foam pads to attach a Christmas Layers piece, with the message, A Merry Christmas and A Happy New Year and used Frosted Crystal Embossing Powder over the top of this to create some texture.

I added a star to the top of the frame, which I covered with Holiday Sparkle glitter and for even more sparkle, I applied some Glossy Accents and sprinkled Mica Flakes over the top.

Underneath I added some Vignette Trims to form a ledge ~ I used the Scalloped and Bracket Trims and applied Crackle Paste to the surface.
I then attached the gorgeous little girl and her furry companion to the centre of the ledge, which I colour tinted with Distress Crayons and again attached with foam pads.
In her hand, I placed a small Woodland Tree. I coloured this with Peeled Paint Distress Spray Stain and then frosted the tips with glitter. After removing the wooden base from the tree, I attached it so it looked as if she was holding it.
On either side of the ledge, I broke a metal fence in two, which I inked with Rust and Pitch Black Alcohol Inks to create a rusty finish to the metal before I attached each piece with Matte Collage Medium.
To complete the fence, I tied some rusty alcohol inked Tiny Bells onto the right hand fence.
Around her feet, I added some Grit Paste and some Bauble Findings. I then dusted them with a sprinkling of Rock Candy Distress Glitter and Mica Flakes.

I finished the piece with the gorgeous poinsettias from the Worn Wallpaper Scraps and placed these to cascade around the frame, using different heights of foam behind each piece to create dimension and depth...

...before I added the Mini Flair button and some Mirrored Stars onto the background.
Finally, I painted a Christmas Word Plaque with Candied Apple Distress Paint and attached this along the bottom of my plaque. I added small Hardware Heads to the plaque and then surrounded it with pine cones from my garden and some Mica Flakes...
...before I added a Hardware Pull at the top of the panel and a stitched scrap which I attached at the top of the frame and then added a Mini Pin.
So that completes my final project of 2021 and I hope you've enjoyed reading all about this project. As always, if you make anything, or been inspired by anything that you've seen here on my blog ~ then please, let me know by tagging me on social media or leaving a comment here and I will be right over to take a look!

 Thanks so much for taking the time to stop by today and from the bottom of my heart ~ THANK YOU for all the love you've shown my projects and blog over the last year ~ it's not been the easiest of years for so many of us but I'm sure crafting has kept a few of us sane whilst we were in lockdown.

Happy Christmas everyone ~ stay safe, keep well and here's to a happy and healthy new year.
See you in 2022!
Love Emma xxx

Friday, 17 December 2021

The Snowman...

Hello friends...

Today, I'm sharing another of my Christmas idea-ology makes that I created for Tim Holtz's YouTube Live Launch! If you didn't see the LIVE or just want to watch the replay again, and again...then you can catch up with it HERE!

This make was inspired by the book ~ The Snowman by Raymond Briggs and is all about the morning that James wakes up and looks outside his window to see the snow, and then precedes to build the Snowman who becomes his friend and takes him on an adventure, walking in the air!

So let's get started and I hope you enjoy your stroll around this miniature winter wonderland... 

The base of this make was two vignette boxes that I flipped over to have the solid side uppermost. The boxes are both covered in co-ordinating papers from the Christmas Backdrops stash, and I covered the tips and the sides. I loved that ‘Christmas Tree advertising paper’ from the set and when cutting it into panels, it was just perfect on the front of the boxes, combined with different patterns on the sides. I used a Collage Brush to apply Matte Collage Medium to adhere each panel of paper to each box. I then always seal my covered boxes with a coat of the medium over the top and also added some Hardware Heads to my boxes.

I ran the Walnut Stain Distress Crayon around each of the box edges to create more of a vintage feel to the boxes and blended out any harsh lines with my fingers.
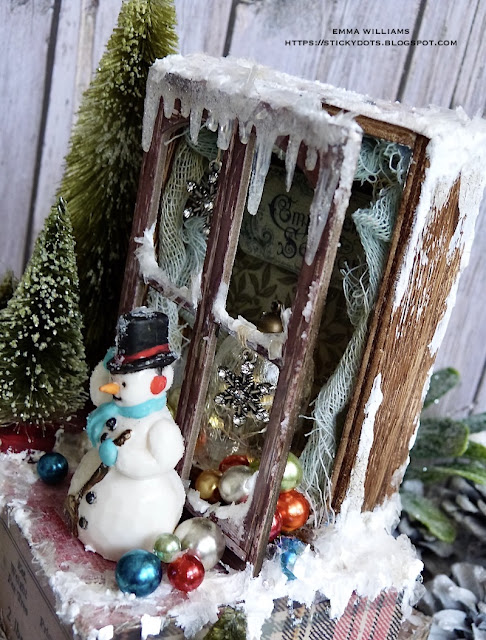
Taking a third vignette box, I again covered the back and the top of this box in a tartan design, but left the sides bare as I wanted it to resemble a natural looking wooden window frame. 
I also covered the inside of this box with more of the paper and added curtains made of Mummy Cloth dyed with Speckled Egg and Antique Linen Distress Spray Stain. Once the stain is dry, I attached the cloth around the inside of the box.

On the back wall of this box, I placed a Christmas Ephemera piece, ‘Compliments of the Season’.

This small box that will become the window frame, contains a small cluster of lights that I put into a Decorative Dome, so before I attached and stacked the boxes, I drilled a hole through the bottom of each of the larger sized boxes, aligning the holes so that I can feed the wire of the tiny lights up through each box and then drilled a hole in the bottom of the small box which is going to be placed upright on the top of the stack.

With the wires running up through the boxes, I can now attach the boxes to form the stack ~ placing them and adhering them on top of one another and slightly offsetting each box, adhering the final box upright on the top.
I attached the battery compartment to the base of the box on the bottom, so that you can access it easily to switch it on and off. At this stage, I placed the tiny lights into the glass section of the Decorative Dome. I didn’t use the metal base. If there are too many lights, cut away the excess and then fix the dome into place with Matte Collage Medium. You can see the dome behind the window in the photo below.

With the boxes in place, I added some Grit Paste over the top and down the sides and then sprinkled some Rock Candy Dry Glitter over the top. For even more frosty sparkle, I added Mica Flakes over the top, attaching them with Glossy Accents.
Now to add the window frame.
To begin with I attached the icicle across the top of one of the frames. To create the frosty look to the icicle, I smeared some Glossy Accents over the surface and then sprinkled with Rock Candy Glitter before I attached it along the top of the frame. I also added some Grit Paste along each quarter section of the frames to create the look of the snow drifts along the wood.
Hanging down in each of the window frames, I attached two of the Snowflake Adornments. I used cotton thread which I wound round the window frame and then secured them with a dab of Matte Collage Medium.
With the icicle and snowflakes in place, I attached the completed frame at a slight angle to make it look as if it was open. I then used Matte Collage Medium down the edge and along the bottom of the frame to secure it in place.
Leave this to dry and set in place before even trying to move onto adding any embellishments but whilst the drying time is happening, I moved onto bringing each embellishment to life....

...and started with the trees, using a selection of different sized Woodland Trees, which I sprayed with Peeled Paint and Bundled Sage Distress Spray Stains.

Once they were dry, I painted the wooden bases with Candied Apple Distress Paint and then added a frosting of ice over the tips of the trees by rolling them in Glossy Accents that I applied to my Glass Mat and then sprinkled some Rock Candy Glitter over the top.
I attached the glittery trees to my stacked boxes, placing three on the left...
...and one on the right.
I also just tweaked the top of the one tree, so that it was just tipping over.
I painted the Salvaged Snowman, (which comes in a pack together with Santa), with Distress Paint ~ I used Black Soot, Spiced Marmalade, Broken China, Ground Espresso, Frayed Burlap and Candied Apple, all applied with a fine detail paint brush and once he was dry, I attached him onto the box, applying a frosting of Rock Candy Glitter and a sprinkle of Mica Flakes over the top of the snowman.
The Bauble Adornments are all inked with Alcohol Inks ~ I used a combination of Gilded Alloy, Silver Metallic, Mushroom, red, blue and green alcohol inks but this is your make, so use the colours you love!
To complete the boxes, I added some Grit Paste snow. I placed this around the edges of the boxes, over the flat surfaces and dripping off the edges...
...and I also added some around the back of the box, where I placed some wood slices cut in half. Whilst the paste is still wet, sprinkle Rock Candy glitter over the top.
Adhere all the baubles in place using Glossy Accents...
...adding them to tumble out of the window, and all around the trees and snowman.
To finish my make, I added a final dusting of Mica Flakes over the top of the snow and baubles.
So that completes this home decor project that is ready to light up and display for Christmas time. I hope you've enjoyed reading all about this project and as always, if you make anything, or been inspired by anything that you've seen here on my blog ~ then please, let me know by tagging me on social media or leaving a comment here and I will be right over to take a look!

 Thank you so much for taking the time to stop by today ~ stay safe and keep well.
Love Emma xxx

Recipe for project:

Distress Crayon: Walnut Stain
Distress PaintBlack Soot, Spiced Marmalade, Broken China, Ground Espresso, Frayed Burlap and Candied Apple
Distress Spray Stain: Speckled Egg, Peeled Paint, Bundled Sage, Antique Linen
Alcohol InkGilded Alloy, Silver Metallic, Mushroom, red, blue and green 

Powered By Blogger

Total Pageviews