Happy Monday everyone...
Hope you've all had a great weekend and before I move onto this week's challenge, thank you so much for all the lovely comments and messages I've received about the makes that I created for Tim Holtz's Live Launch of the second Vault release from Sizzix. I'm sure by now, you'll have seen the live and all the amazing dies, but if you want to catch up, then click HERE and the dies are available to buy at Simon Says Stamp, HERE!
So back to today and the brand new Simon Says Stamp Monday Challenge which is all about Spring Flowers.
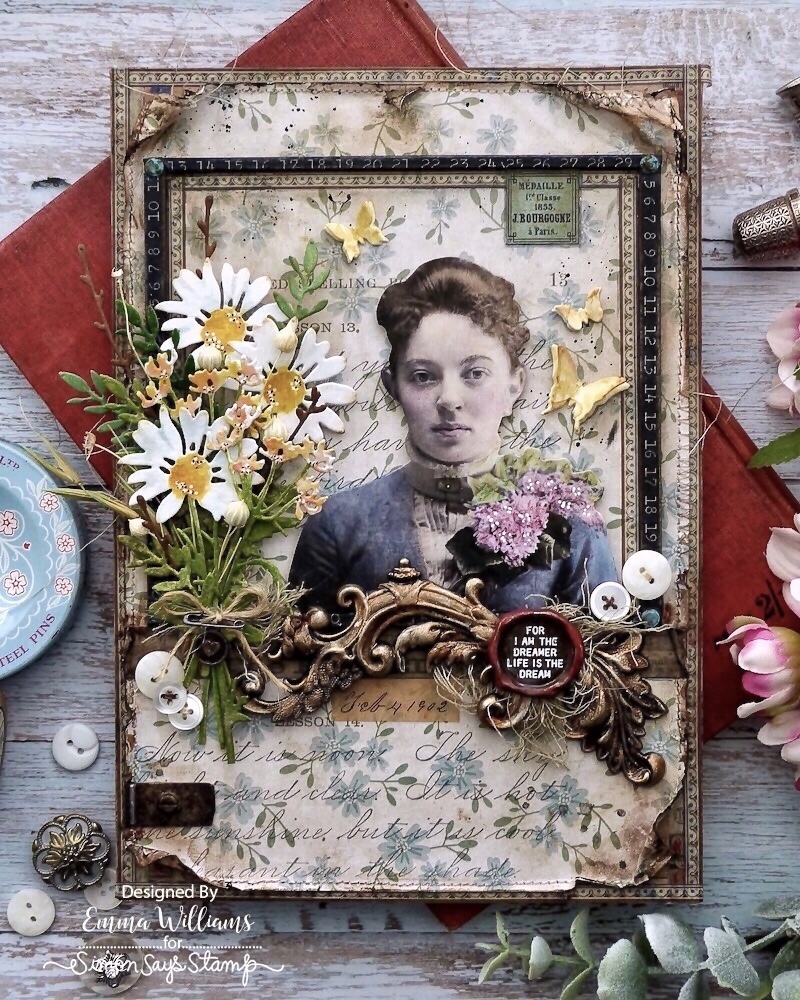
For my make, I chose to create a vintage style piece, inspired by a series that I've just finished watching on apple TV called The New Look, a series about Coco Chanel and the amazing Christian Dior, who is one of my all time icons. I've always known the story of both Christian and his sister, Catherine Dior, but seeing this on screen was so moving and in particular, watching Catherine's story, it was fascinating, heartbreaking and so compelling ~ so much so, that I created this piece in tribute, set slightly before their time, but including a lot of references to them within my make!
So let's get started, and here's how I created this panel packed full of flowers.


For this make, I used the larger sized Rectangular Etcetera Panel by Stampers Anonymous and began by applying Design Tape around the four sides to prep the board ready to decorate and I also added some tape around the outside edges of the surface of the borad.
BOARD
Now to add the paper and for this I used a floral backing paper from the Backdrops Vol 2 pack. I cut the paper slightly smaller than the panel and then I added some rips and tears along the edges before machine stitching a border.
After inking the edges with Walnut Stain Distress Ink, I adhered the paper to the Etcetera Panel using Matte Collage Medium, and added a few more rips to the paper and curled back the corners.
To add some more ageing to the rips and curls, I used a touch of Crackling Campfire and Black Soot Distress Paint, mixed together and watered down. I then used a paint brush to apply the paint solution to the edges.
With my board prepped, I moved onto the main feature, starting with the frame...
FRAME
This narrow frame is actually a waste product from the risers in the
Etcetera Facades, and as the phrase goes ~ waste not, want not...I thought it would be perfect for this make and all I did was paint it black and then add Design Tape trim around the four sides.
I attached the frame to the top section of my Etcetera Panel with more collage medium and than applied more of the Design Tape, using a different design this time, and placed this on the inside of the frame.
To complete the frame, I added some Hardware Heads to each corner, that I painted with Salvaged Patina and Crackling Campfire Distress Paint.
After adding some shading around the inside of the frame, and a few flicks of Black Soot Distress Paint over the entire surface, I moved onto the paper doll.
PAPER DOLL PORTRAIT
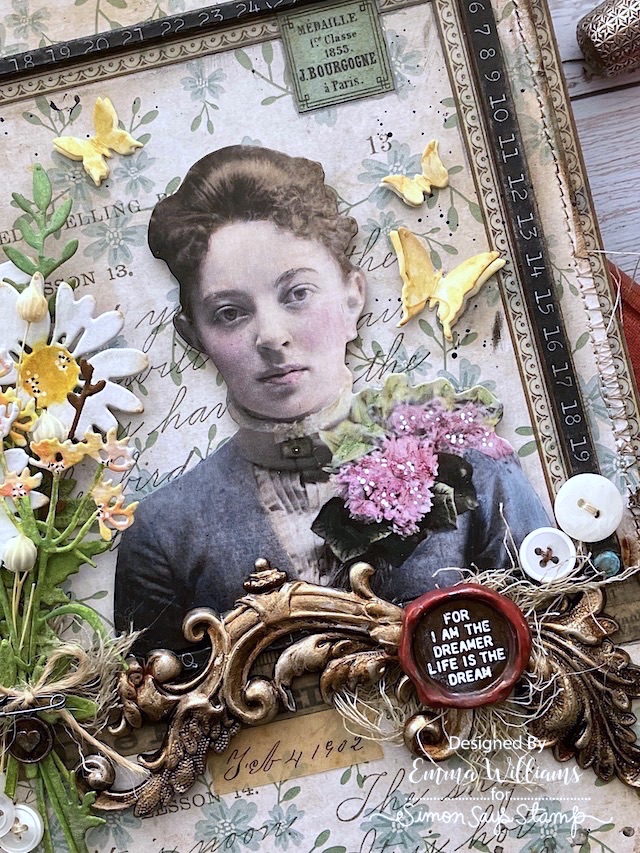
I chose this paper doll because of the huge corsage that the lady is wearing, it went so well with my theme and after prepping the surface with some clear gesso, I used a water brush to colour tint the image with Distress Crayons.
CRAYONS USED: FADED JEANS, PICKED RASPBERRY, TEA DYE, TATTERED ROSE, GATHERED TWIGS, AGED MAHOGANY AND RUSTIC WILDERNESS
I then added some white pen detail to the corsage before adding foam pads to the back of the image and placing it inside the frame, on the right hand side.
Underneath the frame, I added a ruler strip taken from the Memoirs Ephemera pack. I attached the ruler and directly onto the surface of the covered panel and just ripped the two ends.
FLOURISH ADORNMENTS AND QUOTE SEAL
We're now ready to add those beautiful Flourish Adornments.
To add colour to the metal, I used Foundry and Sterling on each of these pieces, applying one layer of wax at a time and then adding the second layer over the top, but not giving the metal a complete coverage. This will allow the layer of wax underneath to show through and create the variation of colour to the metal.
After I'd heat set the wax on all the pieces I used, I applied some dribbles of Mushroom alcohol ink over the metal before arranging and attaching them onto my panel with Matte Collage Medium, placing the flourishes across the bottom of the photo, and adding some Mummy Cloth fibres, where the two flourishes meet.
In the centre of the flourishes where they meet, I placed an idea-ology Quote Seal. I painted the entire seal with a coat of Burnt Sienna Acrylic Paint and allowed this to dry, before painting the outside of the seal, with Candied Apple Distress Paint.
Once the paint was dry, I then used my Picket Fence Distress Crayon to highlight the quote, running the crayon over the wording and allowing it to sink into the recesses before wiping away the excess with a soft cloth.
I then attached the seal to my flourishes with more Matte Collage Medium.
WILDFLOWERS
Now for those spring flowers and using the Wildflowers Vault die set, I cut a selection of leaves, twigs and flowers from watercolour cardstock.
I hand painted each of the flowers using Distress Watercolour Pencils...
DAISIES ~ Mustard Seed, Scattered Straw, Wild Honey, Peeled Paint, Shabby Shutters
MEADOWSWEET ~ Saltwater Taffy, Scattered Straw, Dried Marigold, Peeled Paint
GREENERY ~ Peeled Paint, Rustic Wilderness, Bundled Sage
TWIGS ~ Gathered Twigs
...and once they were dry, I arranged them into a bouquet.
I attached the floral arrangement to my panel with hot glue, adding some foam pads behind the flower heads to add some dimension.
I then added the little Word Tag Heart. The metal on this tag, is altered in exactly the same way as the flourishes and once I was happy, I threaded it onto a piece of twine, tied it into a knot and then attached it to my floral arrangement, completing the bow with a Mini Pin.
To add some more dimension to the floral arrangement, I added some dried grasses from my own stash, and placed these in amongst the flowers.
To complete the frame, I added the tiny butterflies, which are cut from some inked card in my stash using the dies from the brand newVault Boutique set from Tim and Sizzix. I cut two of each butterfly and layered them to create more dimension before I attached them to my project.
FINISHING DETAILS
Finally, it's all those little finishing details that need to be added and I started with an Curator Ephemera piece in the top right hand corner of the frame and this piece was chosen for it's reference to Paris.
I then added a Transparent Things Date strip, Feb 4th, 1912 and placed this beneath my frame...
...before adding some buttons, complete with thread, all of which are from my stash.
Finally I added a Type Chip in the bottom left hand corner, complete with a Hardware Head in the centre, painted with Burnt Sienna Acrylic Paint to create a rusty finish to the metal.
With those final touches, my make for this week is finished and I hope you love the theme and the techniques I've used to bring this story to life!

As always, if you make anything, or if you've been inspired by anything that you've seen here on my blog ~ then please, let me know by tagging me on social media or leaving a comment here and I will be right over to take a look!
Don't forget that every week, one lucky random participant has the chance to win a $25 gift voucher from Simon Says Stamp and you can join in up to 5 times, which means you could have 5 chances to win. You have until next Monday at 8am Ohio time. 1pm UK time, 2 pm CET to join in and good luck....
Thank you so much for taking the time to stop by today...Love Emma xxx
Recipe for project:
Distress Paint: Candied Apple,
Black Soot, Salvaged Patina, Crackling Campfire Distress Crayons: Walnut Stain, Picket Fence, Faded Jeans, Picked Rapsberry, Tea Dye, Tattered Rose, Gathered Twigs, Aged Mahogany and Rustic Wilderness Tim Holtz Idea-ology: Hardware Heads, Backdrops vol 2, Memoirs Ephemera Pack, Word Tag, Design Tape, Paper Dolls Portraits, Flourish Adornments, Quote Seal, Transparent Things 2, Mini Pins, Mummy Cloth, Type Chip, Curator Ephemera Hot Glue Gun
Twine, buttons and Dry Flowers from my own stash
****These are not affiliate links****