Showing posts with label Sizzix Halloween 2021. Show all posts

Monday, 29 August 2022

Skeleton Dance...

Hello friends...

It's time for the brand new Simon Says Stamp Monday Challenge and this week, we are asking you to MAKE YOUR OWN BACKGROUND! However you choose to do this, is entirely up to you but with so many inks, paints, pastes and sprays ~ you will be spoilt for choice and we can't wait to see what you create.

As Autumn approaches and my favourite time of year is just around the corner, I'm still very much in my Halloween groove of making and even though I have moved onto Christmas, 🤫...there's plenty of spooky projects to come!

So, with this in mind, I've stepped back in die cutting time to last year and used one of my favourite Tim Holtz dies, Mr Bones but combined him with a brand new stencil, Crest which is from the Stampers Anonymous Halloween release that Tim shared on his recent LIVE and used this to create my inky background.

It's time to jangle those bones and embrace the dead of night because Mr Bones is ready to party and you are invited to the skeleton dance!
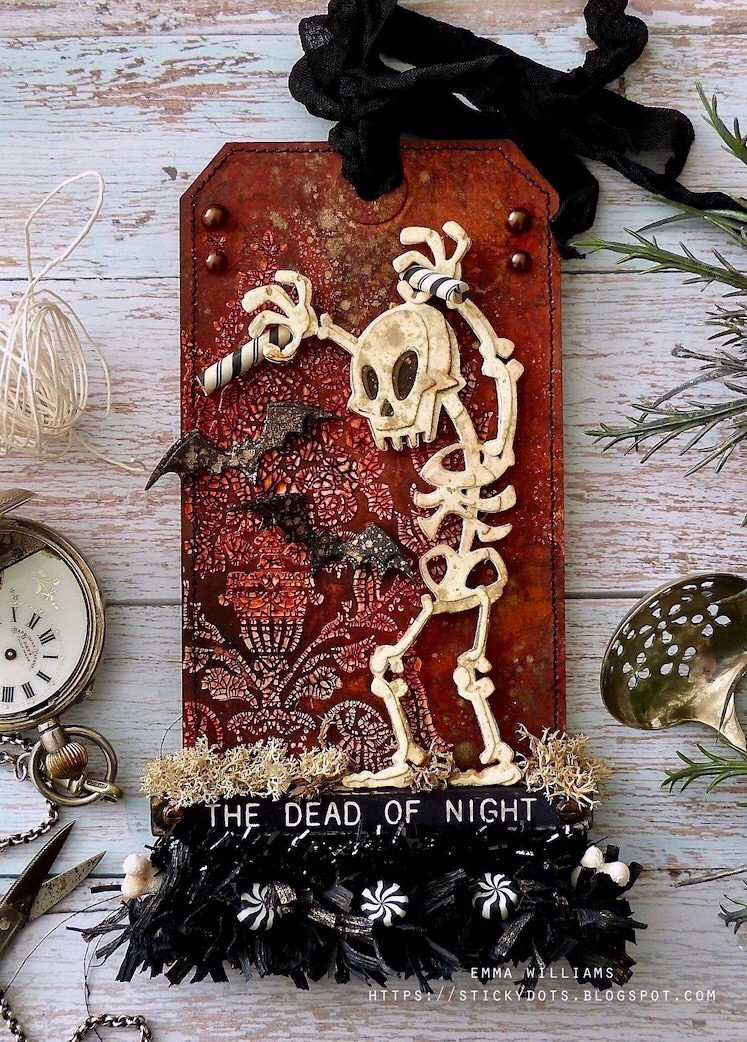
To begin with I used a Size 8 Etcetera tag as a base and using Matte Collage Medium, I attached the smallest size of Pinked Etcetera Trim along the bottom edge of the tag, and painted the trim with Black Soot Distress Paint. This will elongate the length of the tag and also form a base for my fringing.

BACKGROUND

Moving onto the inky background, and I applied Translucent Crackle Paste through the Crest Mini Layering Stencil directly onto a Size 8 Heavystock Mixed Media Tag, placing the design down the left hand side. Set the tag to one side to dry and for those crackles to appear ~ don't be too impatient with this process, I've found depending on temperature, it could take a while, or it could happen quite quickly!

Once the paste is dry to touch and the cracks are visible, I then spritzed the entire tag with a combination of Distress Spray Stains ~ Walnut Stain, Crackling Campfire, Barn Door, Antique Linen and Frayed Burlap. I spritzed water over the top to blend the inks and then gently heat dried the tag, being careful not to overheat the pasted areas.
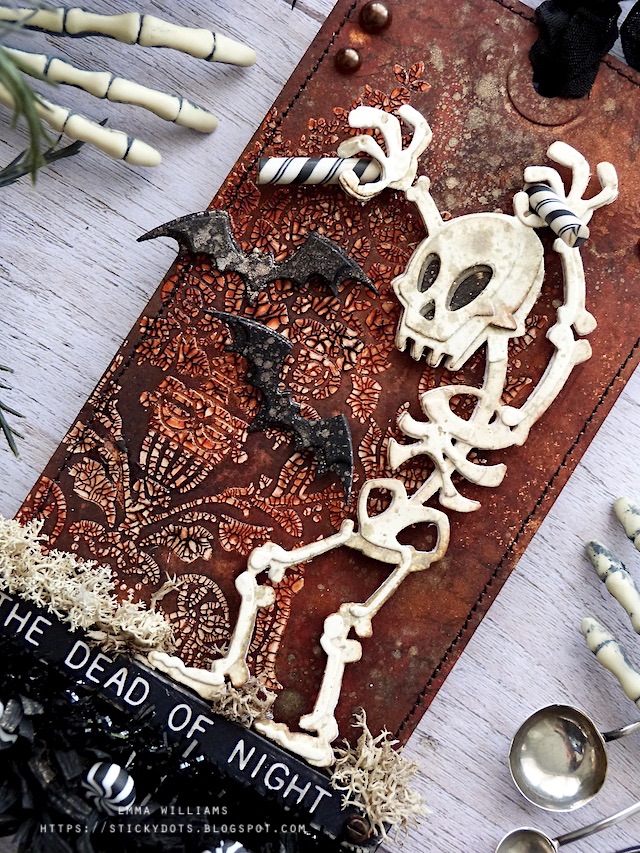
Once I was happy with the blend, I stamped some script onto the open areas of the tag, using the script stamp from Exquisite and then lightly splattered the tag with Decayed and Burning Ember Mica Spray Stains. If you haven't tried these colours yet...you need too because they are amazing and such a great combination on halloween projects.

After allowing the tag to dry, I inked the edges with Walnut Stain Distress Ink and then machine stitched a border around the outside.

Adhere the tag to the Etcetera Tag using Matte Collage Medium.

QUOTE CHIP, FRINGE and TINSEL

With the background ready, it's time for that glorious fringing and for this I used one of the new idea-ology products that Tim released for Halloween.

I cut a piece of fringing to fit across the bottom of the tag and then rolled the trim in my hands to create a ruffled appearance. After a spritz of Decayed Mica Spray Stain over the top, I attached the trim along the bottom of the tag, placing it over the join of the tag and etcetera trim.

Above the trim, I then placed some sparkle and once again, turned to the new idea-ology products, and cut a piece of Black Tinsel and attached this along the top of the trim.

On either side of the trim, I cut a boneyard finding in half and tucked them into the fringe, attaching them so they slightly stick out.

With my trim in place, I added a Quote Chip from the Halloween Baseboards pack, THE DEAD OF NIGHT and used foam pads to attach it to my tag, placing a hardware head on either side of the chip.

We're now ready for the star of the show....

MR BONES

Now to assemble Mr Bones and once I'd die cut all the pieces and layers from Mixed Media Heavystock card, together with some black and grey kraft card, I inked each die cut piece and then layered him up to create my skeleton. 

Because I wanted him to be slightly lifted off the background, I did die cut an extra two solid layers, and adhered these to the back.

Placing Mr Bones into the splat box, I very lightly misted some Decayed Mica Stain over the surface and dabbed away any excess, heavy splatters.

So Mr Bones is now ready for the party and I attached him to the tag, placing foam pads on the back to add support. I then attached some moss along the top edge of the quote chip and around his feet.

Now no dance party is complete without guests, and these guests come in the shape of some bats who seem to be dancing with Mr Bones. The bats are die cut from black kraft card using the bat dies in Otis. I spritzed the black card with Decayed Mica Stain and then die cut, shaped and attached both of the bats to the tag.

CONFECTIONS

In each of Mr Bones hands, I placed a piece of Halloween Confection which I cut in half and altered slightly with some Gathered Twigs Crayon, which just knocks back the bright white areas of the candy. I then attached the candy by placing it in between his fingers, and using a small dab of Matte collage medium to hold it in place.

I also placed three pieces of the candy in amongst the fringing.

We're nearly there and all that's left is the finishing details...

FINISHING TOUCHES

I attached two pearl droplets on the top left and right of the tag...

...and finally I used some Crinkle Ribbon, or seam binding ribbon and spritzed this with Black Soot Distress Spray Stain before threading it through the hole in the top of the tag.

So that's my make finished for this week and I hope you love the inspiration behind this piece, and it's got you into the halloween party spirit!

As always, if you make anything, or if you've been inspired by anything that you've seen here on my blog ~ then please, let me know by tagging me on social media or leaving a comment here and I will be right over to take a look and if sometimes I miss it ~ just keep nudging me!

Don't forget that every week, one lucky random participant has the chance to win a $25 gift voucher from Simon Says Stamp and you can join in up to 5 times, which means you could have 5 chances to winYou have until next Monday at 8am Ohio time. 1pm UK time, 2 pm CET to join in and good luck....


Thank you so much for taking the time to stop by today ~ stay safe and keep well.
Love Emma xxx

Monday, 14 February 2022

High Society...

Happy Monday friends...

Hope you all had a great weekend and enjoyed Tim's latest YouTube Live! Wasn't it just the best kept secret and such a wonderful surprise to see all those brand new inks and glazes! Thank you for all the lovely comments about my makes, I will be sharing step by steps of many of the makes that I'm working on, so please do keep checking back here, or over on Instagram!

In the meantime, it's Monday and that means we have a brand new Simon Says Stamp Monday Challenge and this week our theme is all about, FOOD & DRINK!

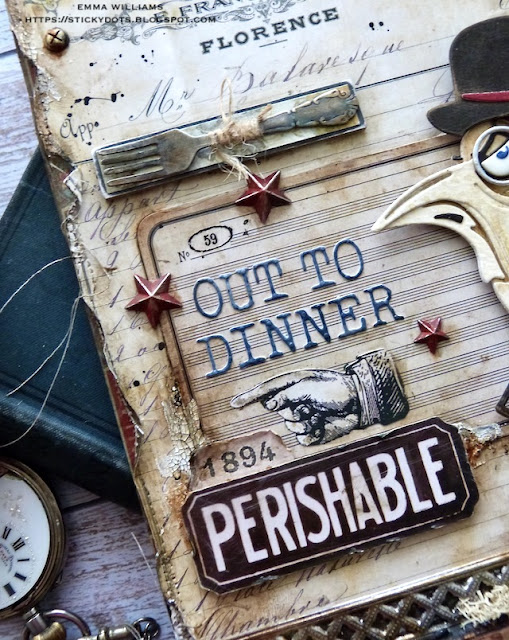
Now, I always like to think outside the box and I've done many food and drink projects over the years, so this time I wanted to take a different route and I decided to make a vintage style tag that features a very dapper gentleman who is out to dinner and has a table reserved at the Grand Hotel Continental!

So let's get started, it's time to pull up a chair to see how I created this week's make!

To begin with I used a small etcetera tag, flipped it upside down so the narrow part is at the bottom and then applied Humidor Design Tape around the edge of the tag itself.

I then took a piece of paper from the Backdrops Vol 2, this particular one has the Grand Hotel Continental as the heading.

After trimming the paper down to size, I machine stitched around the outside to create a border and then ripped and tore the edges to add more of a vintage feel.

I adhered the paper onto the tag with Matte Collage Medium and added some more tears where necessary.

Around the edges of the tag, I added some crackle paste and once this was dry, I then ran my Walnut Stain Distress Crayon over the top of the paste, blending it into the cracks with a brush.

Now to form the ledge that sits across the tag, I used a Pinked Etcetera Trim that is slightly longer in length than the tag itself but I like that it overhangs. I then used the Decorative Thinlits Die set to cut a piece of paper from the Backdrops pack ~ I believe this is from Backdrops Vol 1 and adhered it to my trim.

I attached the trim across the bottom section of the tag and then I added a metal embossed strip. This is actually an older Impresslits Embossing Folder that I have in my stash! It's called the Lattice Trim and once again, if you have don't own it ~ you could use any metal offcuts from Tim's Texture Fades. I just liked this design and it was sitting in my "bits and pieces, offcuts box".

I cut the trim from silver metallic kraft card, and then applied Black Soot Distress Paint over the top, wiped away the excess and once dry, attached this to my tag.

On the centre of the etcetera trim, I attached a Junk Drawer Baseboard Layer and applied a little Grit Paste around the edges to age it. Once the paste was dry, I covered it with Distress Paints, Black Soot and Ground Espresso.

To complete the trim, I added a Drawer Pull, with two Hardware Heads attached to either side and added the wording "Reserved" in the window which is from the Clipping Sticker Book.

Finally, I added some metal hardware to either side of my trim and undereath the ledge, I added a Specimen Remnant Rub ~ Orders Attended To Day or Night.

Now my tag is ready for the star of the show and you might recognise this dapper gent from Halloween!! Yep, this is the count but rather than going down the vampire route, I dressed him up using a few accessories from other die sets. If you don't own these dies, then there are plenty of others from Tim that can be used...so just play around and as Tim always says ~ YOU DO YOU!

Using Mixed Media Heavystock card and black kraft card, I die cut and assembled The Count but didn't use the cape...that's the only difference with this make.

But now he need's to be turned into the dapper gent and for this I used the bowler hat and monocle from The Gent Thinlits Die Set...

...and the umbrella from The Park Thinlits Die Set. These are the perfect size accessories for this gent and are die cut from black and red cardstock for the hat, and black and metallic kraft card for the umbrella.

As a backdrop to the count, I used a label taken from the Urban Layers Ephemera pack and adhered this directly onto the tag using Matte Collage Medium.

Attach the count with foam pads, placing him on the right hand side of the label.

For the "Out To Dinner" wording, I used the Alphanumeric Tiny Type Upper Thinlits die set and cut the letters from blue card and attached them to the Urban Layers Piece.

Underneath the label I added a 'pointy finger" which is from the Christmas Ephemera pack and also placed a Perishable Urban Layer onto foam pads and attached this directly beneath. I added a touch more Crackle Paste around the edges of the label and once that was dry and inked, I attached my count using foam pads.

I placed some Star Adornments onto the label, which I painted red using Candied Apple Distress Paint and attached these with Matte Collage Medium.

Just above the label, I added a fork which is one of the pieces from the idea-ology Silverware Adornments pack. I placed this onto a piece of mountboard that I covered with an offcuts of the Backdrops paper and just aged the metal finish of the fork by using Distress Paints ~ Salvaged Patina, Tarnished Brass, Black Soot and Picket Fence.

We're nearly there and all that's left is to add some more metal hardware down the side ~ I used Hardware Heads and created a rusty finished around each of them.

...and with that final detail, my dapper city gent is ready for dinner!

As always, if you make anything, or if you've been inspired by anything that you've seen here on my blog ~ then please, let me know by tagging me on social media or leaving a comment here and I will be right over to take a look!

Don't forget that every week, one lucky random participant has the chance to win a $25 gift voucher from Simon Says Stamp and you can join in up to 5 times, which means you could have 5 chances to winYou have until next Monday at 8am Ohio time. 1pm UK time, 2 pm CET to join in and good luck....


Thank you so much for taking the time to stop by today ~ stay safe and keep well.
Love Emma xxx

Recipe for project:

Tim Holtz for Stampers Anonymous: Small Etcetera Tag, Pinked Etcetera Trims
Distress Paints: Candied Apple, Salvaged Patina, Tarnished Brass, Black Soot and Picket Fence.
Distress Crayon: Walnut Stain

Tuesday, 26 October 2021

Bewitched, Bothered and Bewildered....

Hello everyone...

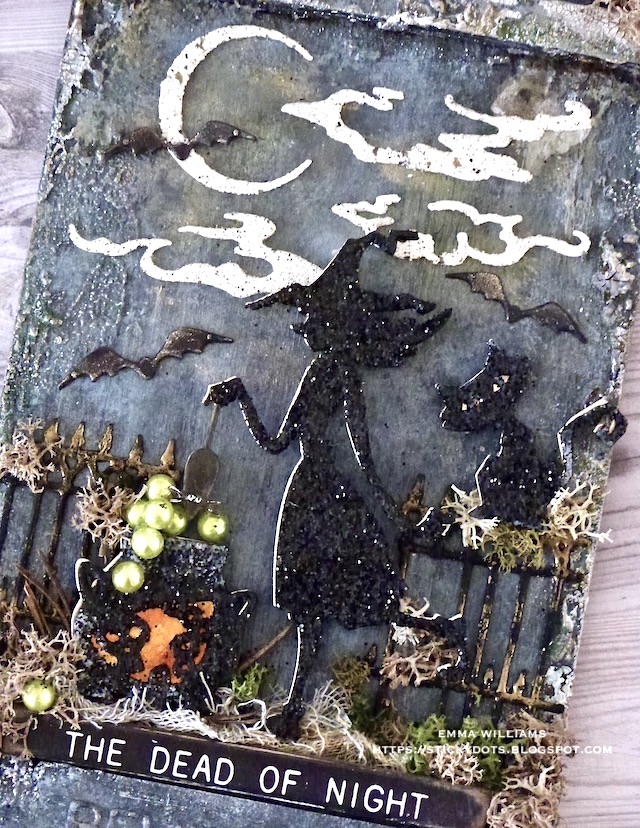
Can you believe Halloween is nearly here?!? This month has flown by so quickly, though to be honest, this year has flown ~ where did 2021 go!?! So seeing as it is nearly Halloween at the end of the week, I have one more spooky make to share with you all before I break out the Michael Bublé Christmas album and begin to share all my Christmas makes and that make is one that I created for the Tim Holtz/Sizzix Halloween YouTube Live launch and features the fabulous Toil and Trouble dies, (which I love), combined with the gates from the Vault series die set, and the clouds and moon from Ghost Town 2 die set which all came together to create my little scene featuring the witch, the mouse and the pussy cat who are a little bewitched, bothered and bewildered by what is going on!!!

If you would like to catch up with the replay of the live, then head on over to Tim's blog or his YouTube Channel and see all the amazing makes for this release from all my talented friends and makers!


TOMBSTONE

To begin with I used the Stampers Anonymous Etcetera Mini Tombstone as my surface and base. This comes in 3 separate pieces which when assembled will form the tombstone and in your pack you will find a tag and two overlays and for this project, I assembled my tombstone before I painted it.

At this stage, I added the Bewitched wording across the bottom section of the tombstone and for this I used the Alphanumeric Label Thinlits Die set and cut each letter from black card. I then attached them along the base with Matte Collage Medium.

So with the tombstone ready, I primed it with a coat of black gesso and once that was dry, I moved onto adding some texture using Translucent Grit Paste. I applied the paste around the edges of the tag, drawing some into the centre to create a really gritty texture to the background of this project. After allowing the paste to dry, I started painting it by layering my Distress Paints over the surface, applying them one at a time and always drying them in between layers. If you don't ~ then you could end up with a muddy mess of colours and that's not what we're looking for!

For my first layer I used Hickory Smoke, and once dry, I used the dry brushing technique where you load a dry paintbrush with paint, remove the majority of paint onto a cloth or a piece of kitchen paper towel and then just apply the paint, just allowing it to kiss the surface and the first layer of paint that I used was Black Soot, followed by Pumice Stone. If you feel that any areas are too dark or too light, or you've overpainted them, don't panic ~ just go back with any of the paints and apply another layer.

Once my paint was dry, I then applied some Crackle Paste to random areas of the tag, and also some of the seasonal Halloween Texture pastes. In the photos, you can see that I concentrated on applying the majority of the texture around the edges of the tombstone, and also the areas along the bottom and around the top.


In the centre of the tombstone at the very top, I attached an idea-ology Deco Frame. To create the rusty finish to the frame, I used Rust and Pitch Black Alcohol Inks and then attached it to my tombstone with matte Collage Medium, placing it over the top of a small section of die cut web that I had on my desk, left over from a previous project. In the centre of the frame I attached a creepy eye, surrounding it with moss.
Now, I can set the tombstone to one side to dry and move onto the die cutting...
DIE CUTTING

To begin with I cut all my pieces from plain black card ~ the witch, bats, cauldron, mouse and cat from Toil and Trouble and the gates from the Halloween Vault 2021 dies. I also cut the clouds and moon from Mixed Media Heavystock using the dies from Ghost Town 2. With the exception of the gates, I cut each of the images three or four times, dependent on which piece so that this will create really substantial die cuts that resemble the thickness of chipboard.

GATES

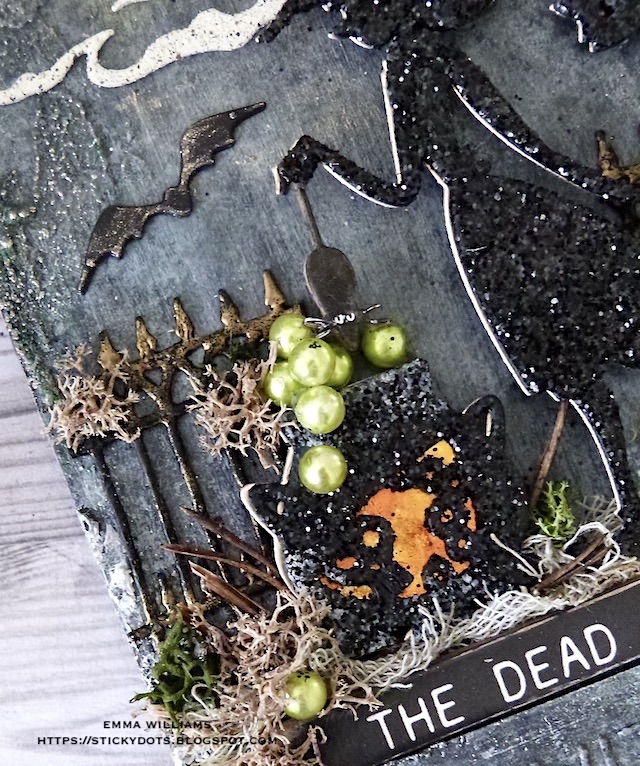
We'll start with the gates first which I will be attaching on either side of the tombstone behind the witch, and I used Tim's Embossing Dabber over the surface before sprinkling them with black embossing powder. Tap away the excess powder and then heat emboss until molten. I repeated this a couple more times to create the enamelled look before I then applied the dabber to just the top spikes of the gates. I then sprinkled gold embossing powder over the top, tapped away the excess and heat embossed the powder.

I then attached my gates to my tombstone using Matte Collage Medium and placed them along the bottom section of the tombstone.

CLOUDS, MOON and BATS

For the moon and clouds, I took my die cuts ~ for these I cut each of them three times and then layered them over one another to make each separate piece. I used exactly the same technique of embossing as I used on the gates but this time I embossed them with Bone Mixed Media Embossing Powder. Once each piece was embossed, I adhered them onto the tag with collage medium.

Just around the moon, I added a glow using Fossilized Amber Distress Crayon. I just applied the crayon directly onto the surface where I was attaching the moon, blended it a little with my fingertip and then placed the moon over the top.

Around the moon, I attached the die cut bats, these were cut three times and layered over one another. I highlighted the bats with a touch of Antiqued Bronze Distress Crayon, blended with my fingertip.

WITCH, CAULDRON, CAT AND MOUSE

With all my die cuts cut four times and layered to create each piece, I glittered the witch, the cat and the cauldron by applying glossy accents over the surface of each die cut and sprinkling with Nightfall Glitter from the Halloween Sparkle Set.

To create a silvery shadow behind the dies, cut each image from silver metallic kraft stash and then placed the silver die cuts behind the glittery images, slightly offsetting the silver backing to create the shadow.

Set these aside to dry and whilst that is happening, I took a small piece of gold metallic kraft stash and applied the colours from the Alcohol Pearls Kit 1 over the surface before placing and attaching the card behind the glittered cauldron. This creates the fiery glow inside the cauldron.


With all my pieces ready, I attached them to the tombstone with foam pads to add dimension, placing the cat to sit on the gates...

...the witch in the centre and the cauldron in front of her. Around the base of the witch and the cauldron, I attached mummy cloth, dyed with Antique Linen and Frayed Burlap Distress Spray Stains, and moss. These little details will help to ground each die cut piece, so they aren't floating in mid air.

To create the bubbles coming out of the cauldron, I used the Bauble Adornments and coloured these with a combination of Limeade and Envy Pearls Alcohol Ink. I then attached each bauble to spill out of the cauldron, using Glossy Accents to secure them into place.

Taking the tiny mouse die cut which I haven't glittered, I added whites to the eyes of the mouse and then placed this in the witches hand, so that it's hovering with trepidation over the cauldron.

We're nearly there and all that's left is to add some small touches of moss, and a few little twigs around the tombstone and some hardware heads on the base and the top section of the tomb...

...before the finishing piece, which is the Quote Chip, "The Dead of Night", from the Halloween Baseboards pack. I sanded the edges of the chip and then attached it directly beneath the scene, and above the Bewitched wording.

I hope you've enjoyed the stroll through my makand have felt inspired to try some of the techniques I've used to create texture, sparkle and dimension, which can be used for any project, not just for Halloween!

Thank you so much for taking the time to stop by today ~ stay safe and keep well.
Love Emma xxx

Recipe for project:

Stampers Anonymous: Mini Tombstone
Distress Spray Stain: Antique Linen and Frayed Burlap
Distress Paint: Black Soot, Hickory Smoke, Pumice Stone
Powered By Blogger

Total Pageviews