Showing posts with label Sakura. Show all posts

Monday, 1 April 2024

Come Rain, or Shine

Hello everyone and Happy Easter Monday!

Hope you all had a wonderful weekend and the Easter Bunny stopped by to leave you some treats! As always, a brand new week brings a new Simon Says Stamp Monday Challenge and this week our theme is all about WHATEVER THE WEATHER and the DT are showcasing the fabulous products of our very own Simon Says Stamp within their makes!

For my card, I chose to combine the Sunburst Die from SSS, with Tim Holtz and Sizzix products to make this card all about a couple of love cats. This piece is actually inspired by the song, Come Rain or Come Shine and as a child, it was a track that was always being played in our house, and to this day my Dad still loves it, whether it's by Sinatra, Streisand or Ray Charles, when I hear it, I have such happy memories and I thought it was perfect for our challenge theme!

So let's get started, it's time for me to introduce you to these two mischievous love cats, who are gonna love each other, come rain, or come shine!


I made a black card blank measuring 18 x 12.5cm and adhered a panel of yellow patterned paper from an older Tim Holtz paper stash, followed by a piece of cream card, inked around the edges with Frayed Burlap Distress Ink.

SUNBURST BACKGROUND

To begin with I'll start with how I created the background and for this, I used the Sunburst Die from SSS to die cut a piece of Mixed Media Heavystock card. I then snipped away the edges of the card panel so that it would leave me with just the rays.

To add colour to the rays, I began by inking the card using a Blending Tool, with a combination of Distress Inks, Scattered Straw, Fossililzed Amber, Wild Honey and Mustard Seed.

I then spritzed the card with a light misting of water, allowing the inks to blend and little puddles to appear before heat drying the die cut.

Once dry, I inked the edges with Tea Dye and Walnut Stain Distress Ink.

Behind the rays, I wanted to add a blue background and for this I cut a panel of Distress Watercolor Card, the same size as the rays. I smooshed a combination of Speckled Egg, and Broken China Distress Inks onto my glass mat and then spritzed with water before dipping the card in and out of the inks, picking up the colour and droplets of ink.

I always heat dry in-between each inky application, and then continue to pick up colour as I go along.

Once happy, I heat dried the background and when this was completely dry, I adhered the sunburst die cut over the blue background, using Matte Collage Medium to secure it into position.

I inked the edges of the panel with Walnut Stain Distress Ink, mounted it onto some black kraft cardstock, and then attached this to the top section of my card blank using foam pads to add some dimension and height.

At the base of the sunburst, I added a Milk Cap, to follow the outline of the round sun. I cut a small piece of the bottom of the Milk Cap and then inked the edges before attaching it with foam pads.

Around the edge of the milk cap, I added small torn pieces of Mummy Cloth, hand dyed with Frayed Burlap distress Spray Stain and some Bouquet Findings flowers which are coloured with Scattered Straw and Fossilized Amber spray stains. Once the flowers were dry, I arranged them around the milk cap, tucking them in between the mummy cloth.

To complete the cap, I added two Hardware Heads, painted with gold acrylic paint and attached these to the cap itself.

COME RAIN OR SHINE QUOTE PLAQUE

Underneath the sunburst, I added the quote ~ "Come Rain or Shine", and for this I inked a piece of watercolour card with the same blue inks as I used on the background.

I then cut each of the individual letters from black kraft card using the Sizzix Alphanumeric Label die set by Tim Holtz. Top Tip: When die cutting any letters and small die cuts, I always use double sided adhesive sheets on the back of the card, it really does make life so much easier.

I attached the letters onto my inked strip before I matted the plaque onto black kraft stock, sanding around the edges to reveal the kraft core of the cardstock. I then mounted the plaque underneath the sunburst using foam pads.

Now the card is ready for the love cats...

LOVE CATS AND UMBRELLA

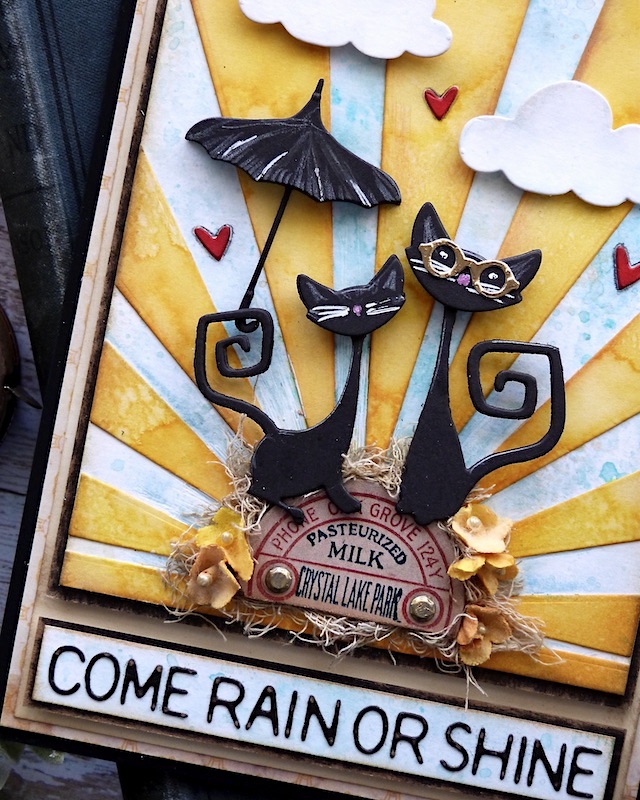
For these cats I used the Sizzix Mischievous Die Set by Tim and after choosing the images from the set, I cut three layers for each cat, which I then attached over one another to form a really substantial die cut. 

In this die set, you also get the heads separate and I cut each of the corresponding heads that I attached using foam pads.

I used a white gel pen to add the facial detail and then a pink stardust Sakura Gel pen to add their little noses.

I then wanted a little quirky detail for the larger cat and thought the glasses would be perfect. These are cut from metallic cardstock using a die from an older, and sadly discontinued die set by Tim, called Crazy Things but if you want larger glasses, then you can always use the ones that are in the Vault Bunny and chick set.

I placed the glasses onto his face and the kitties are now ready to be placed onto my background, sitting them on top of the milk cap, using foam pads to secure them into position.

For the umbrella, I used the die from The Park die set and cut the pieces from more of the black card, again cutting multiple layers to form a substantial die cut.

I added pencil and white gel pen details to the umbrella and then attached it to my kitties tail.

FINISHING DETAILS

To complete the card, I cut two clouds from Distress Watercolour Cardstock, inked the edges and added some shading to each piece and then attached them to my background with foam pads.

I finished the piece with red hearts, cut from red inky card that I had in my offcut box, and used the Tim Holtz Falling Hearts die by Sizzix. I attached three hearts around the kitties using matte collage medium.

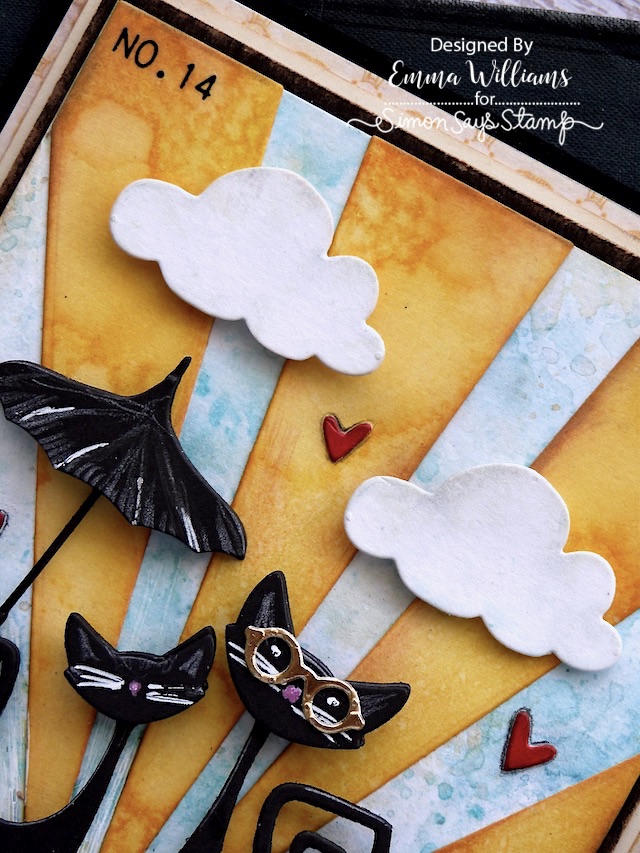
Finally, I applied the No.14 remnant rub in the top left hand corner.

So that's my card complete and I hope you love what I've created and it's made you smile ~ I know I can't help but smile when I see these two sitting together.

As always, if you make anything, or if you've been inspired by anything that you've seen here on my blog ~ then please, let me know by tagging me on social media or leaving a comment here and I will be right over to take a look!

Don't forget that every week, one lucky random participant has the chance to win a $25 gift voucher from Simon Says Stamp and you can join in up to 5 times, which means you could have 5 chances to winYou have until next Monday at 8am Ohio time. 1pm UK time, 2 pm CET to join in and good luck....


Thank you so much for taking the time to stop by today...Love Emma xxx

Recipe for project:

Simon Says Stamp: Sunburst Die
Tim Holtz/Sizzix: Tim Holtz Big Shot Foldaway, Mischievous, The Park, Falling Hearts, Christmas CutoutsLabel Alphanumeric, Crazy Things Die Set from my own stash
Distress Spray Stain: Fossilized Amber, Frayed Burlap, Scattered Straw
Distress Ink: Walnut Stain, Frayed Burlap, Broken China, Speckled Egg, Fossilized Amber, Mustard Seed,  Scattered Straw, Wild Honey, Tea Dye
Hot Glue Gun

****These are not affiliate links****

Thursday, 9 February 2012

Lily Of The Valley

It's a very quick post from me tonight because it's been a busy old day and I'm just about to sit down and have something to eat. But before I do that, I thought I would share my final piece of artwork from the UK TV shows that I made for Barbara Gray. There will be some German TV samples, coming very soon ~ so, if you love Clarity Stamps and want to see what Barbara took to Germany to demo, watch this space!! :)

This card features, the Lily of the Valley stamp and that lovely quote from Wordsworth. I hope you like what I did with this set of stamps...


Okey dokey, there is a gorgeous smell of beef casserole wafting in from the kitchen so, I will bid you good evening and see you soon.
Thank you for all the lovely comments you've been leaving me on this weeks posts ~ I'll be around to visit your blogs later.

Bye for now.
Love Emma xxx

Monday, 8 August 2011

In The Classroom...

Hi everyone ... hope you all had fabulous weekends and a big hello to all my new followers. Some of you, I already know from Twitter but thanks for following me here and I can't wait to get to know you and hear your comments on my cards. Don't be shy...come and say hello, I don't bite! lol

So, did any of you manage to see the Clarity Stamp shows on Create & Craft this weekend? Did you see the brand new show, In the Classroom with Barbara Gray? Wasn't Barbara fantastic? For a first time, I thought she did amazingly well, I know that I couldn't do anything like it...you'd be looking at a very mute, waxwork dummy on screen if I was there. lol

But I was there in spirit and to give her support by making these samples for the show, using the Berries Corner stamp kit. You might have caught a glimpse of them, displayed on the side. I hope you like them...
Both of these cards, show the versatility of the stamp and how lovely it can look when you start pattern building with it. This card, I stamped in white ink, then I traced over the lines of the image, with metallic pencils to give this gorgeous effect. I added the small dots, using a Sakura gel pen and finally, I thought the Tim Holtz stamp worked perfectly with this design. It really says it all...


This card, once again, shows how you can build patterns with the stamp and how stunning it can look, keeping the colour monotone. Black and cream is such a big favourite of mine and I thought that hint of pink just finished it off perfectly.


So, thank you for popping by to take a look at the first of my Clarity shares of the week. Of course, there are plenty more to come and I can't wait to hear what you thought of them. :)

I'll be around to comment on all your blogs, asap or as soon as I start ticking off some of the items on my ever growing "to-do" list!!

See you tomorrow and hope you all have a lovely day!
Love Emma
xx

Wednesday, 4 August 2010

Umbrella Emma

The last few days have been quite eventful. On Sunday, my Mum got bitten by an insect, whilst in the garden. At first we didn't think anything of it but during the night, her face started to swell and she was having difficulty in swallowing and breathing. On Monday, she had to go to hospital and was told that the bite had caused a massive infection and was causing her face to fill with fluid. Thankfully, she's back home now but on antibiotics and the swelling is going down slowly but she really did give us a scare. Now, I'm doing my Florence Nightingale act and looking after her and in between times, I've also been working on my top secret project. All I can tell you at the moment is...and shhh, don't tell anyone else, but....I love it and I think you will too!!

So, back to today's card that I'm sharing with you all and as I'm writing this post, there is only one song that is in my head...

"Now that it's raining more than ever
Know that we'll still have each other
You can stand under my umbrella
You can stand under my umbrella"

Yep, it's Rihanna's fabulous song, Umbrella and for all my friends who read this, they will know exactly why that song springs to mind and that's because I do have a thing about umbrellas. Don't ask me why...but I just love images, photographs and umbrellas!

I've even started to collect rubber stamp images, that show umbrellas...I'm obsessed!! But now, you can see why I had to have this stamp from The Greeting Farm...and wait for it...it's called "Umbrella Emma".
When it came to making this card, I really wanted to have Umbrella Emma standing in a shower of rain and to do this, I cut some acetate strips and just dotted little gems on them, then tucked the strips and adhered them underneath one of the matts of cardstock and just left them to dangle to create the effect of falling rain. The image itself was stamped with a Memento ink pad and coloured in with Promarkers but I used a Sakura Glaze Gel Pen on her little boots to give them that shiny finish.

But the real piece de resistance for me, was that backing paper...it's from K and Company and I just love it and it worked so perfectly with this card. To be honest, when we make a card, I know we always say that this one is our favourite but...this one is kind of special and I was so proud of the way it turned out, that I think it will always remain one of my favourites.

I hope you all have a really happy Wednesday and a big hello to my new followers and a bigger thank you to all those who leave comments. They are greatly appreciated and I love hearing from you all!!
Emma
xx

Wednesday, 13 January 2010

On the positive side...

My last post showed a card that I made using the negative image from a sheet of peel offs. So, using the same flower image but this time, the positive image, shows just how versatile these stickers can be.

I think peel offs can make such a stunning looking card and with this card, I really wanted to keep it very simple, elegant and stylish. The image itself is handpainted using Sakura glitter gelly roll pens. Firstly, I apply colour where I want the most dense shade to be and then using a waterbrush, drag out the ink along the petals and this leaves you with a subtle shading in colour. If I want more colour in certain areas then I just apply a little bit more and blend it until I get the correct shades. Once the image is completed and dry, I matted and layered with co-ordinating cardstock and some mirri card. I stamped a swirl using an image from Anna Griffin's acrylic stamp set with a Versamark Dew Drop ink pad in Platinum Planet and finally added a greeting plaque and the finishing touch of some silver gems!


Thursday, 31 December 2009

Happy New Year!


I made these menus for a friend's New Year's Eve dinner party that they're having tonight and seeing as it is NYE, I thought it would be appropriate to share them with you. I handpainted these wonderfully, funny little cat images with watercolours and then highlighted some areas with Sakura glitter pens.

For the menu plaque, I wanted to use a specific colour and as always, no matter how much paper or card I have, and believe me, it's a LOT, I can NEVER find the right piece and shade that I need! So, in this instance, I used ink to paper technique and with the help of a Brilliance Dew Drop ink pad in Cosmic Copper, I found the exact colour I wanted.  After stamping the word menu with my alphabet stamps, I added the final touch of little cat paws as these naughty cats scamper across the card, ready to sing their little hearts out and bring in the next decade....


So, as the final hours of 2009 tick down, I just wanted to say...


Wherever you're going and whatever you're doing...
Have fun tonight, be safe
and
 hope you all have a wonderful, happy and peaceful 2010!!
HAPPY NEW YEAR!!
Powered By Blogger

Total Pageviews