
Today, is the second day of the Simon Says Stamp Believe In You Blog Hop and I'm really excited to be joining so many talented designers as one of the stops on this hop! You can see the fabulous new release in full by just popping over to Simon Says Stamp and if you've been hopping along, you'll have arrived here from Karin's blog but if you've just popped by and want to join us for this fun hop, then just head back to the beginning and Simon Says Stamp's Blog.

For my project, I chose to design a card with one very precious person in mind ~ Mom and used a combination of 3 products from this release ~ the Stripe Jumble Background, the Mom & Dad dies and the Cosmos Stem Die to make a card in the vintage style that I love.

So, let's get started and here's how I created my card...

To begin with I made my background and started by cutting a panel of Mixed Media Heavystock Card to measure, 11 x 14cm. I applied Distress Inks, Antique Linen, Old Paper, Pumice Stone and Frayed Burlap to my glass mat and lightly spritzed the inks with water before dragging the card through the inks, picking up the colour. I always heat dry the first layer of colour before going back for a double dip, or even a triple dip and picking up the remaining colour on the glass mat. Once the card is thoroughly dry, I then inked up the Stripe Jumble Background stamp with Versamark Ink Pad and stamped over the top of the inked card panel. Sprinkle some gold embossing powder over the top and tap away the excess before heat embossing the powder until molten.
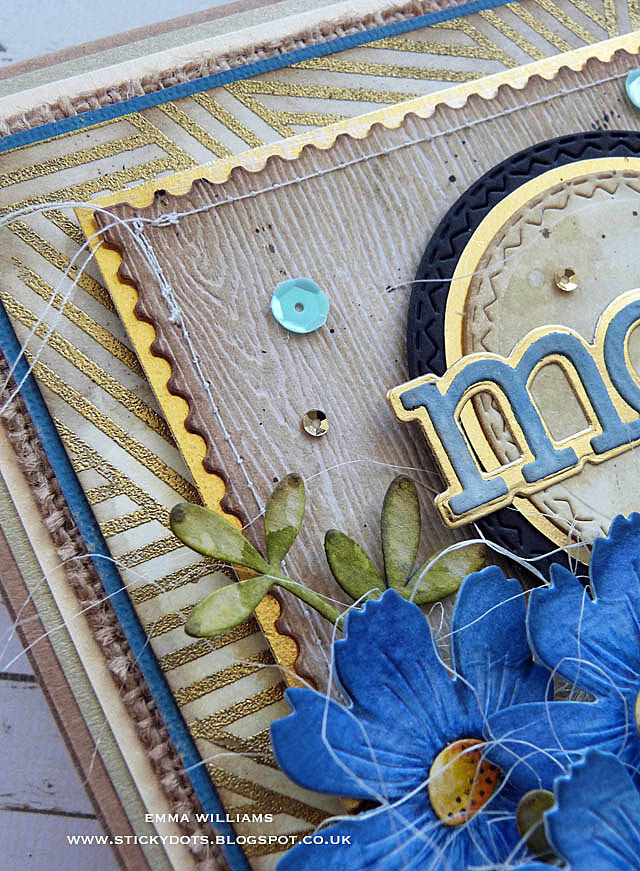
After inking around the edges of the card, I mounted it onto a piece of blue coloured card from Tim Holtz's Classic Kraft Stash Paper Pad, followed by a panel of burlap, cream card and finally a layer of gold card. I then mounted the layers onto a kraft card blank, 16.5 x 13.5cm.
I wanted to add some texture to this piece, so for the final layer I used the Tim Holtz Stacked Postage Thinlits Die set to die (from my own stash) and cut a panel of Woodgrain Watercolour card, and once again applied the inks that I used previously to my glass mat. I picked up the colour with my card and then inked the edges with Walnut Stain Distress Ink before machine stitching around the edge and matting the panel onto gold metallic kraft stash.
I mounted this layer onto the centre of my covered card blank using foam pads to add some height and dimension

Now to create the focal point of this card, and I began by creating the bouquet of flowers using the gorgeous Cosmos Stem Die.
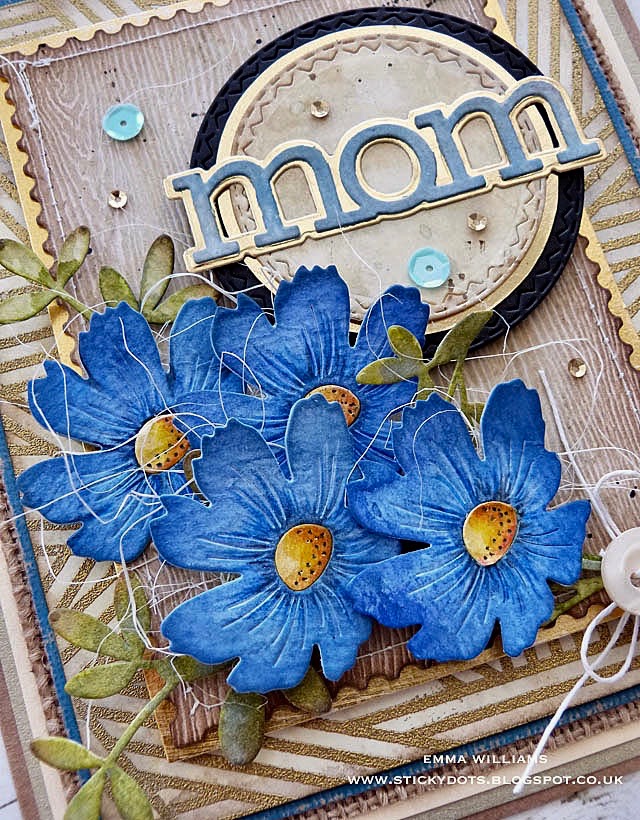
I started by creating the beautiful shade of blue for the petals and applied Faded Jeans and Blueprink Sketch ink pads to my mat. I used exactly the same technique as I used on the backgrounds by spritzing the inks with water before this time dragging watercolour card through the inks, picking up the colours and building up the intensity by double dipping.
Once I was happy with the colour on the card, I used the Cosmos Stem die to die cut four flowers. The centres of the flowers do pop out and because I wanted to apply a different colour to these, I did a make a second cut using white card, popping out the centres from each of the die cuts and colouring them using Fossilized Amber and Wild Honey Distress Marker Pens.
I then placed the centres back into the flowers and secured them with a small piece of tape at the back of each die cut.
I arranged the flowers into a bouquet, adding a few cut Wildflower Stems 2 into the arrangement.

You can add any stems or foliage of your choosing but I had these gorgeous Tim Holtz Wildflower Stems left over from a previous project, and just thought they were the perfect accompaniment to complete the bouquet. As a finishing touch, I tied a piece of twine around the stems before attaching a button over the top of the bow.

To create the sentiment circle, I used Tim Holtz's Stitched Circle dies to cut three layers ~ one large black circle, followed by a gold circle and completing the layers with a circle inked with the Distress Inks that I had used previously on the embossed background and the woodgrain background.
After layering the circles, I then used the Mom die to cut my wording ~ the shadow from gold metallic kraft card and the layered sentiment from Mixed Media Heavystock Card, which I had inked with Faded Jeans Distress Inks.
After layering the sentiment, I attached it to my circular matts before mounting it onto the card blank using foam pads.

Taking the die cut Cosmos Stem bouquet, I attached this across the bottom section of my card, using foam pads on the back to add dimension, placing the arrangement over a bed of floristry sisal fibres, that I have in my stash.

To complete the card, I added some sequins and a little 'thank you' message, cut from the SSS Sentiment Strips, that I attached to my bouquet.

So, I hope you've enjoyed this final stop on the blog hop and loved the card I've made for you.

HOP DETAILS:
Simon Says Stamp is giving away a $25 coupon to every stop on the blog hop! This means you can leave a comment here and on every stop along the way to increase your chances. Winners will be posted on the Simon Says Stamp blog on Wednesday, 31st July. Also, last but by no means least ~ we are also running a special surprise promotion in conjunction with this hop and to celebrate the fact that the amazing Tim Holtz is our current brand of the month, you can claim an exclusive free gift ~ a Mini Distress Resist Spray! The offer is valid until 31st July or while supplies last and no code is required!

HOP ORDER:
Emma Williams (you are here!)
Thanks so much for hopping by today, hope to see you again soon!
Emma xx
RECIPE FOR CARD:
Simon Says Stamp Believe In You Release: Stripe Jumble Background, Mom & Dad and Cosmos Stem
Simon Says Stamp Sentiment Strips
Simon Says Stamp Sentiment Strips
Tim Holtz/Sizzix: Stitched Circles, Stacked Postage Thinlits Die Set, Wildflower Stems 2
Distress Ink: Old Paper, Pumice Stone, Frayed Burlap, Antique Linen, Blueprint Sketch, Walnut Stain, Faded Jeans
Distress Marker Pen Set
Ranger Ink Gold Superfine Embossing Powder
Versamark Ink Pad
SSS Star Spangled Sequins
Distress Marker Pen Set
Ranger Ink Gold Superfine Embossing Powder
Versamark Ink Pad
SSS Star Spangled Sequins
Surfaces: Classic Kraft Card, Mixed Media Heavystock Card, Metallic Kraft Card, Distress Watercolour Card, Woodgrain Watercolour Card, Black Card, Burlap Hessian Sheets
Foam Pads
Twine
Big Shot
Foam Pads
Twine
Big Shot
Heat Gun
button and sisal fibres from my own stash
button and sisal fibres from my own stash


