Showing posts with label 2017 Halloween Inspiration Series. Show all posts

Tuesday, 31 October 2017

Happy Halloween...

Hello friends...

It's hard to believe that we're at the end of October already ~ where has the last month gone? In fact where has this year gone? But because it is the last day of the month and because it's Halloween, I thought today seemed like the perfect time to share a round up of all the projects I made for the Tim Holtz Inspiration Series. I have had the best time and so much fun working on all of these projects and I just want to thank Tim, Paula and Mario for inviting me along to join them on this spookalicious journey!

So, I hope you enjoy taking a look back at all the projects and Happy Halloween everyone...have fun and stay safe!


Love Emma xx

Wednesday, 25 October 2017

Found Curiosities...

Hello friends...

Hope you've all had a great start to the week and thank you so much for all the lovely comments you left on my last post...it's always such a joy to read them all!

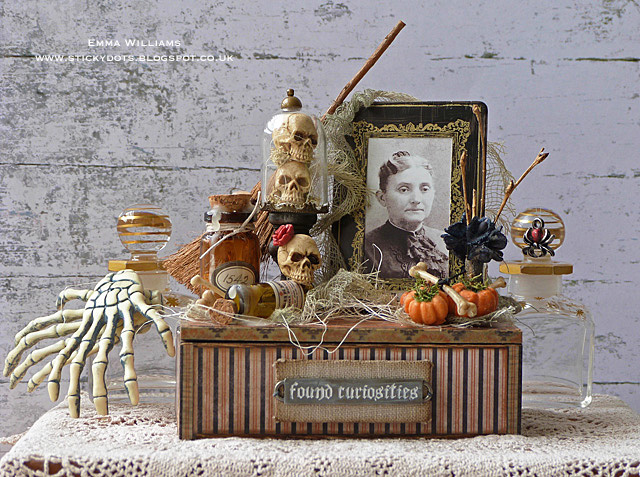
Today, I'm sharing another of the projects that I created for the Tim Holtz Halloween Inspiration Series ~ my Found Curiosities Box which I created as a piece of home decor and filled with a little surprise of some chocolate treats.


The Vignette Box and Vignette Panel are both covered with papers from the Halloween Paper Stash and I covered the box, inside and out, attaching the papers with Matte Collage Medium.
The top of the box is just packed full of Tim's idea-ology products from the Halloween release ~ the mini pumpkins, boneyard findings, those awesome resin skulls and one of the broomsticks, which are all laid out on a bed of cheesecloth dyed with Pumice Stone and Antique Linen Distress Spray Stains.
For the little corked vials, I crackled the glass on the outside with Rock Candy Crackle Paint and then filled them before then adding the labels. To complete the bottles, I added dripped candle wax over the tops, letting it pour down the sides.
For the frame, I used one of the Framed Portraits and added an easel stand to the back, which allowed the frame to be freestanding...
...I also added a small vase of bouquet findings, dyed with a combination of Chipped Sapphire and Black Soot Distress Spray Stain. I arranged the flowers with some twigs from my garden and hung one of the spiders from the Halloween Adornments.

To complete my box, I attached a Halloween Word Band to a piece of chipboard, covered with linen and adhered it to the front of my box.
Finally, all that's left to do is fill the box with chocolate or candy. I found some chocolate coins in my local supermarket, which I thought worked so well as it looked like it had been stashed away as part of Mrs, M. E. Drury's dowry...
Thanks so much for stopping by today and I hope you've loved this project and I've inspired you with some of my ideas.

See you again soon...Emma x

All Tim Holtz products used in this project are available from Simon Says Stamp

Friday, 20 October 2017

Foolish Mortals...

Hello everyone...

Today, I'm sharing my Foolish Mortals framed panel which I made for the Tim Holtz Halloween Inspiration Series, inspired by the wonderful photograph from the Ancestor Paper Dolls set and telling the story of  Til' Death Do Us Part.
The panel itself is one of the large framed panels that from Tim's idea-ology range and I started this project by painting the frame itself. First, I gave both pieces, the frame and the edges and back of the backing panel, a coat of black gesso ~ this will prime the wood ready for my paint. Then, once the gesso was dry, I used Black Soot Distress Paint over the top of the gessoed surface.

I allowed the paint to dry thoroughly before then dry brushing the wood with a combination of Brushed Pewter Distress Paint and a touch of gilding wax, just to accentuate the beading.

For the next stage, I used paper from the Halloween paper stash, cut it to the size of the backing panel and then attached it to the panel using Matte Collage Medium ~ at this stage I also applied a coat of the medium over the top of the paper.

To create the inner layer of the frame, I then attached Designer Tape, ensuring that the tape was in the right place and would just show around the edge when I attached the frame over the top.
I now have my base to work with and the next layer is that gorgeous cobweb layer. The cobweb is die cut from black card and then embossed with a layer of Liquid Platinum Embossing Powder. Repeat the embossing a couple of times, to create a thick enamelled look to the die cut but on the final layer, sprinkle over a small amount of black embossing powder before heating the powders to become molten and shiny.

I attached the web to the top section of the frame using collage medium.

For the base of my panel, I used some more of the paper, this time the newsprint design, from the Halloween stash and rolled it up to create scrolls. I then attached the scrolls to the bottom section of my panel, over a bed of cheesecloth which I dyed with Pumice Stone and Antique Linen Distress Spray Stain, arranging the cloth so that it would also lie underneath the layers I was about to add. I also attached one of my favourite pieces from the Halloween release, those amazing skulls!
Moving onto the next section, I now created my coffin lid and for this, I used the lid of the Vignette Coffin Box as a template. I drew around the outline of the lid onto chipboard which I had covered with the wood effect paper from the Halloween Paper Stash. I then cut the coffin lid shape from the chipboard and added extra strips to create the look of wooden planks that would be nailed down onto the lid.

To complete the lid, I added a spider remnant rub and some small brads that I painted to create the look of rusty nails before attaching this section onto the background using foam pads to create dimension.

I then added my Ancestor Paper Doll and a Halloween Clipping Sticker over the top of the photo.
As for the all important finishing touches, I used one of the Halloween Word Bands, altered with Picket Fence Distress Paint and attached it to a piece of chipboard covered with linen. I adhered this to the top corner of my framed panel using foam pads and added a spider from the Halloween Adornment set, painted with Distress Paints, to just crawl out from underneath the band.
...and finally, I used some of the Bouquet Findings, spritzed with a little Antique Linen Distress Spray Stain and a tag, complete with Remnant Rub.
Thanks so much for stopping by today and I hope you've loved the creative process behind this project...it was definitely one of the favourite pieces I made!

See you again soon...Emma x

 Cheesecloth and chipboard from my own stash

Tuesday, 17 October 2017

Wicked...

Hello friends...

Hope you've all had a good start to the new week and you're enjoying Tim Holtz's Halloween Inspiration Series and been inspired by all the wonderful projects that have been shared by some very talented designers! You can catch up with all the projects over on Tim's Facebook and Instagram pages.

Today, I'm sharing my Wicked project ~ a wallhanging that would be perfect to display amongst all your Halloween decorations and at the end of the post, I will include a list of ingredients I've used to create this piece and I hope you'll be inspired by some of the tricks and treats along the way that can be used on your projects, whether they are home decor or cards...

So, here we go...the creative cauldron is bubbling and here's how I created this project!

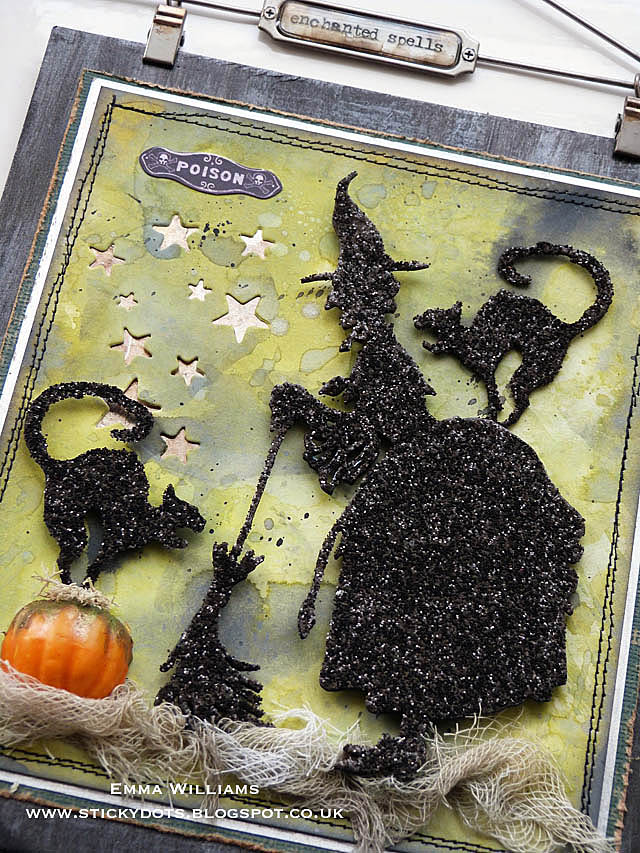
To begin with I cut two panels of mixed media heavy stock card, 16 x 13cm and the second, 6.5 x 13cm...this is a perfect weight of card for this project and technique that I'm going to use.

To get that gorgeous wicked green background colour, I used Distress Oxide Ink Pads and applied a combination of Peeled Paint, Twisted Citron and just a touch of Iced Spruce to my craft sheet. Mist the ink with water and then taking your panels of card, swish the card through the inks, picking up the colour. Heat dry the inked card and if you need to pick up more colour from the sheet, go back into the ink, to layer the colours of ink.

Once I was happy with the colour, I heat dried the card thoroughly and then inked the edges with Black Soot Distress Ink.

Taking the larger piece of card and using the stars from the Witchcraft die, place the die in the top left hand corner of the card and run it through the machine to cut the stars into the card.

Machine stitch a 'wonky' border around the outside of each panel of inked card and then matt the card onto metallic kraft stash. The die cut stars on the larger piece of card, now shine through.
To complete the larger panel, matt the layers onto a piece of green classic kraft stash, distressed around the edges. I then attached both of the panels to the backing which I created from a piece of thick chipboard, again cut into two separate panels ~ 16 x 18cm and 8 x 14.5cm. I painted the chipboard with two coats of Black Soot Distress Paint and then once those layers were dry, I dry brushed, Brushed Pewter Distress Paint over the top to create a worn effect to surface.

Die cut the witch and two separate images of the cat from black card and run the die cut images through a Xyron machine, applying a layer of the adhesive to the side that you want uppermost ~ as you can see from the picture below, I reversed the die cut of the two cats, so that they face opposite ways! Sprinkle the images with Black Soot Distress Glitter and tap away the excess.
I attached the glittered images to the larger panel using foam pads to create dimension and added one black cat onto a pumpkin piece which I sliced in half and fixed directly onto the card using Collage Medium.
Add a bed of cheesecloth, dyed with Pumice Stone and Antique Linen Distress Spray Stains, to ground the images and to complete this section, I added a Ephemera piece in the top left corner.

For the lower panel, I used the Wicked die from the Vintage Spirits die set and again cut the wording from black card. I then used the same technique to emboss the lettering as I used on the Ornate Owl in this post, click HERE.
To complete the smaller panel, I attached the stars that were originally cut from the large piece of green card and used Collage Medium to secure them into place.

Finally, I punched two holes into the bottom of the large panel and two holes in the top of the small panel, aligning the holes on each of the panels so that they would hang straight. I added the mini book rings through the holes, joining the separate panels together.
As a finishing touch, I used one of Tim's Display Hangers, clipped it to the top and then used a Remnant Rub, "enchanted spells" to complete the wall hanger.

Thanks so much for stopping by today and thank you to everyone who has taken their time to leave me a comment on all the recents shared posts...it means so much to me to read them all!
See you soon...Emma x


Cheesecloth and chipboard from my own stash

Friday, 13 October 2017

The Hallowed Spot...

Hello everyone...

Today, I'm back with another sample that I created for the Tim Holtz Halloween Inspiration Series and if you follow Tim on Facebook and Instagram, by now you have probably seen the inspiration series and seen all the wonderful projects by many talented designers but if you haven't you can always catch up with a recap each Saturday on Tim’s blog.

For this project, I used the beautiful Ornate Owl die from Sizzix, together with the Cobweb die which I have found so useful, for so many of my projects during the Halloween run up and I hope you enjoy all the photos in this post, showing you all the close up detail of The Hallowed Spot. I'm not going to do a full tutorial for this post but I am going to share how I created the enamel effect on the die cut...
So to begin, I die cut the owl itself from black paper which I then embossed to create this beautiful glossy enamelled look to the owl. To do this, I applied clear embossing ink in a dabbing motion, over the top of the die cut before sprinkling it with clear embossing powder and heating it to become molten. I repeated this process another 4 times to create the thick enamelled effect. For the final layer, I added a sprinkling of gold embossing powder to random areas and then heated it for the final time.
As you can see, it gives such a wonderful effect and also creates a really substantial die cut. I then backed the die cut owl with a silver deco sheet, which had Cranberry. Eggplant and Gold Mixative alcohol ink randomly applied to it, mainly concentrating around the body area of the owl. To complete my die cut, I added a Halloween Token to the body, altered with Picket Fence Distress Paint.
For the background, I used a circle of black card and Antique Linen Distress Oxide Ink. I applied the ink to my craft sheet, misted it with water and just dragged the card through the ink, picking it up in random areas ~ I don't want the ink to cover the whole piece of card, I just want it to create the look of a misty night sky. I heat dried the card and matted it onto gold and black card layers to create a border. I added the cobweb, cut from silver metallic card and altered with Mushroom and Latte Alcohol Ink which I then attached to my background using Collage Medium.
I then attached my owl die cut over a bed of cheesecloth, dyed with Pumice Stone and Antique Linen Distress Spray stain, and added a twig from my garden for him to perch on.
To complete the panel, I used Mirrored Stars and a spider from the Halloween Adornments set, and stuck them around the image...
... before finishing the project with a Halloween Clippings Sticker!
Thank you so much for popping over to my blog today and thank you for all the lovely comments you've continued to leave on the projects that Tim has shared.
See you soon...Emma x


Cheesecloth, black card, twig ~ all from my own stash


Wednesday, 11 October 2017

The Witching Hour ~ Tim Holtz Halloween Inspiration Series 2017

Hello friends...

Thank you so much for all the lovely comments I received about the projects I shared on Monday, I really do appreciate every single word and it means the world to me! Today, I'm back to share another project that I made for Tim's Halloween Inspiration Series ~ The Witching Hour, which some of you will probably recognise from Tim shared this on his Facebook and Instagram pages last week!

Since then, I've had quite a few messages and emails asking me if I would share how I created the texture on the outside of the clock, so I thought I would concentrate on that in this post because once you have that technique, then you can fill the clock with anything you choose!

To begin with I took the clock apart, piece by piece ~ I recommend that you keep all the screws and individual pieces together as you remove them from the clock...this will mean it's easier to piece it back together when you finally assemble the painted section of the clock. You also won't be needing the glass front or the attachments for the glass, on this project, so these can be put to one side.

I then painted all the metal sections of the clock, inside and out, with a couple of coats of gesso, allowing each layer to dry in between.

When the gesso is completely dry, I then smeared some Grit Paste over the gessoed surface ~ I used my fingers for this as it gave me more control over the paste ~ I purposely didn't cover the whole clock in the paste, I left some areas smooth. Leave the paste to dry, I left it overnight before then painting all the individual pieces of the clock with Black Soot Distress Paint.

You might need to apply a couple of coats of the black paint to give a solid coverage and at this stage, I also painted the inside rim of the clock.

When the painted surface is dry, I then dry brushed the surface with a little Antique Bronze distress paint, allowing it to pick up the texture of the Grit Paste but not giving a solid finish!
Finally, I used the lightest touch of silver gilding wax which will accentuate some surface areas. 
Now that the paintwork of the clock is complete, it's time to assemble the clock and put it back together, but don't attach the back of the clock at this point as I would recommend that you do some of the work for the inside now!

At this stage, I cut a circle of paper from the Halloween Paper stash by tracing around around the circular back cover of the clock and then I fixed the paper to the back wall of the clock using Collage Medium. I also added my lantern at this stage, attaching it in place using Collage Medium.

Now that this part is done, I gently eased the back cover onto the painted clock but allowed the wire of the lantern to trail outside. This can then be attached to the battery box which I fixed to the back of the clock, so it's easily accessible.

To decorate the inside of the clock,  I used dyed cheesecloth (dyed with Pumice Stone and Antique Linen Distress Spray Stain), floristry fibres and moss, which created my layers in the bottom of the clock and then attached my witches into place...these are actually secured onto an old cotton reel, which I then attached to the back wall of the clock, allowing the witches to stand proud at the front. I then added the various items from Tim's Halloween release and layering them behind and around the images to create dimension and to build up the layers. 

As the final touch on the inside, I added a Halloween Clippings Sticker.
To complete the outside, I added a key adornment, slightly altered to create a more vintage look and attached it to some chain, which I then twisted around the key and also added a halloween token and a spider form the halloween adornments set...
...before finishing the project with a skull, attached with Collage Medium and sitting proudly on the top of the clock.
I hope you've enjoyed how I created this project and it's definitely going to be displayed proudly amongst my Halloween decorations ~ I just love how the lantern glows from inside and creates a warm ambience to the witches market...
Thanks so much for stopping by today and I'll be back soon to share more of the projects I created for this series and don't forget you can catch up with all the projects and inspiration from the talented groups of designers, over on Tim's blog.

See you soon...love Emma x

Cheesecloth, moss, sisal fibres and chain from my own stash

Powered By Blogger

Total Pageviews