Hello everyone...
Hope you're all having a great start to the week and had a good weekend! If you watched Tim's LIVE Watercolor Extravaganza over on his YouTube channel, then I hope it's inspired you to create some projects using these amazing pencils which are available to purchase from Simon Says Stamp.
As always, a Monday brings a brand new Simon Says Stamp Monday Challenge and this week, our theme is called TIE IT UP and we would love to see how you use ribbon, twine and all things that tie in your projects ~ so, hope you'll come and join us and play along!
Now you can't help but notice that this week, love is in the air and with Valentine's Day on Wednesday, it gave me the opportunity to make one last make from the heart and I chose to create some hand stamped gift wrap, using the Stampers Anonymous Love Notes Stamp Set from Tim Holtz, and these are all tied up with ribbon and twine, and come complete with little love notes.
So here we go...love is in the air and it's time for me to share how I created these projects.

For this project, I used a roll of kraft gift wrap that I had in my stash and combined this with the miniature envelopes, that I cut from Kraft Cardstock using the envelope thinlits die in the Sizzix Postale Thinlits Die Set by Tim Holtz.

GIFT WRAP
We'll start with the gift wrap and as mentioned, I used some kraft gift wrap that I had in my stash. I cut a piece from the roll and placed it on my glass mat before inking up the hearts in the Love Notes Stamp set with Barn Door Archival Ink.
I wanted this deep red on my paper but will admit, when I initially stamped the images onto the kraft paper, they were slightly brighter but as they dried, they became a bit darker...so, if you want your paper to be brighter, then test the ink on a spare piece before stamping the whole sheet.
I used a combination of three different hearts, all different sizes and just randomly stamped a pattern.
Once I was happy, I then stamped the 'xoxoxo.' sentiment in the spaces in between. For this I actually used Picket Fence Distress Paint, applied to the mat. I then brayed the paint to provide a thin layer and dipped my stamp in and out to give a complete coverage before stamping directly onto the paper. I kept repeating this process until I had filled in the tiny spaces between the hearts and had the design I was happy with.

The gift wrap is ready and my presents are all wrapped up, ready for their bows and ties....
BUNNIES
...but before I get to each present. I made my little bunnies.

Both bunnies are created the same, just the addition of the glasses and the bow.

I began by cutting all the pieces for each bunny using the Vault Bunny + Chick Thinlits Die Set, and with all my die cut pieces placed on my glass mat in front of me, I inked each individual piece using the following Distress Inks and the brand new, dinky little tiny blending tools, which are perfect for this job:
Frayed Burlap, Gathered Twigs, Spun Sugar, Kitsch Flamingo
After inking the edges with Walnut Stain Distress Ink, I layered the pieces to create the bunnies. I finished each bunny by die cutting the eyes, nose and mouth from black card and then added tiny whiskers with a black pen.
On the Mr Bunny, I added a pair of glasses, again die cut using the die that is in the Bunny + Chick Die Set...

....and on Mrs Bunny, I added the bow which was cut from a leftover scrap that I had in my scrap box.

After attaching each of these accessories, I'm ready to begin to add the ribbons/rope twine and make the love notes to add to each gift.

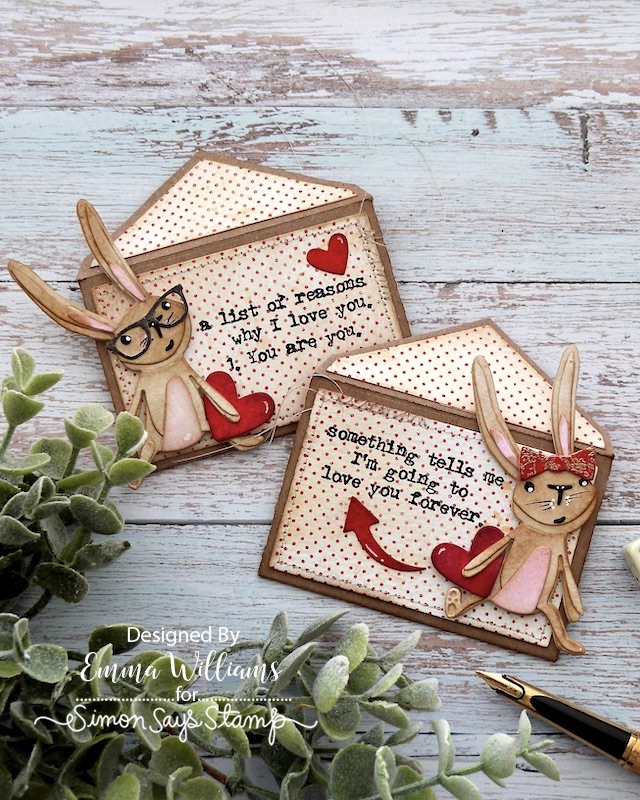
GIFT and LOVE NOTE 1 ~ MRS BUNNY
For the first present, I tied this with some beautiful ribbon from Prima. I chose the off white and wrapped it around the present, creating a big bow.

I then placed two vintage pins into the knot. These are from my stash, and have a very special place in my heart as they're from my Nan's sewing box.

The gift is now ready for it's love note, die cut from kraft heavystock card, using the Postale Thinlits Die Set.
After folding along the scorelines, I used red line tape to attach the flaps, leaving the top flap open for the secret note.
On the front of the envelope, I cut a second panel using the rectangular die in the same Postale die set, and cut this from Watercolor Distress Card.
I then spritzed Antique Linen over the card, wiping away the excess ~ I just want to knock back the whiteness of the cardstock.
Using the dot background stamp from the SA Dot and Floral Stamp Set by Tim, I inked this with Barn Door Archival Ink and stamped the background over the die cut panel.

I then stamped my sentiment in Black Soot Archival Ink, using the sentiments stamps in the Love Notes Stamp set ~ "something tell me I'm going to love you forever".

To complete the panel, I machine stitched a border around the edge and attached this to the front of the envelope before placing Mrs Bunny onto the right of the sentiment.
I added a medium sized die cut red heart in her paw and then the only difference on this envelope is the swoosh. This is die cut using one of the dies from the Postale Thinlits Die Set and cut from the same red card as the hearts.

To complete the envelope, I added a matching dotty stamped panel to the flap. Below is the panel attached to Mr Bunny's envelope.

GIFT and LOVE NOTE 2 ~ MR BUNNY
I tied rope twine around the second present, and once again stuck some vintage pins into the knot but this time, I hung a heart adornment from the pin.

The pin itself is painted with Lumberjack Plaid paint to accentuate the heart and I then dry brushed a little Black Soot over the top before applying gilding wax from my stash.

The Love Note is created in exactly the same way as the previous note but this time I stamped the sentiment from the Love Notes stamp set, stamping it on the left hand side. This sentiment says, "a list of reason why I love you. 1. You are you". I am a huge fan of Tim's sentiment stamps and he always knows exactly the best quotes to use and this really was perfect.

After attaching Mr Bunny to the envelope, placing him on the left hand side, I placed a medium sized heart in his paw and then also added a smaller red heart just above the sentiment.

All of the die cut hearts are die cut from Mixed Media Heavystock card coloured with Lumberjack Plaid and Barn Door distress spray stains, and cut using the hearts from the LoveBirds die set.
We're nearly there but there's one last thing to share...the secret note!
SECRET NOTE
This final piece is to pop into the envelope and is created using the same die as I used on the fronts and I stamped it with the same stamp.

I then stamped the sentiment, again from the Love Notes stamp set and added another swoosh and a tiny heart.

Finally, I punched a hole through the top left corner and added an eyelet before threading some twine through the hole.

...and that completes my project, made with love!
I hope you enjoyed the creative process for these makes and it might inspire you to create some handmade Valentine gift wrap and love notes for the loves of your life, or maybe for a friend or family member.


As always, if you make anything, or if you've been inspired by anything that you've seen here on my blog ~ then please, let me know by tagging me on social media or leaving a comment here and I will be right over to take a look! Also, if you have any questions, then please...just ask away!
Don't forget that every week, one lucky random participant has the chance to win a $25 gift voucher from Simon Says Stamp and you can join in up to 5 times, which means you could have 5 chances to win. You have until next Monday at 8am Ohio time. 1pm UK time, 2 pm CET to join in and good luck....
Thank you so much for taking the time to stop by today...see you all again very soon!
Love Emma xx
Recipe for project:
Distress Inks: Walnut Stain, Frayed Burlap, Gathered Twigs, Spun Sugar, Kitsch Flamingo