Showing posts with label ephemera. Show all posts

Monday, 15 December 2025

Hello, Santa Claus...

 Hello everyone...

Well, there's not long to go until the big day and as we begin the new Simon Says Stamp Monday Challenge, I thought our challenge theme was the perfect chance to share some Tim Holtz Idea-ology inspiration. As you know, I love all of Tim's products from mediums, and Sizzix Dies to Stampers Anonymous stamps, but my one true love is idea-ology and with the theme in mind, I chose to create a vintage style panel all about the night before Christmas, that will be perfect to display throughout the holidays...

So, let's get started because it's time to share all the details of how I created some Christmas magic...

To begin with I have a recent post that will help with how I created some of the sparkly magic for the Woodland Garland and you can find that post if you click HERE.

PANEL & FACADE

For this make, I used the larger sized Rectangular Etcetera Panel and began by covering the edges with Design Tape. I still have some of the Christmas Design Tape that is now sadly retired but any design will do, it's really only there to give a nice finish and cover those raw edges.

With my tape in place, I started selecting some of the Collage Strips that I would be using on both the panel and the facade. The strips need to be cut into sections so that they will fit both surfaces perfectly, so you might have to play around with these to get the perfect fit but once you have chosen the pieces, I adhered them to each surface using Matte collage Medium. I also added a coat of the medium over the top of each piece to seal them.

To cover all those joins and to give this piece that vintage touch, I used the Walnut Stain Distress Crayon around the edge of the panel and facade and also applying it between each of the joins of the Collage Strips. Blend out any harsh line of crayon with your fingertip.

The panel is now complete and can be set to one side whilst we add the finishing touches to the facade.

Behind the aperture of the facade, I cut and adhered a piece of Christmas Backdrops paper. At this stage, I also adored a panel of Heavystock Mixed Media card to the back of the facade, as this will help to give a bit more stability to the paper. Once again I used the Walnut Stain Crayon around the edges, blending out any harsh lines of colour.

I attached some Screw Heads around the top edge of the facade and then added an idea-ology Mini Flair Pin that I had in my stash. To complete the facade, I applied some Snowfall Grit Paste around the top and down the sides, and then sprinkled Chunky Rock Candy Glitter over the top. Set aside to dry.

Attach the risers from the Etcetera Facade pack to the back of the facade itself and then attach this to the Etcetera Panel using Matte Collage Medium and allowing the facade to slightly overlap the top edge of the panel. I always add a weight over the top to ensure every section of the facade, adheres to the panel.

Underneath the facade, I added two Scalloped Etcetera Trims to form a ledge. 

I used the Decorative Trims die to cut some Christmas Backdrops Paper to cover each trim and then placed the trims to form a 'L' shape, before adhering them to the panel and then applying Crackle Paste onto the top of the ledge. I allowed for this to dry before adding a good amount of Snowfall Grit Paste. Again, you need to allow this to dry....

To complete the facade, I adhered two stamps from the Ephemera Pack onto the right hand side and added a Remnant Rub, before attaching some Cello Sticker Tape as a finishing touch.

Along the ledge, I added a good amount of Snowfall Grit Paste and then set this to one side to dry whilst I move on to the embellishments.

WOODLAND GARLAND

To colour and add some sparkle to the Woodland Garland, you can pop on over to my post and see exactly how I created this. Once you've got the perfect colour and a good amount of sparkle, then all I did was to shape the garland by manipulating the wire and then attach it with hot glue. I placed this underneath the ledge.

BUILDING THE SCENE

We're now ready to bring this story to life and for this, I began by attaching the Santa from the Layers and Paper Dolls pack, using foam pads to add some height and dimension to the piece.

Using two of the candy canes from the idea-ology Confections pack, I attached these to either side of the facade. Each candy cane has been smeared with Glossy Accents and had a dusting of Crystal Rock Candy added.

Around the base of each candy cane, I added some idea-ology 'bubbles', again smeared with Glossy Accents before having their sprinkle of Rock Candy added over the top.

I attached the sparkly bubbles using Glossy Accents and then, attached two of the poinsettias from the Layers and Paper Dolls pack to either end of the ledge, placing them over the top of where the garland is attached.

Finally I drizzled Glossy Accents over the top of the dried out Snowfall Grit Paste, and sprinkled some Mica Flakes over the top. I also added some flakes and rock candy to the poinsettias.

I also added some flakes around the top edge of the Christmas Tree that Santa is holding...

We're nearly there and all that's left is the Christmas Greetings sentiment, which is from the Chrismtas Ephemera pack. I adhered this to a piece of mount board, and then attached it to my panel, placing it underneath the garland.

After a gentle splatter of white acrylic paint, my panel is complete and I hope you've enjoyed the process and all the little tips and techniques that I've shared to bring this piece to life.

As always, if you make anything, or if you've been inspired by anything that you've seen here on my blog ~ then please, let me know by tagging me on social media or leaving a comment here and I will be right over to take a look!

Don't forget that every week, one lucky random participant has the chance to win a $25 gift voucher from Simon Says Stamp and you can join in up to 5 times, which means you could have 5 chances to winYou have until next Monday at 8am Ohio time. 1pm UK time, 2 pm CET to join in and good luck....


Thank you so much for taking the time to stop by today...
Love Emma xxx

Monday, 11 December 2023

Candy Cane Lane...

Hello everyone...

Can you believe just two weeks to go to the big day?!?! If you're like me, it's crazy busy getting ready for Santa's visit! There's still so much to do but the list is getting a little less day by day and the trees are up, and the house is all decorated!

In the meantime, we have 3 more Simon Says Stamp Monday Challenges before the end of the year and this week's challenge is all about "USING DIES IN DIECEMBER" and of course, the DT are using are very own SSS dies on their makes!

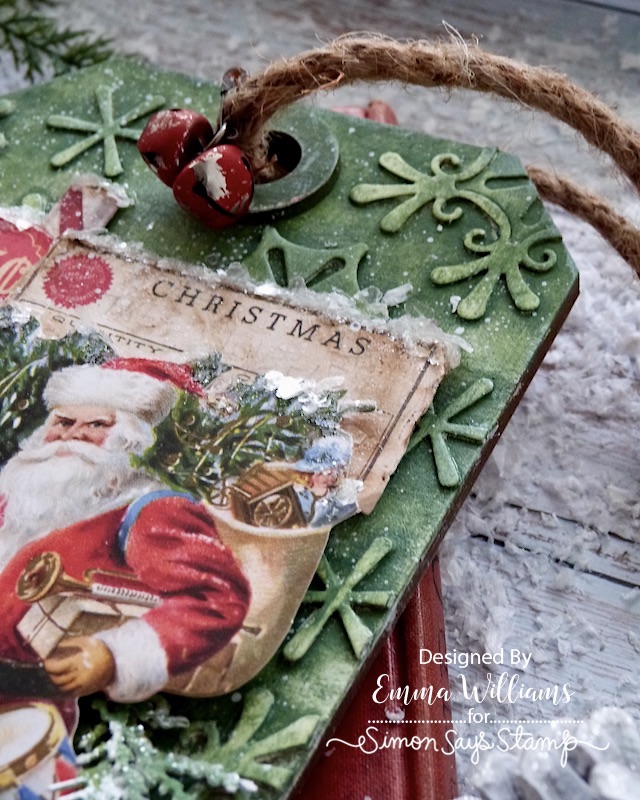
For my project, I chose to make an Etcetera Tag and used the beautiful Fretwork Snowflake die to make my background for this vintage style make.

So, let's get started, it's time for Santa to start checking his list to see who's been naughty or nice!

TAG BACKGROUND

We'll begin with making the background for the tag and as I've mentioned already, this uses that gorgeous Fretwork Snowflake Die. I meant to take a photo of the background before I covered it, I always hate doing that but you know me, I love to layer and it had to be done!

I started by die cutting the snowflake and all the separate pieces that I've used are cut in one pass. You will only use the snowflake for this make, but I just saved the negative waste part to use another time.

After I had cut enough of the separate pieces, and at this stage, I did cut extra of the tiny snowflake in the centre ~ I layered all the individual snowflake pieces over the top of one another to form the background. Each of the snowflakes has three layers which I adhered over one another to form this raised design on the tag.

Once dry, I applied a layer of white gesso over the entire tag, allowed to dry and then painted the tag with Rustic Wilderness Distress Paint. Working quickly, and just allowing the paint to become slightly tacky, I took a semi damp baby wipe and used this to remove some of the paint from the surface. Don't oversaturate the tag, you only need to remove some of that colour.

You will see how this technique creates the pockets of light and dark areas around the snowflakes on the background of the tag.

Heat dry the paint and then taking a paint brush dipped in gesso, remove some of the paint from the bristles and dry brush over the top of the raised areas, leaving just a kiss of paint on the background. If you feel any areas need more of the Rustic Wilderness paint, just go back in and repeat the process until you're happy, or you can use the Rustic Wilderness Distress Crayon if you prefer.

Once the background was dry, I added the hole reinforcer piece, which I painted with the Rustic Wilderness and dry brushed with gesso before attaching it to the tag using Matte Collage Medium.

The tag is now ready for the embellishments....

SEASONS GREETINGS

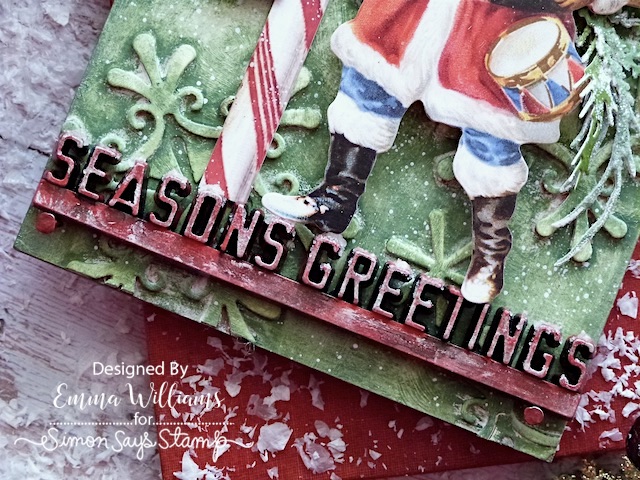
Along the bottom of my tag, I used one of my all time favourite Tim Holtz idea-ology pieces ~ FESTIVE MARQUEE! This is such a gorgeous piece and I've already made sure I have a stash of these, even if I never use them and just stroke them for the years to come, I needed them!

I wanted to alter the colour of the metal and chose to paint it with Candied Apple Distress Paint. I did this in quite rough way, not covering every piece of the metal, leaving some areas of the original colour showing through. I then left this to dry before applying a small amount of Sterling Foundry Wax. I just applied this to areas of the metal piece, you don't want a complete coverage, you need that red to be the dominant colour. After heat setting the wax, I then drizzled Mushroom Alcohol Ink over the top.

Attach the festive marquee piece across the bottom of the tag using Matte Collage Medium.

Finally, I hammered two Nail Tacks into either side of the tag, placing them just underneath the Festive Marquee metal piece, and then painted them red to match.

LAYERS

Now for the layers and I started by collating all the pieces that I wanted to use from Tim Holtz's Ephemera Pack and Layers and Paper Dolls Pack. The labels and stamp come from the ephemera pack, the candy cane, Santa and poinsettia are all from the layers pack.

I then arranged all the pieces behind Santa onto my tag, using various depths of foam pads to create the dimension and placing any of the more flimsy paper pieces from the ephemera pack onto mountboard to make them more substantial when attaching them. I inked the edges with Gathered Twigs Distress Ink and also dipped the pieces into some inky droplets of the same colour to create a more vintage feel.

Once all my layers were fixed into position, I used the splatter brush to splatter gesso across the surface of the tag and blasted them with the heat gun to dry it thoroughly.

To add the frosty snowy feel to this piece, I applied some Snowfall Grit Paste along the top edges of the layered ephemera and then drizzled Glossy accents over the paste, before sprinkling Mica Flakes on top. Tag away the excess flakes and leave to dry. 

At this stage, I also added some of the paste along the Festive Marquee piece.

Now it's time to place Santa in the foreground and once again, I used foam pads to add the dimension, placing his feet on the top edge of the metal sentiment.

GREENERY

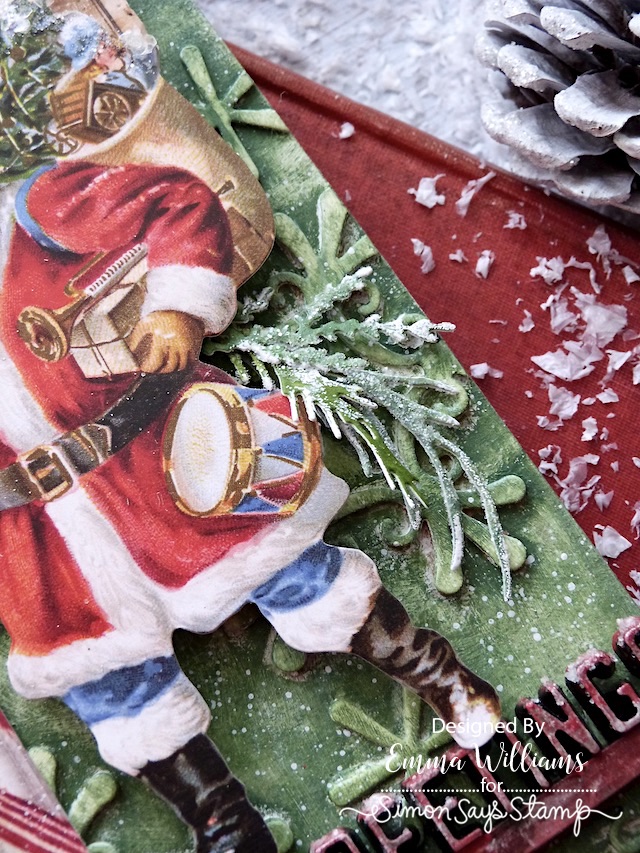
To add more texture to this piece, I used some Sizzix die cut greenery which I placed on the left and right hand sides of the arrangement.

I inked some Heavystock card with the following Distress Stains:

RUSTIC WILDERNESS, BUNDLED SAGE, ICED SPRUCE

...and once the card was coloured, I cut all my foliage using the Tim Holtz Holiday Brushstrokes 3 die set by Sizzix.

Once I had my selection of greenery, I started to add the snowy effect to each piece.

This is achieved by lightly dabbing the edges of the die cuts with the Embossing Dabber and then sprinkling white embossing powder over the wet ink. Tap away the excess, and heat emboss. Once the powder is cool, rub Matte Collage Medium over the pieces, and sprinkle with Rock Candy Distress Glitter. Repeat with all the other pieces and then set them to one side to dry.

Once these pieces were ready, I added them to my tag, arranging them on either side of Santa.

FINISHING DETAILS

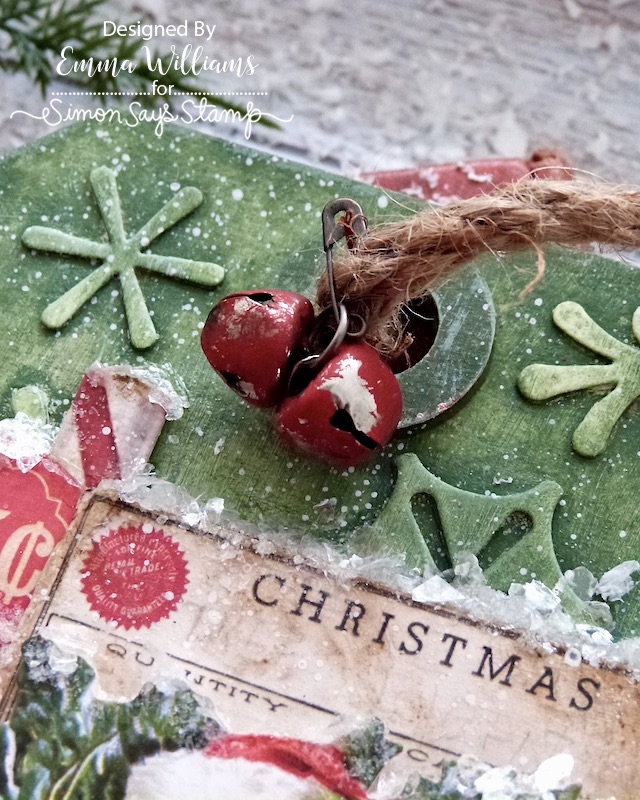
For the final details, I threaded some rope through the hole at the top and then attached two of the Holiday Bells which I painted red using the same technique as I used on the Festive Marquee piece.

Clip these onto the rope using a Mini Pin.


So that's my make complete and I hope you love how I created the background and enjoyed seeing how I made this piece. Santa is now ready to walk down Candy Cane Lane bringing joy to everyone....

As always, if you make anything, or if you've been inspired by anything that you've seen here on my blog ~ then please, let me know by tagging me on social media or leaving a comment here and I will be right over to take a look!

Don't forget that every week, one lucky random participant has the chance to win a $25 gift voucher from Simon Says Stamp and you can join in up to 5 times, which means you could have 5 chances to winYou have until next Monday at 8am Ohio time. 1pm UK time, 2 pm CET to join in and good luck....


Thank you so much for taking the time to stop by today ~ stay safe and keep well.
Love Emma xxx

Recipe for project:

Simon Says Stamp: Fretwork Snowflake
Tim Holtz for Stampers Anonymous: Mini Etcetera Tag
Distress Paints: Rustic Wilderness, Candied Apple
Distress Inks: Gathered Twigs
Distress Spray Stains: Rustic Wilderness, Iced Spruce, Bundled Sage

Monday, 23 October 2023

That Old Black Magic...

Hello everyone...

This week over on the Simon Says Stamp Monday Challenge Blog we are getting ready for some Halloween tricks and treats with our SPOOKY theme and whether you enjoy the darker side or the fun side of this season, we would love for you to join us and play along.

Now I'll admit that I do like the wicked side of Halloween and for my make, I chose to create a display panel using Tim Holtz Halloween idea-ology because when it comes to this season, Tim always brings us the very best Halloween products.


So, let's begin to make this dreadfully wicked piece...

For this make, I used the larger sized Etcetera Panel from Stampers Anonymous and I applied the crackle design from last year's Halloween Design Tape around the edges so that it gives them a nice finish.

COVERING THE PANEL

Taking a panel of paper from the Halloween Backdrops pack, this one was the design that looked like a book cover, I cut it down to fit the panel, but took the piece that I've cut away and placed this along the bottom so that it has the frame showing all the way around and would look like a cover of a book.

I made some rips and tears around the edges of the paper and then adhered it to my board, curling back the corners to reveal and expose the tape underneath.

Where I've joined the papers, I attached a Halloween ephemera trim over the top. Sometimes there's little things in these ephemera packs that are so useful and I would be so happy to have a whole pack of these because I love them!

Now to move onto building the scene...

WINDOW FRAME

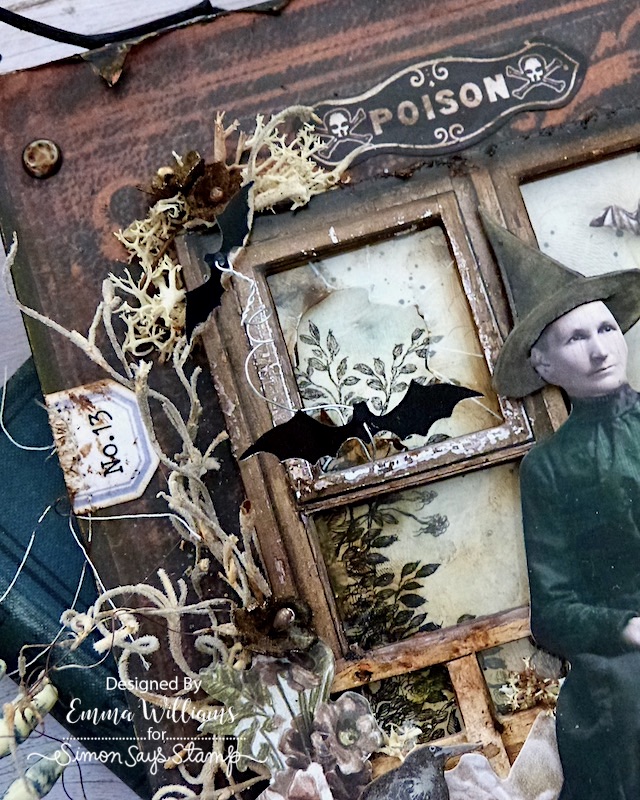
I used one of the frames from the Halloween Baseboards and Transparencies pack and placed a shattered window behind it, attaching it with red line adhesive tape and then adding some Mushroom Alcohol Ink to make the 'glass' appear slightly dirty in appearance.

To complete the window, I applied Translucent Grit Paste for added texture, placing it along each of the ledges and along the top. Once this was dry, I painted it with a combination of Black Soot and Crackling Campfire Distress Paint.

In the top right hand corner of the window frame, I attached a small flying bat from the Ephemera pack.

The next step was to add the flying bats which are again taken from the same pack as the frame and shattered window. 

I pierced a hole into the bodies of each bat and then threaded florist wire through the holes, applying a small amount of glue behind each to secure them. The wire I used is very thin and can be easily twisted and manipulated. I attached the wire to the frame, and placed the bats to appear that they're flying through the shattered window.

Behind the window, I added the scene. This particular piece is from the Halloween Layers and Paper Dolls pack and I cut it down to fit behind the frame. I added a very light colour wash over the panel using Distress Crayons ~ Stormy Sky, Peeled Paint, Black Soot, Gathered Twigs and Pumice Stone.

After attaching foam pads to the back of the window frame, I positioned it over the top of the background layer before I attached the completed frame to my Etcetera Panel with matte Collage Medium.

Just above the frame itself, I placed the Poison ephemera piece that I adhered with the collage medium and then rubbed a little Walnut Stain Distress Crayon over the top to age it.

PAPER DOLLS AND LAYERS

Next are the paper dolls and I selected these two characters as they worked so well together. I colour tinted the images with Distress Crayons and then added the accessories. The witches hat and the mask are both from the Halloween Stickers book and after placing the mask on the little girl, I cut a slit in the hat and placed this on the older ladies head.

I added some foam pads to each image and used various depths to create dimension before attaching them to the right hand side of my frame.

To the left of the images, I layered some of the floral ephemera pieces from both the Halloween Layers and Ephemera packs and I placed them onto foam pads, and arranged them around the bottom of my window frame.

I also added the small black crow, (or maybe it's a raven??) from the Ephemera pack, which I placed amongst the floral arrangement.

ADDING THE MOSS, FLOWERS and BROOMSTICK

To the right of the frame, I attached the broomstick from the Graveyard pack and propped this against the window, attaching it with hot glue.

Around the frame, I added small clumps of moss which I attached with hot glue ~ I used a combination of reindeer moss and Spanish Moss. I also attached some moss in, and between the floral arrangement...

...and beneath the feet of the little girl.

In amongst the moss, I placed some cut bouquet findings flowers. I coloured the flowers with Crooked Broomstick Mica Spray and once they are dry, I cut them from the stems and tuck the flowers into the mossy clumps.

FINISHING DETAILS

We're nearly there and all that's left is the all important finishing touches.

After sanding the edges of the Dreadfully Wicked Quote Chip from the Baseboards Pack, I inked over the top with Walnut Stain Distress Ink and then attached it to my panel, placing it beneath the images, using foam pads to add height. On either end of the quote chip, I placed two Hardware Heads that I painted with Black Soot Distress Paint.

On the left hand side, just creeping out from underneath the flower arrangement, I used Black Soot Distress Paint to paint a spider from the idea-ology spiders adornments and branches pack and then positioned it onto the panel using matte collage medium.

Details, details, details and you might just notice that on the left of the window I attached a label, cut in half and complete with the No.13. The label is from the Vials pack and the number is from and older pack of Tim's Halloween Remnant rubs that I have in my stash.

Finally, I cut the legs from the back of two Large Fasteners, and used the texture hammer to add a few dents to the surface before I attached one to the top, and a second one to the bottom of the panel, adhering them with collage medium on the left hand side. I then painted each one with a combo of Black Soot and Crackling Campfire Distress Paints to add a vintage touch.

...and that completes my spooky make for this week, which I hope you love!

As always, if you make anything, or if you've been inspired by anything that you've seen here on my blog ~ then please, let me know by tagging me on social media or leaving a comment here and I will be right over to take a look!

Don't forget that every week, one lucky random participant has the chance to win a $25 gift voucher from Simon Says Stamp and you can join in up to 5 times, which means you could have 5 chances to winYou have until next Monday at 8am Ohio time. 1pm UK time, 2 pm CET to join in and good luck....


Thank you so much for taking the time to stop by today ~ stay safe and keep well.
Love Emma xxx

Powered By Blogger

Total Pageviews