Showing posts with label Infusions. Show all posts

Monday, 3 August 2026

Sweet Little Sixteen...

Hello friends and welcome to the brand new Simon Says Stamp Monday Challenge. This week, we challenge you to create a project to say HAPPY BIRTHDAY because we're celebrating Simon Says Stamp's 16th Birthday and the DT are showcasing the products of PaperArtsy.

For my make, I created a card that uses PaperArtsy Infusions to make a background for a very special delivery from Theodore the Bear.

So, let's get started, it's time to say Happy Birthday and make a card!

To begin with I created a card measuring 13.5 x 19cm tent fold card blank using white card.

CARD LAYERS

This card has multiple layers to frame the focal point, and to begin with I cut a panel of Watercolour Distress Card, 11.5 x 17cm and a second piece measuring 8.7 x 13cm. I lightly misted the card with water and then sprinkled the PaperArtsy Infusions over the card, focusing on the centre of each piece and leaving white space at the top and bottom.

I misted more water to start blending the powder ~ Infusions are water soluble particles with a dye colour pigment and all you need to do is use the smallest amount, less is more! 

Between each layer, I tend to heat dry and once the first layer was dry, I then spritzed droplets of water across the card, and added some more of the Infusions ~ The Sage and Sleight Blue. If you feel there's too much colour, just dab some away with a towel but I just kept going until I achieved the desired effect.
After heat drying the cardstock, I added some random stamping to the larger panel, using the Seth Apter/Paperartsy cling stamp, sam 033 inked with Black Soot Archival Ink and then machine stitched a border around each panel. 
Put the smaller panel to one side whilst we add the first layers to the card blank.

Matt the larger panel onto a piece of storm cloud cardstock and then mount onto the centre of the card blank.

After adding some stamping to the smaller panel, the "Special Delivery' stamped in Fired Brick Archival Ink, across the bottom of the panel and the 'Received" stamp mark in Black Soot Archival in the top left hand corner...
...both stamps are  from the Stampers Anonymous Correspondence stamp set, I matted the panel onto silver metallic Kraft card. I then use the AALL & Create Quirky Post Dies to cut another piece of the Cloud Blue cardstock, and then mounted the inky blue layered panel onto the die cut before attaching the layers to my covered card blank using foam pads.

I added small piece of Cello Sticker Tape to the small panel and the larger panel.

THEODORE

Now for Theodore who is delivering a birthday card inside an envelope, ready for the special day!!

I used the new released Mini Theodore from Tim Holtz and Sizzix and cut the pieces from inked Mixed Media Heavystock Card.

I used various shades of brown tones of Distress Spray Stain which I spritzed onto the card, misted with water to blend the colours and then once dry, I ran them through my die cutting machine.

I assembled Theodore to make the character and then added some white pen work to add highlights and on the bridge of his nose, I added a pair of glasses. The glasses are from the Mini Accessories Colorize die set.
I then placed Theodore onto the right hand side of my card using foam pads to add dimension.
THEODORE'S ACCESSORIES

The balloons are die cut using the Mini Accessories Colorize Die Set, and I cut them from inked Mixed Media Heavystock card that I had in my stash. I chose pink and yellow for this fun make, with gold metallic strings. I attached the balloons with foam pads.
I added a little bow tie to Theodore, again cut using dies from the Mini Accessories Die Set and card in my scrap box.

Finally, I added the oversized envelope and I cut a scrap of some of Tim's patterned paper, using the Tim Holtz/Sizzix Love Notes Sidekick Dies and Texture Fade Set.

After folding the die cut along the scorelines to create the envelope, I attached the flaps with glue and then placed a small piece of Cello Sticker Tape. Finally I added a Remnant Rub, "hello friend" to the envelope. I believe this is from a retired set of Remnant Rubs, so if you don't have it in your stash, then you can always handwrite the message.

I attached the envelope to Theodore's paw.

Finally, I added the quote that sits at the bottom of the card. This is a sticker from the Small Talk Snarky Sticker Book, and I thought it was perfect for this card. After all, Theodore is ready to party and it would be rude to not have cake.....

For the finishing touch, I added two Screw Heads to either Side of the Small Talk Sticker.

So that's my card complete and I hope you love the piece I've made because it was so much fun to create....

As always, if you make anything, or if you've been inspired by anything that you've seen here on my blog ~ then please, let me know by tagging me on social media or leaving a comment here and I will be right over to take a look!

Don't forget that every week, one lucky random participant has the chance to win a $50 gift voucher from Simon Says Stamp and you can join in up to 5 times, which means you could have 5 chances to winYou have until next Monday at 8am Ohio time. 1pm UK time, 2 pm CET to join in and good luck....


Thank you so much for taking the time to stop by today...see you soon!
Love Emma xxx

Monday, 6 February 2023

L.O.V.E.

Hello everyone...

Hope you're all well and had a great weekend! As always, a new week means we have a brand new Simon Says Stamp Monday Challenge and this week, with Valentine's Day less than 10 days away, we can feel that LOVE IS IN THE AIR and hope you'll join us for our fun challenge theme, where the DT are also showcasing the products of PaperArtsy.

With so many amazing crafty products to 'love', I'm sure that the ideas for this theme will be endless and we can't wait to see what you create and of course, over the many years of my blog, I've been making a lot of pieces that I hope will inspire you. But back to today, and this year my Valentine's make is all about a love bird, and I can't wait to share how I created this piece using products from Tim Holtz, and Sizzix!

So, here we go...it's time to share some L.O.V.E. and talk you through how I made this week's project!

TAG

This tag began life as a panel of Distress watercolour card, and I spritzed the card with water before sprinkling some of PaperArtsy's In The Navy Infusions over the wet surface. You don't need a lot of this powder, a little goes a long way and you can always add more if you need it. TOP TIP: I pierce a small hole in the top of the metal cap, and shake the powders through the hole, this gives me the minutest amount to use.

With the powder sprinkled over my wet card, I then added another light misting of water to dissolve the crystals and make the colour pop.

I didn't want a complete coverage of colour, I wanted to leave some white space around the infusions.

After heat drying the cardstock, and ensuring there are no wet areas for the next stage ~ I cut my tag from the card, using the largest sized Framed Tag and I inked the die using Clear Embossing Ink and a brayer. I just roll the brayer over the raised part of the tag die to transfer the ink, place the die on my card, and then run through the machine.

Working quickly, remove the die and sprinkle gold embossing powder to highlight the debossed areas of the die cut tag. Tap away the excess and then heat emboss the powder until molten.

I mounted the tag onto grey cardstock, followed by a layer of burlap, each time leaving a border showing around the outside.
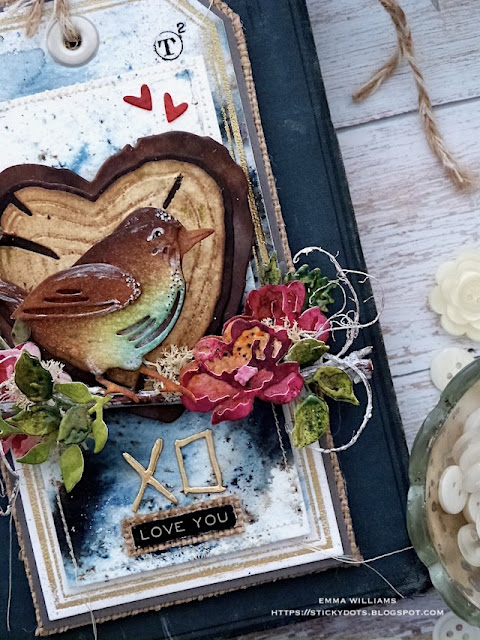
To complete the tag, I added an eyelet through the hole to reinforce it and then threaded some rope through the hole itself.

INNER PANEL

Moving onto the inner panel of the tag, and taking the larger panel of the card that I used for the tag, I cut a smaller inlay panel. I machine stitched around the edge and then placed this onto my tag using foam pads.

HEART WOOD SLICE

We're now ready to created the centrepiece and I started with the wood slice.

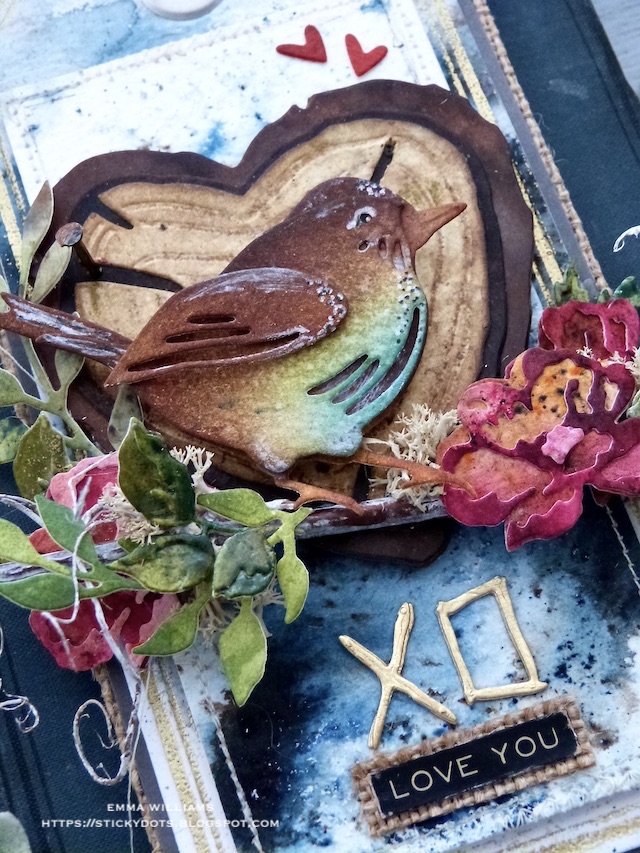
I used the heart shape from the Wood Slice and Alphabet Thinlits Die Set and cut the layers that I need to build the slice, from various shades of inked Heavystock Mixed Media Card, I also cut a further four layers of the largest section of the die.

COLOURS USED:

Base; Ground Espresso Distress Spray Stain

Middle; Walnut Stain Distress Spray Stain

Top: Antique Linen, Old Paper and Frayed Burlap Distress Spray Stain, plus Gathered Twigs Distress Crayon

After placing each layer over the top of one another, I have a really thick wood slice but without the weight...it's still light enough to be used on a card front, or as I have, used on a tag.

I applied a layer of Matte Collage Medium over the top of the slice, and once dry, I ran the Gathered Twigs Crayon over the top to accentuate the tree rings on the slice, wiping away the excess crayon with a cloth.

I attached the slice to my tag, using foam pads.

FEATHERED FRIEND

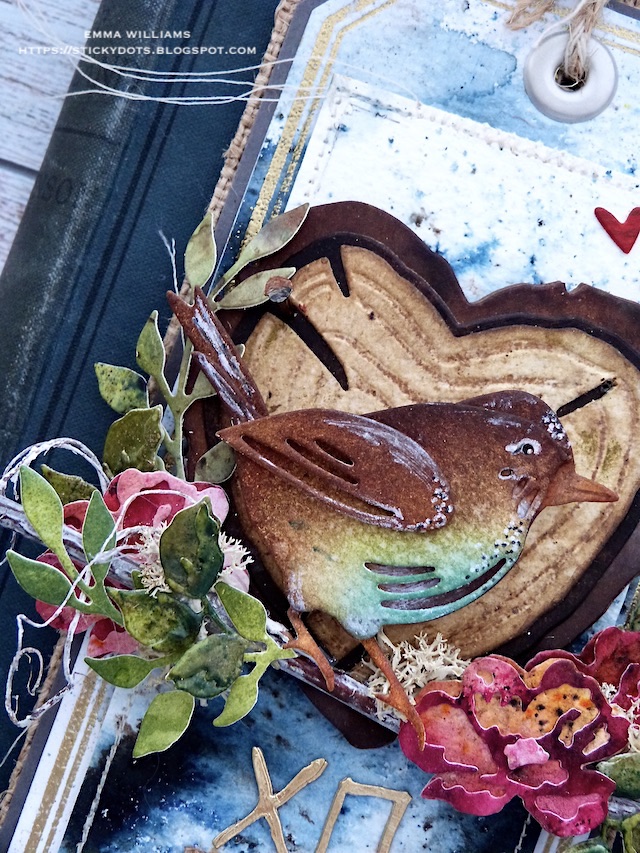
For my little bird, I used the smaller bird from the Feathered Friends Die Set to cut watercolour card, and then inked and coloured my bird with Distress Inks, blending the ink over the surface.

INKS; Tumbled Glass, Rusty Hinge, Vintage Photo, Gathered Twigs, Broken China, Old Paper

I then assembled the bird and added white pen highlights.

Using a twig from my garden, I adhered this across the tag with hot glue, and then attached the bird to sit on the branch, using foam pads to secure my little feathered friend in place.

The foam pads, also add height and dimension to the tag.

FLORA and GREENERY

To create my greenery and flowers, I used the Mini Brushstroke Flowers Die Set and cut the leaves and flowers from watercolour card, coloured with The Sage and Are You Cerise? Infusions, applied to the damp cardstock in exactly the same way as I made the background panels.

Once I had a varied selection of foliage, I wanted to add a little more depth to the smaller pieces, so I applied an embossing dabber over the surface of the die cuts and sprinkled some Peeled Paint Distress Glaze over the top. After tapping away the excess, I heat embossed the glaze.

I arranged the flowers and the foliage around the bird, then added some curly moss and reindeer moss, both of which I have in my stash.

SENTIMENT

For the sentiment, I used a combination of the "Love You' from the Metallic Sticker Book, layered over a strip of burlap and the letters, 'xo' cut three times from gold metallic kraft card, using the alpha dies from the Wood Slice and Alphabet Die Set. After I layered each letter, one over the other to resemble the thickness of chipboard, I attached them to my tag.

We're nearly there and all that's left is the details.....

DETAILS

I added two small die cut hearts that I cut from red card using the dies in the Falling Hearts Die Set and placed these in the top right hand corner...

...before adding a Remnant Rub, just above it.

Finally, I hammered a nail tack into the wood slice itself, which is painted with a combination of Black Soot, Crackling Campfire and Ground Espresso to create a rusty effect to the metal.

...and that completes my project for this week, which I hope you love and feel inspired by some of the techniques and products that I've used.

Don't forget that every week, one lucky random participant has the chance to win a $25 gift voucher from Simon Says Stamp and you can join in up to 5 times, which means you could have 5 chances to winYou have until next Monday at 8am Ohio time. 1pm UK time, 2 pm CET to join in and good luck....


Thank you so much for taking the time to stop by today ~ stay safe and keep well.
Love Emma xxx

Recipe for project:

PaperArtsy Infusions: In The Navy, The Sage, Are You Cerise?
Distress Spray Stain: Ground Espresso, Walnut Stain, Antique Linen, Frayed Burlap
Distress Paint: Ground Espresso, Crackling Campfire, Black Soot
Distress Glaze: Peeled Paint
Distress InksTumbled Glass, Rusty Hinge, Vintage Photo, Gathered Twigs, Broken China, Old Paper

Monday, 7 December 2020

It's Christmas Time...

Hello friends...

It's Monday and the start of a new week, means that it's time for the brand new Simon Says Stamp Monday Challenge and this week we invite you to join us and share your FAVOURITE TECHNIQUE. The DT are also showcasing PaperArtsy products within their projects, but this isn't something you have to do unless you want to!

For my project, I chose to go back to where my crafting journey began and use my favourite technique of stamping and watercoloring. Looking back, I could never have imagined that when I bought my first stamping kit from QVC UK, I would be doing what I'm doing now, and I would never have dreamt in my wildest dreams that I would be a maker for Tim Holtz brands ~ together with being on the SSS DT, this really was a dream come true! So, with stamping in mind, I created a Christmas card using two of my favourite Stampers Anonymous stamp sets from Tim's Christmas 2020 release, and watercoloured the beautiful poinsettia with PaperArtsy Infusions.

...and here's how I created this card.

To begin with I cut a black card blank to measure 12.5 x 20.5cm and matted this with a layer of green card over a layer of kraft card, cut with Tim's brand new Deckle Trimmer by Tonic.

The next step was to stamp and watercolour those poinsettias and for this I inked up the stamp with Versamark Ink Pad and using my stamp platform, I stamped the image onto watercolour card stock. I then sprinkled Gold Embossing Powder over the top and heat embossed the image until molten and glossy. I repeated this to create a second stamped image.

To colour the images, I used a combination of PaperArtsy Infusions ~ Sunset Beach, Are You Cerise? and Black Knight. I started by sprinkling a small amount of the crystals from the bottle onto my glass mat and using a paint brush, I dipped the brush into water, and added this to the infusions. This will create a watercolour paint and the more you dilute it, the colour will become less intense...so you can control how much you use. You'll also notice that there will be a variation of colour in the crystals, which is the nature of the product but this creates a beautiful effect for this technique.

I started by adding the lightest shade, Sunset Beach and then to build up the colour and the intensity, I added Are You Cerise? and in the centre, a tiny amount of Black Knight.

Once the image was dry and I was happy with the colour, I fussy cut around the outline to create my two beautiful poinsettias.

Setting these to one side I moved onto the background, and for this I cut a panel of the brand new White Heavystock Card and believe me when I say this is absolutely amazing cardstock and it takes ink so well. You do need this in your stash....

The panel measures, 10 x 18cm and I inked it by using Antique Linen, Frayed Burlap, Old Paper and Pumice Stone Distress Spray Stains, all blended together with a light mist of water.

After inking the edges with Walnut Stain and flicking a small amount of Black Soot Distress Paint across the panel, I added some random stamping using the script and music stamp from the Poinsettia set and stamped this directly onto the inked panel using Hickory Smoke Archival Ink.

In the top left and bottom right hand corners, I added the swirl ~ stamped in Versamark Ink and then embossed with the gold embossing powder.

I machine stitched a border around the outside and then matted the card panel onto a piece of Black Soot Kraft Stash, which I cut using Tim's brand new Deckle Trimmer from Tonic.

I then matted the layered panel onto gold kraft stash. Before mounting this onto my card front, I dyed a piece Mummy Cloth with Rustic Wilderness and Speckled Egg and then wrapped this around the card, securing it with a small amount of tape on the front and leaving the ends loose on the right hand side. I then tied these into a loose knot and secured it with a Tiny Pin.

Mount the inked panel over the top of the ribbon strip attached to the card front.

After mounting the matted layers onto the front of the black card blank, I cut a further strip of the White Heavystock, 3.5 x 11cm and inked with these same colours as I used on the background.

I used the sentiment, Best Wishes for the Holiday Season from the ChristmasTime 3 stamp set and stamped this onto the strip in black ink, embossed with clear embossing powder. This is my favourite ever font that Tim has used on a stamp set ~ I just think it's perfect in every single way, it reminds me of Disney and many iconic Hollywood movies and TV shows from the 50's.

I also stamped the three little sparkles that are in the set onto the strip, placing them in the right hand corner and then machine stitched a border around the outside.

Matt the sentiment onto more of the gold metallic kraft stash and using foam pads, mount across the centre of the inked panel, before arranging the poinsettias top and bottom of the sentiment strip using foam pads for dimension.

...added some Gold Metallic Droplets to either side of the sentiment and finished the card by painting some Hardware Heads with a touch of candied Apple Distress Paint and adding them above and below the strip.

As the final detail, I took the poinsettia from the Adornments set and coloured this with Alcohol Pearls ~ Deception for the flower head and Envy for the leaves before sprinkling with a light dusting of Rock Candy Distress Glitter. I then attached it to one of the loose ends of the Mummy Cloth and tied the cloth to secure it into place.

Hope you've all loved this card I've made and enjoyed the tutorial that I've shared. As always, if you've been inspired by any of my makes, please let me know and I will pop by to take a look ~ it always means the world that you love my projects and I love seeing your interpretations of them!

Don't forget that every week, one lucky random participant has the chance to win a $25 gift voucher from Simon Says Stamp and you can join in up to 5 times, which means you could have 5 chances to winYou have until Monday 8am Ohio time. 1pm UK time, 2 pm CET to join in and good luck....


Thank you so much for taking the time to stop by today ~ stay safe and well, and see you again soon.
Love Emma xxx

Powered By Blogger

Total Pageviews