Showing posts with label Emerald Creek Craft Supplies. Show all posts

Monday, 13 April 2020

We All Stand Together...

Hello friends! Hope you've all had a safe and happy Easter and you're now ready for another week here on the Simon Says Stamp Monday Challenge Blog!

This week our theme is called "E is for...?" and all we want you to do is create something that features the letter 'E' somewhere on your project.

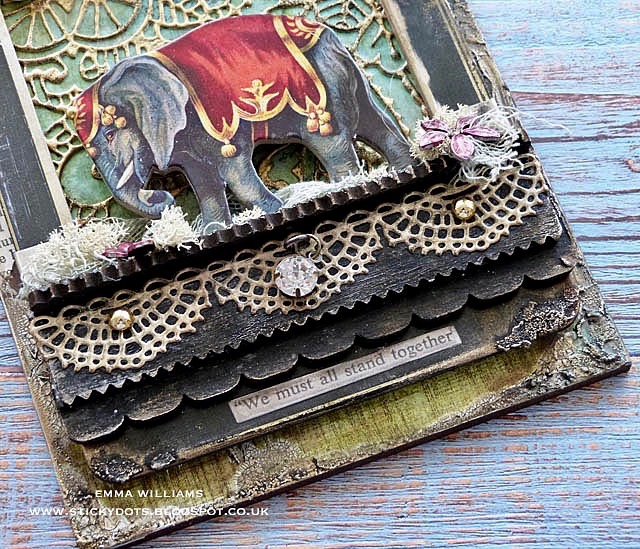
For my project I chose to use 'E' for elephant, a beautiful creature and one that I always associate with strength ~ something I think we are all needing at the moment, and I combined this message with 'E' for embossing to create an etcetera (see where I'm going, lol) tag. Hope you love the piece I made and will read along to see how I used Tim Holtz products to bring this piece to life....
So, let's get started because it's time to share all the details of how I added some texture...


To begin with I took the Small Etcetera Tag and covered it with a panel taken from the Abandoned paper stash. I adhered the paper in place with Matte Collage Medium and then added some torn pieces of book paper to add some interest to the edges ~ you can see the paper on the left and right hand sides, sitting behind the frame. To seal the tag, I applied a coat of the medium over the top, allowing it to dry thoroughly.

Once dry, I applied some Crackle Paste around the edges, again let this dry and wait for the crackle to appear. Once that has happened, I then went in with some Translucent Texture Paste and applied this to the edges, paying particular attention to the corners, I want to make this piece look worn and textured.

Once the pasted areas were completely dry, I then took the Gathered Twigs Distress crayon and ran this over the top of the paste, using a water brush, or you can use your finger to blend the crayon to colour the paste, before adding a touch of Vintage Gold Alchemy Gilding Wax.
To complete the tag, I added the hole reinforcer which I painted with Candied Apple Distress Paint before applying a small amount of Black Soot Distress paint, dry brushed over the top. I also added a small Remnant Rub Sticker, No.84.
Moving onto the framed section and the centrepiece of this project...

...and I started by creating the background section. I wanted to create the look of iron fretwork and capture the feel of ancient India in times gone by and so after having a think of how to create the background, I thought the Doodle Art 2 Die would be perfect for this and used it to cut a panel of Mixed Media Heavystock Card. After removing all the little bits that get caught in the die, I then applied a good coverage of the Embossing Dabber over the top of the die cut before sprinkling with a combination of embossing powders ~ Emerald Creek Charred Gold and the Weathered Gold from the Seth Apter Trio. Apply each powder one at a time over random areas of the die cut, don't cover the entire panel, tap away the excess powder before then applying a second colour. Tap the second colour away and heat emboss. I repeated the process a further three times to create this thick enamelled effect onto the die cut.
The background that sits behind the die cut is a panel of inked card ~ I inked this with a combination of Cracked Pistachio and Broken China Distress Spray Stains, then added more colour into the mix using Mermaid Lagoon, Cracked Pistachio Oxide Sprays before finishing it with Twisted Citron Distress Spray Stain. I then stamped some script over the top, if you look real close you can just see that peeking through before attaching my embossed die cut panel over the spray inked background using Matte Collage Medium applied to the back of the die cut.

To create the framed panel, I used the black baseboard frame and sanded it lightly to create a more weathered effect. I then applied some more of the Translucent Paste around the edges to create a gnarly, crusty look. Once the paste is dry, and this really does need to be dry, I then applied some Black Soot Distress Paint over the top of the paste to colour it. Once again I dried it thoroughly and then applied Bronze Age and Vintage Gold Alchemy Waxes over the top to accentuate the pasted areas and make them pop.
I now have my frame ready and placed the embossed panel behind it before attaching the completed frame to the tag using foam pads.

For the ledge that the elephant is standing on, I chose to use 2 Pinked Etcetera Trims and a Scalloped Etcetera Trim. All the trims are the same length but are two various depths. So after painting each of the three trims with Black Soot Distress Paint, I then lay the deepest Scalloped Trim in front of me, and attached the same depth Pinked Trim over the top overlapping them to create the illusion that the scalloped trim is deeper and shows beneath the pinked trim. I hope that makes sense but hopefully you can see from the image what I've done.
Taking the final Pinked trim, I attached this horizontally over the top to form the ledge. I then sanded the edges of the painted trims before applying some more of the waxes and attaching the completed ledge to my frame.
To create the lace effect underneath the ledge, I used the Crochet Die Set and cut a strip from Mixed Media Heavystock card. I then inked it with a blend of Antique Linen and Pumice Stone Inks before adding Walnut Stain to the edges. I adhered the crochet trim to the underside of the ledge with matte collage medium.
To complete the trim I added some gold Metallic Droplets and in the centre, I hung one of the new Tim Holtz Antiqued Gems, hung from a screw eye fixture.
Now to add my elephant and this is taken from the Junk Drawers Baseboard which are pieces of ephemera that are thick chipboard and can stand freely on their own. I attached the piece with foam pads and added some Mummy Cloth around the base of it's feet for texture. The cloth is dyed with a combination of Bundled Sage and Antique Linen Spray Stains.

As a finishing touch to the ledge, I added two Floral Adornments, that I coloured with a blend of Shell Pink and Gold Mixative Alcohol Inks. I placed these onto the ledge with some moss.
As a finishing touch on the elephant, I added a Metallic Droplet to his forehead.
We're nearly there and we need to now add the message, Strength! The lettering is made up of letters from idea-ology Typography Findings, which I painted with a combination of Old Paper Distress Paint and Frayed Burlap before attaching directly to my fretwork panel using Matte Collage Medium.

I then attached a Clippings Sticker beneath the ledge to complete the message.
Finally, I added a Mirrored Star from stash, inked with Mushroom Alcohol Ink and attached to the top of the frame and then threaded torn pieces of silk ribbon through the hole reinforcer.


As you may know the lovely Heidi, and all the people working behind the scenes at the Simon Says Stamp Store are running on limited operations ~ they are still accepting orders but due to the current Coronavirus (Covid-19) situation, shipping times are going to be slightly longer than usual!

But due to the outbreak we have made the very difficult decision to suspend the $50 vouchers for now but we know that many people are staying safe at home and we would love it if you would continue to enter the challenges and have fun! We are all in this together!


Thank you so much for taking the time to stop by today and see you again soon. I just wanted to let you all know that I am reading all the lovely comments you're leaving me and please don't stop because I love them all and appreciate them so much but last week was one of those weeks ~ on Wednesday, my aunt was admitted to hospital with coronavirus, she's still there and at the moment we're taking each day as it comes but keeping everything crossed for her. Then to make it the perfect week, I broke my toe in a freak accident and I'm now hobbling around...so I just wanted to explain why I haven't replied to your kind comments, etc but to bear with me and I will get back to you asap! ❤️


Stay safe everyone and take care of yourselves and your loved ones...


....love, care, believe ~ Emma
xxx


Recipe for project:

Monday, 13 January 2020

Light Up Your Life....

Hello friends and Happy Monday everyone...

Hope you all had a great weekend and looking forward to the week ahead! Thank you to everyone who joined in with last week's SSS Monday Challenge, it's always lovely to see what you've made and this week, we challenge you to RUST IT UP with our brand new theme!

So, however you choose to create some rusty effects on your projects, we hope you'll play along and share all your makes.

Of course, I was in my element with this theme, who doesn't love some rusty, crusty goodness and I chose to create a tag using Tim Holtz, Sizzix and Stampers Anonymous products to build up all those layers.
So, let's get started...the new challenge is about to begin!


Before I take you through the creative process of the tag, I wanted to list the colours of Distress Paint that I use to add the rusty appearance to each of the metal pieces. These are a combination of Rusty Hinge, Vintage Photo, Black Soot, Ground Espresso and Evergreen Bough ~ each paint is layered over one another, but remember to dry between layers as you don't want to end up muddying the colours.

Moving onto the tag, I used a Mini Etcetera Tag as my base and applied some Design Tape from the Humidor Set around each side of the tag.

Now the fun begins and some of you might remember that a while back I created a box using a faux metal technique which you can read all about here, a technique that I absolutely love and I thought it would be perfect for this theme but this time, instead of using a base of Foil Metal Sheets as I did in the previous tutorial, I used Tim's champagne coloured Metallic Kraft Card from stash 3 and after cutting the 8" x 8" sheet down to approx 16 x 11cm, this will allow for a border around the outside edge of the tag, I ran the first sheet of metallic card through my machine in the Sizzix Mechanics 3D Embossing Folder by Tim Holtz. You can see the depth of the embossing that this folder achieves ~ it's amazing and so touchy feely!
I then cut a further sheet of the metallic kraft card but this time 4 x 11cm and then embossed this panel using the Foundry 3D Embossing Folder.

I now have my two embossed panels but need to make them look vintage and to do this, I used Distress Paints, starting with Black Soot which I applied all over the surface of both panels of card before wiping away the excess paint.
After gently heat drying the painted surface, don't overheat ~ I added some more layers, Ground Espresso and Evergreen Bough ~ each time wiping away the excess paint and drying between the layers.

Once I was happy with the colour, I attached the embossed panels to my tag, placing the Mechanics piece at the top....
...and the Foundry piece along the bottom.
To add even more rusty goodness and texture, I applied the Emboss It Dabber around the edge of the tag and used Chunky Rust Embossing Powder from Emerald Creek. Sprinkle the powder over the the embossing ink, tap away the excess and then heat emboss.

I now have my base tag ready to decorate....

...and started with the Voltage die to die cut each part from chipboard before applying some Grit Paste to each of the pieces to add some texture to the finished die cut. Once the paste was dry, I primed all the die cut pieces with gesso and then painted each of them with a base of Black Soot Distress Paint, heat dried the paint and followed through with Evergreen Bough, Peacock Feathers and Rusty Hinge ~ just building the layers of paint. Once the final layer was dry, I then added the Chunky Rust Embossing Powder to the edges to add some more texture.

I used Matte Collage Medium to adhere each of the die cut pieces together to make up the Voltage Gauge, placing a piece of silver metallic kraft card between the top and bottom layers that will show through the aperture window of the Voltage gauge. I then mounted the die onto a further piece of chipboard that will act as a baseboard for the die cut, and painted this square panel in the same colours as the gauge.

For the numbers, I painted the curved die cut piece with neutral coloured Distress Paints and then stamped the numbers to create the dial, using the stamp from The Professor set.

Attach in the window of the die cut and then, paint the indicator pointer using Candied Apple and Black Soot Distress Paint, attach and add a Hardware Head, again rusted up with a little Distress Paint. I also added the number 59, which is taken from the Tim Holtz Special Delivery Remnant Rubs set.
Now it's time to build up the scene and after creating my ledge which is made up of various lengths of the Bracket and Pinked Etcetera Trims. I applied some Crackle Paste over the top of the 'ledge' and  once the paste was dry, I used Pumice Stone and Gathered Twigs Distress Crayons to accentuate the crackle before attaching the ledge to the tag with Matte Collage Medium.
I attached the Voltage gauge to the tag, together with a Paper Doll standing to the right that I colour tinted with Distress Marker Pens...
...and also layered some ephemera pieces from the Snippets Ephemera set behind the die cut.
In the photo below you can see the depth that I've got on this piece which is all created by using foam pads to add height and dimension.
Along the ledge, I added some Mummy Cloth, dyed with Pumice Stone and Antique Linen Distress Spray Stains and then placed some 'rusted up' Sprocket Gears into the arrangement and added a lightbulb, a piece of Tim Holtz idea-ology from a while back, that I had in my stash.
In the centres of a couple of gears, I added a star adornment which I painted with Evergreen Bough Distress Paint.
Just below the ledge, I added a drawer pull and placed the word Admission, taken from the Clippings Stickers and popped this inside. I added two hardware heads to appear as if it's bolted onto the tag.
To complete the tag, I added one of the Foundry adornments and attached a Hinge Clip to the bottom of the metal piece before attaching it to my tag.
So, that's my project for this week all done and dusted and I hope you've enjoyed how I created the rusty elements of this piece ~ it's not been the easiest of projects to photograph, I bow down to anyone who can get a good photo of metallic card but I hope I've managed to share just how much shine there is in this project...
Don't forget, if you would like to see more inspiration from my talented teamies over on the challenge blog and every week, one lucky random participant has the chance to win a $50 gift voucher from Simon Says Stamp and you can join in up to 5 times, which means you could have 5 chances to win. You have until Monday 8am Ohio time. 1pm UK time, 2 pm CET to join in and good luck....


Thank you so much for taking the time to stop by today and hope to see you again soon, love Emma xxx


Recipe for project:

Monday, 17 June 2019

Step Back In Time...

Happy Monday friends...

Hello everyone and welcome to the brand new Simon Says Stamp Monday Challenge. This week our theme is called Transport It and we would love for you to join us and play along.

For my project, I chose to take you on a step back in time ~ please say hello to the professor, a man who has invented a time machine that will transport him on adventures, near and far!
So, let's get started and let me transport you through how I created this tag...


To begin with I covered a medium Etcetera Tag with paper from the Correspondence Paper Stash. I adhered the paper onto the tag using Matte Collage Medium and then sealed it with Vintage Collage Medium.
I wanted to create a really rusty, crusty look to the edges of the tag and I started by adding some Crackle Paste. I applied the paste using a palette knife and just adding it around the edges, spreading some of the paste inwards. Allow the paste to dry and the crackles to appear and then to accentuate the cracks, I used Hickory Smoke Distress Crayon which I scribbled onto my glass mat and then picked up with a wet brush to apply it to the crackles, allowing the colour to sink in. Moving onto the next step, I added the rust and for this I used Ranger Ink's Embossing Dabber and just applied it randomly around the edge of the tag before sprinkling some of Seth Apter's Chunky Rust Embossing Powder over the top and heating it with a heat gun.

Once I was happy with the rusty edge, I ran the Gathered Twigs and Black Soot Distress Crayons around the outside, blending out the colour with your fingertip.

After attaching the hole reinforcer to the top of the tag, I now have my base ready to decorate...

For the next stage, I added some layers onto the tag to add some depth to the finished project. I used some ephemera pieces from the Keepsakes and Remnants Layers Pack, together with some Design Tape from the Elementary collection. I adhered these to the central area of the tag using Matte Collage Medium, adding some depth of colour around the edges with the Pumice Stone Distress Crayon.

Moving on to the next layer, I added a selection of gears ~ the majority of the gears are all die cut from chipboard, covered with Metal Foil Tape and cut using the Sizzix Industrial Die by Tim Holtz. Once I had my gears cut, I then inked them with Alcohol Inks; Mushroom, Gold Mixative and Patina applied to the metal gears using an alcohol applicator tool.

Attach the gears to cascade across the tag from top to bottom, adding some Kaisercraft Wooden Cogs into the mix, which I painted with a combination of Black Soot, Antiqued Bronze and Evergreen Bough Distress Paints.

We're now ready to introduce the star of the show, the professor and his time machine!
To begin with I stamped the professor, his top hat and the propeller onto some Mixed Media Heavystock card and watercolored them with Distress Marker Pens. I then fussy cut each of the images and built up my professor, placing the top hat and propeller on his head.
Moving onto building his time machine, I used the Voltage Die from Tim Holtz and die cut all the elements on the die from thick chipboard. I then primed each of the pieces with gesso.

To add the vintage paint work to the bolts, base and the circular section of the voltage meter, I used the combination of Black Soot, Antiqued Bronze, Evergreen Bough and Rusty Hinge, applying each layer of paint individually, heat drying between applications and just building up the colour and the texture! There is no paste, nothing on this piece ~ just paint!
I adhered all the die cut pieces into place and then added some silver metallic kraft stash card into the window. For the date on the dial, I attached my painted dial piece onto the metal window and then used some Remnant Rubs from my stash to add the year, 1890.

As a finishing touch on my 'time machine', I added some shattered mica and placed this onto the window section of the meter, attaching it with Collage Medium.
Attach the pointer needle, coloured with Candied Apple and Black Soot Distress Paint to complete the time machine before adding a Hardware Head as the finishing touch.
Now all that's needed is to build up the layers and dimension to bring this time traveller's story to life...
Attach the 'time machine' over the top of the gears, placing the professor onto foam pads for dimension and attaching him to the right of meter, adding an arrow adornment directly beneath him.
For the final details on this tag, I added some hardware heads, a combination of metal ones and some of the die cut ones that come from the Voltage die and placed these onto the gears.

Finally, I adhered a star adornment, painted with Candied Apple Distress Paint....
...and a quote chip, 'Wander'.

So that completes this week's project, which hasn't been the easiest to photograph ~ the glare of the mirrored dial, the shine of the gears and the mica all made this piece a little challenging...sometimes these photos take longer to get right than the actual project, lol and I won't tell you how many I took!!! But I hope I've managed to show all the detail and you will be inspired by this piece or some of the techniques I've used!

Have fun creating your projects and don't forget, you can find more inspiration from my talented teamies over on the challenge blog and every week, one lucky random participant has the chance to win a $50 gift voucher from Simon Says Stamp. You have until Monday 8am Ohio time. 1pm UK time, 2 pm CET to join in and good luck....


Thank you so much for taking the time to stop by today and hope to see you again soon, love Emma xxx


Recipe for project:


Tim Holtz/Stampers Anonymous: The Professor, Medium Etcetera Tag
Tim Holtz/Sizzix: Voltage, Industrial
Distress Paint: Black Soot, Evergreen Bough, Antiqued Bronze, Walnut Stain, Ground Espresso, Candied Apple, Rusty Hinge
Powered By Blogger

Total Pageviews