Hello everyone and welcome to Day 2 of the Smitten and Sweetheart Blog Hop ~ day 1 of this hop can be found here!
I'm so excited to be joining this hop and you might have arrived here from my extremely talented friend, the amazing Alberto Gava but if not, and you want to catch up with everyone who is participating in this hop, then don't worry because you can head back to the beginning, HERE.
For my card set, I chose to combine products from the two releases and used the beautiful Flower Love Stamp Set with the Friendship Leafy Cluster stamps to create a couple of projects that celebrates friendship. You can check out all the fabulous new products in the Sweetheart release, HERE and the Smitten release, HERE.
So you've seen the cards, and it's time to share how I created them...
To begin with I made my background, which is one sheet of black heavystock card that I stamped the design onto, and then cut into three separate panels which I used on the two card projects.
BACKGROUND
With the panel of black heavystock card in front of me, I took the larger leafy clusters stamp from the stamp set and inked this with Versamark Clear Ink. I then stamped the pattern, one leaf at a time, onto the outside edges of the cardstock, leaving plenty of open space in the centre of the panel. After sprinkling with gold embossing powder, I then heat set the powder until molten and glossy.
Now to colour the leaves, and for this, I used a combination of Polychromos Pencils and Tim Holtz's Wicked Elixir Mica Spray Stain. I began by colouring inside the embossed areas with the various shades of green pencils, this helps to intensify the colour of the Mica Stain. Once I had coloured all the leaves, I then spritzed some of the stain onto my glass mat and used a waterbrush, or a paintbrush to apply a colour wash over the top to create the beautiful shimmer.
Allow for the mica stain to dry before cutting the background into three separate panels which are ready to cut and use on the cards.
2 panels measuring 8.5 x 11.5cm and a 3rd panel to measure 3 x 8.5cm.
After machine stitching a border around the outside of the panel, I matted each panel onto gold metallic kraft stash, leaving a border around the outside.
FLOWERS
I used the Flower Love Stamp set to create the selection of flowers that I used on each of the cards. The flowers are all stamped in clear embossing ink onto black card and then I coloured them in exactly the same way as I coloured the leaves, first a layer of polychromos pencils and then I painted the Mica Spray Stain over the top to create the shimmery, jewelled tones.
For the flowers I used the following colours of Mica Stain:
Yuletide, Juniper Berry, Snow Flurries and Flickering Candle
Once the colour was laid down, and I was happy with the tones and intensity, I actually fussy cut each bloom because I don't own the matching die set. But if you don't like cutting and would like the die set, that is available HERE.
With all the components ready, it's time to make the cards.
CARD No. 1
Kraft card blank measurement: 15.5 x 12cm
To create the first layers on the card, I cut a panel of black card, 15 x 11.5cm and attached this to the card blank.
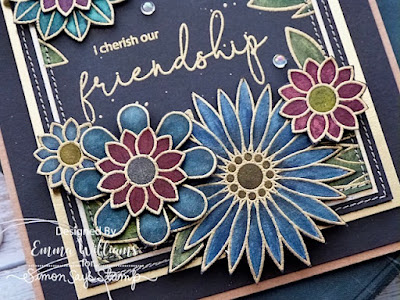
Using one of the 8.5 x 11.5cm stamped background panel, ink up the 'I cherish our' and the 'friendship' stamps from the Friendship Leafy Cluster set with Versamark Clear Ink and stamp this onto the left hand side of the card panel, placing it in one of the open spaces.
Sprinkle gold embossing powder over the sentiment and heat emboss until molten.
Taking a splatter brush, lightly splatter gold paint over the surface, and set to one side to dry.
Using 8 of the stamped flowers, I arranged these onto the card panel, layering some of the stamps over the top of one another to create dimension and using foam pads to attach each of them.
I mounted the finished panel onto a piece of black cardstock, slightly larger than the artwork and with a machine stitched border before mounting these layers onto a final layer of gold metallic kraft stash.
I then mounted the panels onto the card blank using foam pads.
Finally, I added three of the Rainbow Splash Drops to complete this card.
CARD No.2
Kraft card blank measurement:18 x 11.5cm
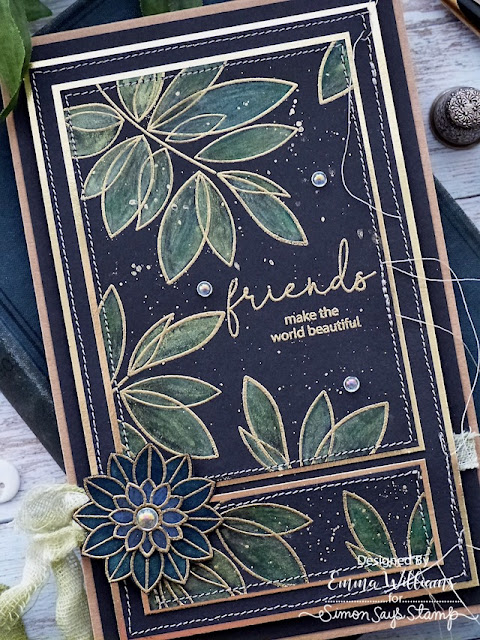
For this card, I cut a black card panel slightly smaller in size than my card blank and then wrapped a piece of hand dyed Tim Holtz's Mummy Cloth Trimming around the card.
This strip of cloth is dyed using a combination of Shabby Shutters and Antique Linen Distress Spray Stains before heat drying until thoroughly dry. I then wrapped the trimming around the card, and tied it into a bow on the left hand side to secure it into position.
For this card, I used the remaining two stamped and coloured panels both of which are matted onto gold metallic kraft card.
As with the previous card, I stamped the sentiment, Friends Make The World Beautiful, onto the larger sized panel and lightly splattered gold paint across the surface before I mounted both panels onto a piece of black card, 16 x 9.5cm which once again had a machine stitched border around the outside.
Using foam pads, mount the layered card panels onto the front of the card blank and to complete the card, I used the remaining two stamped flowers, layering one over the top of the other with foam pads. This flower is attached it to the left hand side of my card.
Finally, I placed three of the droplets onto the sentiment panel and one larger sized droplet in the centre of the flower and that completes both of my card projects for this hope and i hope you love what i've created.
HOP ORDER:
Emma Williams ♥️ You are here!


You’re cards are stunning!!!!! Thank you for sharing the recipe. 😍😍
ReplyDeleteYOWZA!!! The Layers! The Stitching! The Embossing! The Dark Backgrounds! These are all sooooo GORGEOUS!!!
ReplyDeleteOH MY GOSH! Love Love Love! The layers are just...You have really show cased this set on a whole other level! I am lost with words. Beautiful card!!!!
ReplyDeleteThese are STUNNING! I LOVE the gold embossing!
ReplyDeleteWOW!WOW!WOW!!! Stunning!
ReplyDeleteThese are absolutely stunning! Beautifully done.
ReplyDeleteGorgeous is an understatement and so much detail and time! I always like dark backgrounds but rarely remember to use them. This will stand out in my mind, for sure.
ReplyDeleteSimply stunning!
ReplyDeleteLoving the dark background! Just spectacular.
ReplyDeleteThese are absolutely gorgeous! I will try my best to recreate them or something similar. Just. Beautiful.
ReplyDeleteWhat a beautiful card! The colored pencils with mica is so rich! Thank you so much for sharing this with us.
ReplyDeleteI am not making this comment to get entered for a prize, because I never remember to check the site to see if I have won - but to just tell you these are the most beautiful cards I have ever seen! Totally Awesome! Wish you did videos.
ReplyDeleteThese are so stunning. Your technique for creating the lovely colors is awesome and thank you for sharing!
ReplyDeleteAbsolutely beautiful! I’m going to try this technique.
ReplyDeleteThese are amazing cards. I forwarded your blog to my email so I can slowly read what you did to make,these masterpieces!
ReplyDeleteLove the look of these beautiful leaves and flowers against the black background!!
ReplyDeleteWonderful artwork with the gold, framing & do much more.
ReplyDeleteMelissa
"SunshineHoneyBee"
Absolutely gorgeous!! Thank you for sharing.
ReplyDeleteThese cards are so beautiful!! Love the dark background!!
ReplyDeleteGorgeous! The gold and the colors you used are so striking
ReplyDeleteGorgeous cards, like the gold borders and your deep colors!
ReplyDeleteThese are incredible! I love seeing how the mica stain works on black and the gold embossing pop out. Simply stunning.
ReplyDeleteVery striking and gorgeous cards!
ReplyDeleteStriking!
ReplyDeleteSo unique and beautiful!
ReplyDeleteWOW WOW WOW! I love the dark background and the stitching plus the embossing. Beautiful!
ReplyDeleteThe dark background really does make the card stunning! Great job!
ReplyDeleteWow-I can't believe you stitched that border. (I do not sew at all so that is very impressive to me!) Using the stamps on the dark card stock is such an interesting and different way to present this. Onc again, another way to use the Leafy Friendshp set. Thank you for sharing.
ReplyDeleteI never think to use dark cardstock like you did but I will now Ü
ReplyDeleteHow absolutely stunning! They are truly beautiful ♥
Love the background
ReplyDeleteStunning cards!
ReplyDeleteThese cards are absolutely gorgeous! I love the elegant colors and sophisticated designs.
ReplyDeleteSo beautiful on black!!
ReplyDeleteLove how you used a dark background and embossing to make the image stand out! Beautiful!!!
ReplyDeleteWOW, WOW, WOW! The colors glow. And the gold is incredible. What a gorgeous look you achieved!!!
ReplyDeleteEmma these are so gorgeous. Your attention to detail is perfect! Lovely job, TFS
ReplyDeleteStunning, the colors are awesome! Thanks for sharing how they were created.
ReplyDeleteBeautiful cards. Love the black background. So beautiful.
ReplyDeleteI love your cards with the gold embossing on the black background. Thanks for the clear explanation of how you made them.
ReplyDeleteSo beautiful!!
ReplyDeleteStunning! Love the leaves on the black. Wowza!
ReplyDeleteStuuning. Beautiful colors.
ReplyDeleteAbsolutely stunning!! I love the colors on that black background and I love the design, stitching and splatter!!
ReplyDeleteGorgeous cards... love the dark color combinations.
ReplyDeleteWow, wow, wow! Your cards are so amazing, they are like no others. These cards are in a league of their own! I absolutely love, love, love your cards, they are unique, beautiful and So inspiring ❤️
ReplyDeleteWow, your cards are absolutely beautiful, the words memorizing & moody came to my mind as I looked at them. GORGEOUS !!
ReplyDeleteOMG, your cards are stunning!
ReplyDeleteYour cards are stunning with the colors against that black background.
ReplyDeleteI am very intrigued by the dark background. I need to up my game!
ReplyDeleteWow!! So stunning and beautiful! I love the dark background with the mica stain. Gorgeous!
ReplyDeleteBeautiful and stunning! So much work to create this art piece! Lovely!
ReplyDeleteThank you for teaching me a new technique! I love the colors! I using black cardstock and always looking for new ideas to use on it.
ReplyDeleteWow! I read through your process, amazing results! Gorgeous cards!
ReplyDeleteSo interesting I love how these turned out!
ReplyDeletePaulette Still craftqueen 417 at yahoo dot com
DeleteVery detailed cards, love the stitching and deep warm colors used!
ReplyDeleteStunning cards!
ReplyDeleteI'm such a huge fan of your art. You are such an inspiration. .as I mentioned before I love the dark background. Stunning
ReplyDeleteSo much work and do worth it, their beautiful! I really liked the leaf card.
ReplyDeleteVery pretty cards.
ReplyDeleteI want to use a different adjective, but STUNNING is absolutely the right word, no question.
ReplyDeleteAbsolutely stunning, Love the jewel tones created on the dark CS
ReplyDeleteYour cards are absolutely gorgeous!
ReplyDeleteBeautiful
ReplyDeleteMarisela Delgado said: Stunning, absolutely gorgeous! Like WOW! mariandmonsterd@yahoo.com
ReplyDeleteLove these designs against the dark papers! So pretty!
ReplyDeleteLove your take on this set with the dark background and softly colored flowers and leaves. Just lovely!
ReplyDeleteAbsolutely STUNNING!!! I can’t stop looking at these cards!
ReplyDeleteYour cards are elegant and rich looking. Just beautiful! Dorothy Ayotte
ReplyDeleteWow! Your cards are stunning! I love the shimmer and dimension! The flowers really pop!
ReplyDeleteThese cards are absolutely gorgeous. Thanks for the detailed instructions, I greatly appreciate it. Now I can try to practice that coloring technique once I have the product. Does this work with other pencils other than the ones you used?
ReplyDeleteReally Gorgeous cards - I love the rich colours you have used.
ReplyDeleteVery unique technique on the black.
ReplyDeleteWow, the color combinations are perfect. Dark and rich but not brooding. Love it.
ReplyDeleteWow very interesting card. Love it! Totally different than I’m used to seeing but it’s so awesome.
ReplyDeleteThese are amazing. It blows my mind how you got such brilliant colors on black cardstock!
ReplyDeleteWow! These cards are works of art. So Beautiful.
ReplyDeleteWOW, Emma! Just WOW! These cards are gorgeous! Your colors are amazing!
ReplyDeleteYour cards are so eye catching, gorgeous florals and leaves against the stark black!
ReplyDeleteElegant cards. I would not have thought to use black card stock.
ReplyDeleteVery elegant! Love all these leaves!!!
ReplyDeleteStunning!! Such a different style and I loved to read how you all did it. Really nice cards.
ReplyDeleteEmma, your cards are stunning!! I love the bright and shiny coloring of the flowers and leaves...brilliant, on the black background! Just gorgeous!!
ReplyDeleteSo pretty! Love the dark background. I can't pick a favorite. They are all gorgeous.
ReplyDeleteStunning! Those cards are so beautiful, thanks for sharing your technique!
ReplyDeleteBoth cards are so classy and elegant.
ReplyDeleteThanks for sharing
Love your bold, dramatic floral card designs, and all the stitching!! How lovely!
ReplyDeleteGreat design and use of color for the images.
ReplyDeleteWow!!!! Really Stunning cards!!!! I love the gold layers!!!
ReplyDeleteGorgeous! Love the way it looks on the black background.
ReplyDeleteEnjoyed viewing your cards. They were done with skill and patience. Very classic.
ReplyDeleteYour cards are gorgeous with such great dimension and depth! The colors and the gold touches are beautiful!
ReplyDeleteTruly works of art...just stunning! These colors all work so well agains the dark background.
ReplyDeleteOMG - what gorgeous cards - simply stunning - LOVE the gold and black combo
ReplyDeleteOMG - what gorgeous cards - simply stunning - LOVE the gold and black combo
DeleteYour cards are amazing. I love the colors and the way you put it together. Thanks for the inspiration.
ReplyDelete