Hello everyone...
Hope you've all had a wonderful weekend and as we head into another week, it's time for a brand new Simon Says Stamp Monday Challenge and this week our theme is HOME DECOR.
As we head into the final week of October and the witching hour is nearly upon us, I chose to squeeze in one more Halloween project. This was actually something I started way back in August, but it got put on the back burner because I was carried away making other projects and I found it sitting on the shelf in a cupboard, just waiting for me to complete it. So, with this in mind, it made it's way out onto my desk and I thought now was as good as time as any to finish what I started, ready for the most spooktacular night of the year.
BUILDING THE STRUCTURE
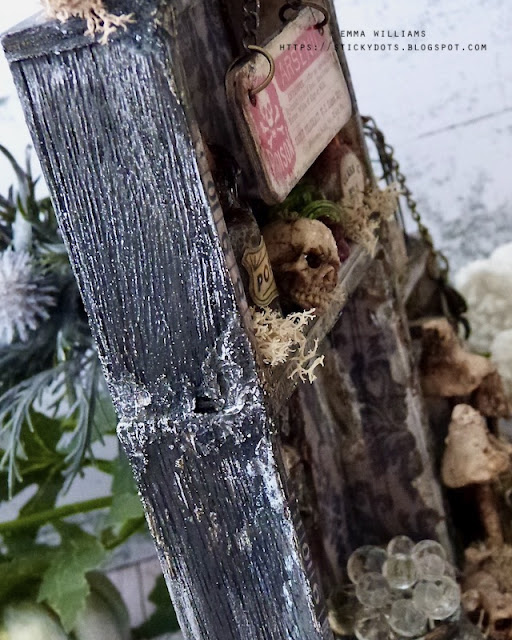
I attached my boxes with Matte Collage Medium, placing the larger of the two rectangular boxes that I chose to use, on top of the square one and then, the smaller box was adhered to the right hand side. Once the adhesive is dry and the boxes are stuck, I added Halloween Design Tape Trim around the front edges and then applied some Translucent Grit Paste to give a gnarly, crusty finish to the wood.
After letting the paste dry thoroughly, I painted the sides and the back of completed structure, with Black Soot Distress Pain and once the paint is dry, I applied some Sterling Foundry wax to accentuate the crusty areas. Heat set the wax with a heat gun.
On the inside of the box, I covered each surface, and also the tops of the boxes on the outside, with Halloween Worn Wallpaper, adhering the panels with Matte Collage Medium. I then applied some crackle paste, adding it to the corners of the boxes to make it look old. Once the paste is dry and the crackles appear, I used Hickory Smoke and Walnut Stain Distress Crayons to accentuate and colour the areas.
With the structure ready, I made a base and for this, I adhered two smaller vignette panels together to form one long panel. I applied a coat of Black Soot Distress Paint to the base and then covered the top section with a panel of Halloween Backdrops before I attached the vignette boxes to it.
To complete the box, I used a Web Trim, painted black and attached this along the top of the tall part of the structure, adhering a halloween Mini Flair in the centre.
My structure is now ready for all those Halloween goodies...
CAULDRON SECTION
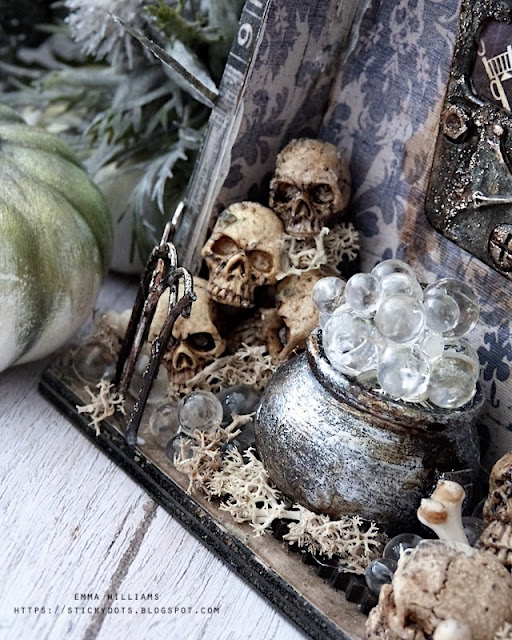
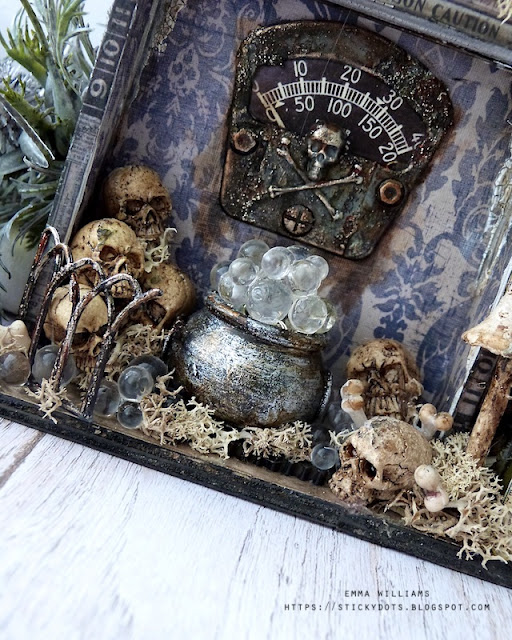
...and we'll start by adding the cauldron with it's glowing green bubbles.
I began by boring a small hole from the back of the box, through to the front and then threaded the green string of Halloween Tiny Lights through. Taking one of the cauldrons, I placed a wood chip in the bottom and attached it to the centre of my square box. I then ran the light string up the back of the cauldron and into the base, attaching it with a dab of hot glue. If you find you have too many lights, just cut away the excess ~ they will still work as long as the remainder of the wire is attached to the battery box. I then filled the lit pot with the bubbles, placing them one by one and attaching them with Glossy Accents, making sure that I didn't cover or block out any of the lights.
Once all the bubbles are fixed into place, walk away and let the adhesive set.
GAUGE FRAME
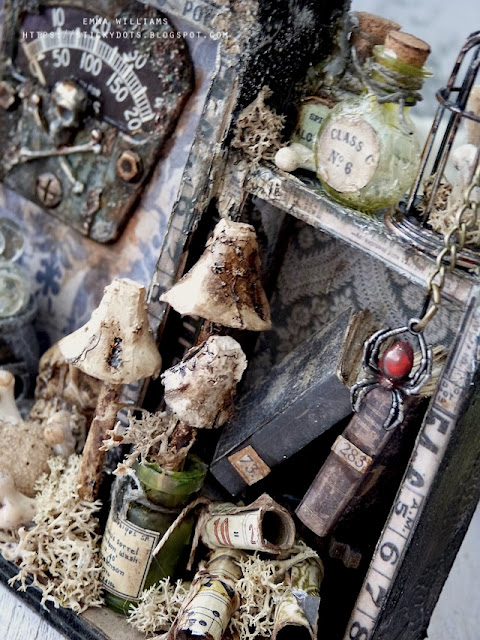
Whilst the bubbles are setting, I moved onto the Gauge Frame that sits on the back wall and started by attaching a skull adornment to the gauge, before applying some Translucent Grit Paste to the metal surface. Leave the paste to dry before painting the metal with a combination of Black Soot Distress Paint, followed by a layer of Crackling Campfire, Ground Espresso and Antiqued Bronze and once again, leave to dry. Once the paint is dry, I then added a smear of Statue and Sterling Foundry Wax over the top, and again gently heat set the wax.
Behind the aperture of the Gauge Frame, I added a Gauge Dial and then attached the completed piece to the back wall of the box.
SKULLS and FENCE
I used a selection of idea-ology skulls, some of the new ones and some of the older ones as I wanted all different sizes. I arranged all my skulls on either side of the cauldron, attaching them with a scattering of bubbles and boneyard findings that can be found in amongst them.
To complete this section, I attached a metal fence to the left hand side, again using the same technique as I used on the gauge, to add crusty goodness to the metal. I attached the frame with Matte Collage Medium and placed clumps of moss in and around the skulls and fence.
BOOK SHELF
For the book shelf, I added a small off-cut of an Etcetera Trim and stuck this in the middle of the box.
I then made two of the tiny books. The covers for the books are in the Halloween Ephemera pack and I used old book pages to create, the old book pages that I made for the insides of these miniatures. As some of my regular followers will know, I've made these books many times before and if you want to see how I create them, click HERE.
After adding Curiosities Stickers to the spines and aging them with Walnut Stain Distress Crayon, I attached them to my shelf.
Underneath the shelf, I made tiny scrolls, again I've featured these in previous projects, one of them can be seen HERE. I attached these scrolls to my project with hot glue to secure them.
Next to the scrolls is a bottle of toadstools. I used a Corked Vial, complete with a Curator Ephemera Label attached to it. I then attached two toadstools inside the vial, and adhered the vial onto the base....
...attaching a third toadstool next to the bottled toadstools.
On top of the bookshelf, are a couple more bottles. These are crackled with Rock Candy Crackle Paint and then I dripped alcohol inks onto the crackles to add colour before adding Curator Ephemera Labels and twine around the necks of each. I attached the bottles to the shelf and then placed the birdcage, filled with boneyard findings next to it.
I added a piece of chain to the birdcage, and hung the spider adornment, complete with painted red body to the end of the chain.
To finish this section, I added more moss.
TOP SECTION
The top section of the box, houses some more moss, bottles and skulls. The tiny bottle lying down is spilling out some poisonous potion, which is made by applying hot glue, allowing the glue to set and dry before painting it with Distress paints.
To finish this section, I hung the arsenic sign. This is a Halloween Baseboard piece and I just made it look more vintage by adding crackle paint around the edges and tinting it with Walnut Stain Distress Crayon. I then punched two holes in either side of the sign, and added some chain. I hung the sign from a Nail Tack that I hammered into the front of the box.
We're nearly there and all that's left is the key that sits on the side. Again, I altered the metal in exactly the same way as I altered the other metal pieces and then I just attached the key to the side of the box....
...and that is the finishing touch to my halloween make, which I hope you love and will be inspired by because it's such a fun piece to make and will be perfect to use as a home decor piece for Halloween.
As always, if you make anything, or if you've been inspired by anything that you've seen here on my blog ~ then please, let me know by tagging me on social media or leaving a comment here and I will be right over to take a look and if sometimes I miss it ~ just keep nudging me!
Don't forget that every week, one lucky random participant has the chance to win a $25 gift voucher from Simon Says Stamp and you can join in up to 5 times, which means you could have 5 chances to win. You have until next Monday at 8am Ohio time. 1pm UK time, 2 pm CET to join in and good luck....
Recipe for project:


Fantastic❤️❤️❤️
ReplyDeleteJust amazing as always. Your attention to detail astounds me. Thanks so much!
ReplyDeleteOmGezzers... From now on you should be called the Queen of Grunge. The torn wallpapers and all the distressing is amazing. So many little details all brought together in one project, This one is over the top fantastic. Can you tell I like it....LOL
ReplyDeleteThis is quite amazing! I love seeing all of your artwork. How do you have time to create like you do--it takes me forever just to get one card done or to cut out and use the Colorize die cuts and then I never seem to have time or think I'm good enough to post anything. I LOVE the Harveys that you did and posted on Instagram! Those inspired me to go out and buy that TH die and I'm currently die-cutting the pieces. Did you color the pieces yourself with Distress inks or sprays? The colors are so rich. I'm not good with the inks and oxides but I try. Don't have the sprays though . . . I'm just using textured colored cardstock. Thanks for making me smile every time I see one of your new creations!
ReplyDeleteSorry, didn't realize I was commenting as "anonymous" in the one above . . .
ReplyDeleteInsanely fabulous!!!!!!
ReplyDelete