Happy Monday everyone!
Thank you for all your visits and lovely comments on my previous blog posts, I really do appreciate every single word and I'm thrilled you loved the projects so much ~ it's going to be exciting to see all your makes!
Today over on the Simon Says Stamp Monday Challenge Blog we have a brand new challenge which is all about Sparkle and some of the DT are showcasing Stampendous products in their makes to celebrate their birthday! Unfortunately, my Stampendous goodies are still making their way across the pond and didn't arrive in time but that doesn't mean I wasn't able to add some sparkle into this make using Tim Holtz's Mica Flakes, which were an alternative for the Stampendous Shaved Ice that I was intending to use!
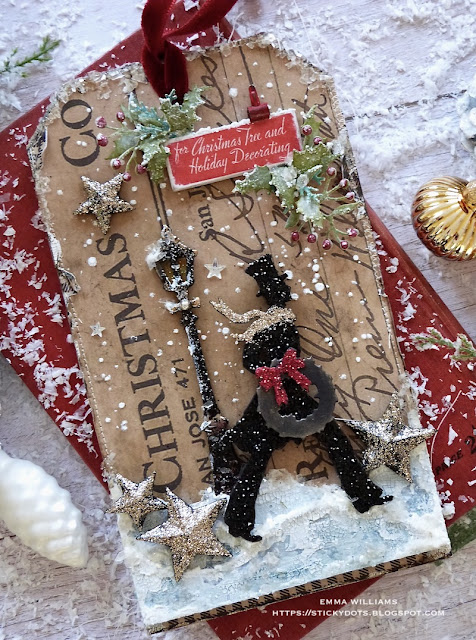
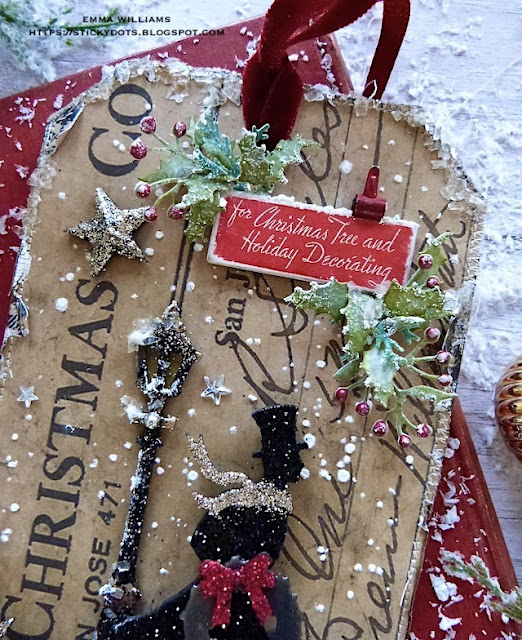
For my project I chose to make a vintage style tag for Christmas. I was inspired to make this tag by my love of old black and white movies ~ I always remember as a child, I would spend hours watching these films and I especially loved the ones that were made for Christmas ~ It's A Wonderful Life, Miracle on 34th Street, A Christmas Carol, The Bishop's Wife with the amazing Cary Grant and so many more and because of this I immediately was drawn to this die set and decided to mix up some idea-ology papers with Sizzix dies which includes the brand new Vault Series 2021, to create this festive make.
So let's get started and here's how I created my tag...
I used a Mini Etcetera Tag for my make and began by covering the surface with paper from the Christmas Backdrops set. I love the vintage feel of these papers and I thought it would be a match made in heaven for my tag and the Festive Gentleman Caller.
I cut a panel of the paper and machine stitched a border around the edge before I attached the paper to the tag with Matte Collage Medium, tearing and curling some of the edges to look worn. Along the bottom edge of the tag, I flipped the paper over and attached a narrow strip of the dogtooth pattern, just to give a little more interest.
I then applied some Grit Paste through the Speckles Layering Stencil to create the look of snow and set this to one side to dry.
DIE CUTTING
Dies used: Christmas 2021 Vault Series, Home For The Holidays, Holiday Greens
GENTLEMAN CALLER
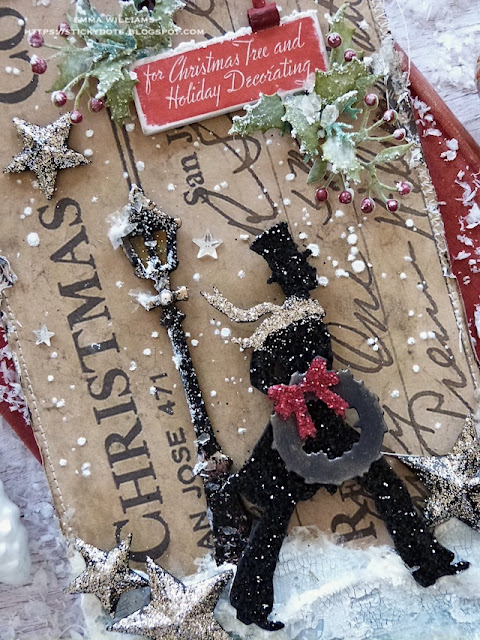
Starting with the gentleman in the Vault Series 2021 Thinlits Die Set, I cut five separate images from black card and layered these over one another to create one image, the thickness of mount board. I then spread Glossy Accents over the die cut image and sprinkled Nightfall Glitter from the Halloween Sparkle Set, adding it over the top of the glossy accents, but I left a gap where I wanted the scarf to be glittered in an alternative colour. Tap away the excess before applying Glossy Accents to the scarf area but this time I sprinkled it with Tinsel Glitter from Tim's Holiday Sparkle Set. Set aside to dry.
For the wreath I cut two separate sections from black card, layered them together and then applied a small amount of gilding wax over the surface. I attached the wreath to the gentleman die cut and placed the die cut bow onto the wreath which I glittered with red sparkle from my stash.
LAMP POST
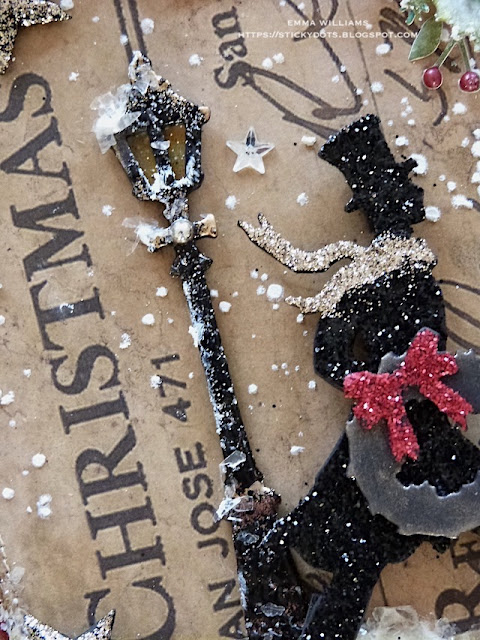
Exactly the same as I did to make the gentleman, I cut the lamp post five times from black card and layered the card over one another to create one substantial die cut. I then applied an embossing dabber over the surface of the die cut before sprinkling Wow Etched Platinum Embossing Powder over the top. Tap away the excess and heat emboss until molten.
I repeated this technique once more to create an enamelled effect.
I then took an embossing pen and just added the pen to areas of the lamp post that I wanted to emboss in gold. Sprinkle gold powder over the top and heat emboss.
STARS
Die cut four dimensional stars from black card using the two dies in the Vault Series 2021 set and after folding along the score lines to make the stars, I smeared them with Glossy Accents and then sprinkled the same glitter as I used on the scarf over the top of each start.
SNOWY PATHWAY
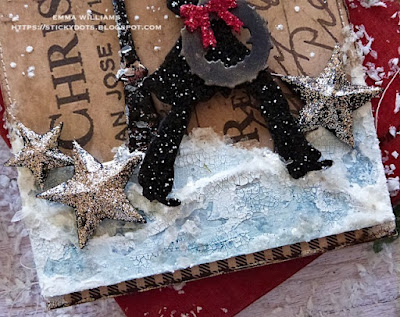
I coloured some Mixed Media Heavystock by spritzing it with Speckled Egg and Weathered Wood Distress Stains, together with Speckled Egg and Tumbled Glass oxide Sprays. Once I had the colour I wanted, I then heat dried the card. Making sure the card is completely dry, I randomly applied Crackle Paste over the surface, leaving some of the blue areas untouched. I allowed it to dry and the crackle to appear before I used a die from my stash to die cut the snowy mounds from my card. The die I used is an older die of Tim's called Home for the Holidays.
HOLIDAY GREENS
I cut a selection of holiday greens from card inked with Peeled Paint, Iced Spruce and Bundled Sage Distress Spray Stains and then inked the edges with Peeled Paint.
For the icy effect, I smeared the die cuts with Matte Collage Medium before sprinkling Rock Candy Dry Glitter over the top and adding Tonic Nuvo Crystal Drops in Postbox Red to create the berries on the sprigs. Set aside to dry.
With all my die cutting ready, I can now assemble the tag and bring the story to life.
I started by attaching all the layers of snowy mounds at the bottom, I used four separate layers and attached them with foam pads to form various heights.
To create the crunchy icy feel to the ice, I used Mica Flakes and attached them by adding Glossy Accents to the surface of the die cuts and sprinkling the sparkly flakes over the top. Let them dry and then tap away any loose flakes.
At this stage I also added some flakes around the top of the tag and tumbling down the sides.
I then attached the lamp post...
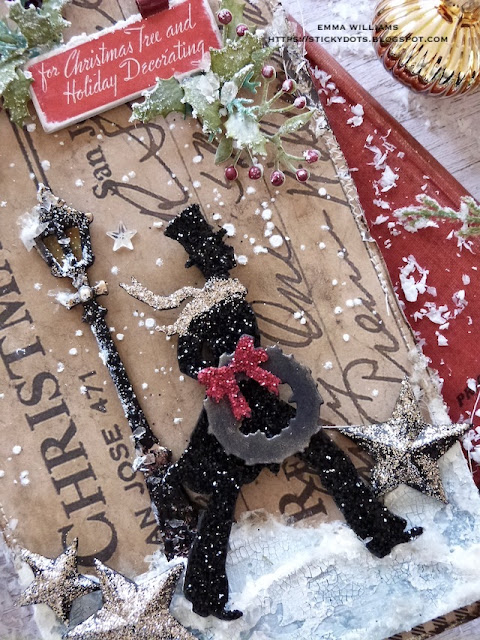
I used foam pads to attach the festive gentleman caller, which I placed to appear as he was running along to get home before the heavy snow started...
Finally I attached the stars, three along the bottom....
...and one in the top left hand corner.
You can see the dimension that I've created in the photo below...
In the top right I attached the Holiday Greens, which I placed to surround a Christmas Baseboard piece. I added a Tiny Clip to the baseboard, which I painted with Candied Apple Distress Paint.
I completed the tag by threading some Velvet Ribbon through a hole that I punched out of the paper background on the tag.
So that's my tag finished and I hope you love this make which I think would be perfect for anyone who loves vintage or even for those men in our lives...
As always, if you make anything, or been inspired by anything that you've seen here on my blog ~ then please, let me know by tagging me on social media or leaving a comment here and I will be right over to take a look!
Don't forget that every week, one lucky random participant has the chance to win a $25 gift voucher from Simon Says Stamp and you can join in up to 5 times, which means you could have 5 chances to win. You have until next Monday at 8am Ohio time. 1pm UK time, 2 pm CET to join in and good luck....
Recipe for project:










This project is fabulous! It certainly is sparkly! I love all the icy detail and the dimension on this tag!
ReplyDeleteThis is awesome!! Love the details and the sparkle!!
ReplyDeleteLove your elegant card. Very stunning
ReplyDeleteI love it!!
ReplyDelete