Hello everyone!
Another week has flown by and here we are at Monday already but that means it's the start of a brand new week and a brand new Simon Says Stamp Monday Challenge and this week is called "Don't Cut, Just Paste". From texture paste to paste like paints, molding paste to gesso, this is all a staple of great mixed media projects and we can't wait to see how you will incorporate paste into your project!
For my project, I wanted to make a bright, summery canvas recreating the feel of summer meadows blowing in the wind against a bright blue sky and for this, I used texture paste to create the background that would also become the focal point for the entire piece.
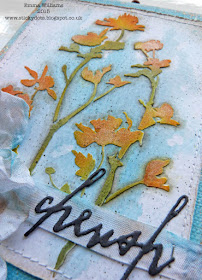
For the next stage I applied the Broken China Mini Distress Ink pad directly to a piece of watercolour card which I cut slightly smaller than my canvas. I spritzed the ink with water and then let the colour run to create a background before heat drying and setting the ink. Once dry, I then place the Wild Flower Layering stencil over the top and using a palette knife added Texture Paste through the stencil. Remove the stencil carefully and allow the paste to completely dry. Once dry, place the stencil back over the top of the paste and using Mustard Seed, Barn Door, Wild Honey and Peeled Paint Distress Inks, apply the inks over the top of the paste, blending the colours together to create the scene. Whilst the ink is still wet, dust a small amount of Perfect Pearls over the top to create a beautiful shimmer.
Remove the stencil and using Pumice Stone Distress Marker Pen, carefully edge around the paste to create a shadow and make the flowers pop. As a finishing touch, I stitched around the edge of the card and then using the Distress Marker Spritzer Tool, I lightly spritzed some Black Soot over the top.
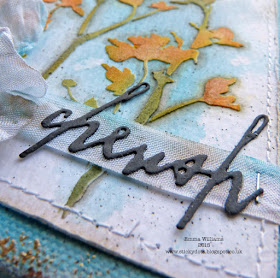
Cut a length of Crinkle Ribbon and dye the ribbon using a small amount of Broken China and Frayed Burlap Distress Ink applied to a craft sheet and spritzed with water. Once the ribbon is dyed and thoroughly dry, cut and wrap a small piece around the bottom section of the canvas and secure the ends at the back.
With the remaining ribbon, I tied it into a scruffy bow and attach it to the left hand side of my canvas.
As a finishing touch to the bow arrangement, I added a small amount of Scattered Straw Distress Paint to the surface of an enameled tag, added the wording "Gather Moments" using Remnant Rubs and attached the tag with a loop pin. I then added an antique button to the centre of the bow, again adding a touch of Scattered Straw Distress Paint for a hint of colour and a decorative pin.
To complete the canvas I just felt it needed one more statement and for this, no meadow would be complete without a butterfly and I used the Butterfly duo die to die cut one of the butterflies from a piece of card. I then coloured the die cut shape with Barn Door, Wild Honey and Spiced Marmalade Distress Inks before embossing it with the co-ordinating folder. I added some Gathered Twigs Distress Ink to the body of the butterfly and very lightly added the ink to the embossed areas to accentuate them before adding a small amount of Treasure Gold Gilding Wax around the edge to give a slight shimmer.
I attached the butterfly to a piece of wire that I coiled around a pencil and then popped it into my bow arrangement to give the effect of it fluttering.
Finally, I die cut the word Cherish from black card and attached it to the ribbon on my canvas and added a ...
To display my summer meadows canvas, I popped it onto an easel which I painted in a co-ordinating colour to match my canvas.
I really hope you've enjoyed the creative process behind this project and that it brings some sunshine into your day!
If you need any further inspiration for this challenge, then you need look no further than our blog to see all the wonderful creations from all the very talented Design Team members and every week, one lucky random participant has the chance to win a $50 gift voucher from Simon Says Stamp. Good luck....
Thank you so much for all your visits today and hope you all have a great week ahead
See you again soon...love Emma xx
Products used:
Tim Holtz Dies: Butterfly Duo, Handwritten Love
Distress Ink: Wild Honey, Peeled Paint, Barn Door, Spiced Marmalade, Gathered Twigs, Mustard Seed, Broken China
Distress Marker Pens: Black Soot, Pumice Stone
Paint: Dina Wakley Sky Blue
Embellishments: Button and decorative pin from my own stash


Beautiful,lovely design and colours.xxx
ReplyDeleteHi Emma. This is just stunning!! I love these colours together, wow! Great work with the stencil, I was debating about buying this one, but I think you just sealed the deal for me! A gorgeous piece! hugs :)
ReplyDeleteOnce again a lovely design xxx screams summer with the turquoise and hot orange love it xx
ReplyDeleteWhat a lovely piece! I really enjoy your art. TFS Emma!
ReplyDeleteGorgeous Emma! just gorgeous!
ReplyDeleteYou n your creativity Emma ALWAYS bring some sunshine into my days n this beautiful canvas is no exception! You have captured the summer meadows so well using the texture paste. Thx for sharing the tip of repositioning the stencil so you can then paint the texture paste with precision . The perfect pearl shimmer compliments the touch of gold leaf opulence you applied to the canvas perfectly . As always your finishing touches n attention to detail is second to none. thx so much for sharing
ReplyDeleteSo gorgeous! I saw this on Pinterest and had to come over and leave a comment.
ReplyDeleteStunning creation, Emma! I love how the butterfly looks like it could fly off the page :)
ReplyDelete*mwah*
Steph
Simon Says Stamp!
gorgeous as always. your attention to detail is awesome. love your colour combos esp the blue and brown. i think those 2 colours are a math made in heaven. love it, hugs xx
ReplyDeleteReally, really pretty Emma. Love the background you created and the Wildflower stencil over the top.
ReplyDeleteBeautiful Emma, I love this piece. The worn canvas base and the stenciled flowers are wonderful. I am going to give this a try. LOVE! :)
ReplyDeleteAbsolutely gorgeous Emma. And Thank You for very good instructions on 'how to'.
ReplyDeleteI love everything about this canvas! Great colors and texture :)
ReplyDeleteOhh this is so pretty, Emma! Love this! The butterfly popping off is such a gorgeous detail! Hugs, Sandra
ReplyDeleteAbsolutely stunning Emma, I love the delicate coloured background and the gorgeous vibrant butterfly - putting it on the wire is a great touch!
ReplyDeleteThis is another amazing piece, Emma! The incredible thing about you is that you never have wasted areas-- you make everything look stunning, even the negative space. I really love how the flowers just rise up out of that subtle background. So pretty!
ReplyDeleteSuch a gorgeous canvas, Emma. The colors and textures are so fabulous! :)
ReplyDeleteThis is lovely Emma! Great use of that stencil and the colours are wonderful.
ReplyDeleteGorgeous canvas! LOVE how you stenciled and colored your flowers and then the beautiful embellishments add that wow touch!
ReplyDeleteEmma I just love your summer canvas... I'm new to mixed media and I'm loving your colours and added embellishments.
ReplyDeleteFabulous canvas :)
ReplyDelete