Hello everyone and Happy Tuesday...
I'm so excited to be here to share a fun tutorial of how to use Distress Glazes to emboss and glaze metallic card stock to make some spectacular enamelled results.

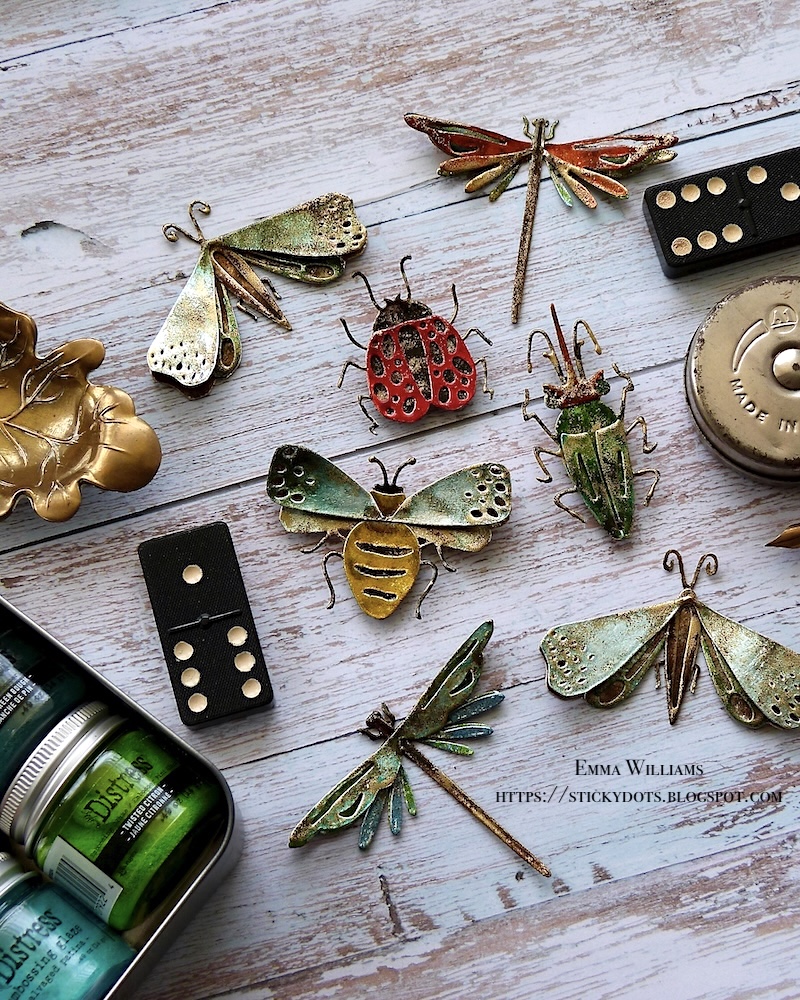
In this post, I’ll guide you through each step and show you how to create this simple layering technique on the Sizzix Funky Insects Thinlits Die by Tim. Then, if you’re anything like me, you’ll just want to keep on going, because this will work on so many pieces ~ from die cut gears to backgrounds, from alphanumerics to flowers ~ the choice is endless and your imagination is the only thing that you will need.
So let's get started and I began with the gorgeous Funky Insect Moth….
The first thing you need to do, is die cut the shapes and pieces you are using. I use the Sizzix Switch Plus Machine to die cut and as mentioned earlier, I will be using the insects which I cut from Silver Metallic Kraft Card. The reason I use silver, is because it's more of a neutral colour, and won't change the colours of the Distress Glaze.

With all your pieces die cut, you now need to choose the colours of Distress Glazes that you want to use. I will be listing the colours that I chose as a guide.

We're now ready for the fun to begin...
DISTRESS GLAZE COLOURS: Hickory Smoke, Speckled Egg, Salvaged Patina, Walnut Stain, Vintage Photo and Ranger Ink Fine Detail Gold Embossing Powder
Using the Tim Holtz Distress Embossing Dabber, I applied the ink over the entire surface of the first layer of the die cut. For this piece, it will be the solid body and I chose Hickory Smoke as my first colour of Distress Glaze.
Heat emboss the powder with a heat tool, until it becomes molten and shiny.
The glaze will cool down almost immediately, and once it is, I applied my second layer of ink using the Embossing Dabber and then sprinkled some Vintage Photo Distress Glaze over the top. When applying the dabber to this piece and any subsequent pieces, you only need to randomly dab the ink, not add a complete coverage. You can also add the ink to highlight certain areas, such as the legs, antennae, etc.
As with the dabber ink, you will also only need to apply the powder sparingly, not create a solid coverage ~ you are trying to achieve a marbled effect. If you find you have too much powder, then you can use a small paintbrush to brush away any excess. Once again, heat emboss the powder and set this piece to one side once finished.
Taking the wings, and using the same process as before ~ apply the Embossing Dabber to the surface and then a first layer of Speckled Egg Distress Glaze...
...followed by a second layer of Walnut Stain Distress Glaze. Always remember to heat emboss between the layers of glazes.
This Funky Insect has four separate die cut pieces, and for the third and final section, I chose to use Salvaged Patina as my first layer of Glaze...
...then a sprinkle of Rustic Wilderness, and finally a sprinkling of Walnut Stain.
For the final die cut piece, I used a solid coverage of Walnut Stain Distress Glaze, but applied two separate layers to this piece before moving onto the next step, adding some hints of gold.
With all my pieces complete, I added that touch of shimmering gold to each die cut, enamelled piece.
Once again, you need to apply the ink using the Embossing Dabber and then a very light sprinkling of Ranger Ink Fine Detail Gold Embossing Powder.
This powder does work in a slightly different way to the Glazes, so therefore you really do only need a dusting of the powder and if you find you have applied too much you can remove it before you heat emboss. Or if you do feel that once you've embossed the powder, it appears too thick, then you can apply more glaze over the top and blend the powders.
All my pieces are now ready to assemble and for this I chose
Distress Matte Collage Medium, and I also used foam pads to add dimension to the wings.
Now that I've shown you the basic steps of how to enamel...the world is your oyster and I went onto creating more bugs using this technique and a few more things that will be coming soon!
I've listed the colours I chose to use as a guide, but you can choose whatever colours of Distress Glaze that you would like...
LADYBIRD ~ Distress Glazes:
Solid Base Layer: Hickory Smoke, Ranger Ink Fine Detail Black Embossing Powder
Top Layer: Lumberjack Plaid, Candied Apple
Ranger Ink Fine Detail Gold Embossing Powder
DRAGONFLIES....
DRAGONFLY Number 1 ~ Distress Glazes:
Solid Base Layer: Uncharted Mariner, Walnut Stain, Twisted Citron
Top Layer Wings: Cracked Pistachio, Rustic Wilderness, Walnut Stain
Wings: Uncharted Mariner, Walnut Stain
Ranger Ink Fine Detail Gold Embossing Powder
DRAGONFLY Number 2 ~ Distress Glazes:
Solid Base Layer: Uncharted Mariner, Walnut Stain, Twisted Citron
Top Layer Wings: Rusty Hinge, Walnut Stain
Wings: Fired Brick, Rusty Hinge, Walnut Stain
Ranger Ink Fine Detail Gold Embossing Powder
BEETLE
Solid Base Layer: Evergreen Bough, Cracked Pistachio, Twisted Citron, Walnut Stain and Fine Detail Black Embossing Powder
Top Layer Wings: Rustic Wilderness, Cracked Pistachio, Twisted Citron, Walnut Stain
Head: Rusty Hinge, Fired Brick, Walnut Stain, Hickory Smoke
Ranger Ink Fine Detail Gold Embossing Powder
BEE
Solid Base Layer: Hickory Smoke, Walnut Stain, Speckled Egg and Fine Detail Black Embossing Powder
Top Layer: Fossilised Amber, Hickory Smoke
Wings: Speckled Egg, Hickory Smoke
Ranger Ink Fine Detail Gold Embossing Powder
Thanks so much for stopping by today and I hope you've enjoyed the tricks and techniques to create these enamelled pieces...
...and if you are inspired by anything you see on my blog, then please just drop me a message, either here or over on my Instagram or Facebook profiles and I will always pop by to take a look.
Don't forget that you can click below to shop for all the products I've used in this tutorial...
See you soon, Emma xxx


Thank you for sharing such an interesting technique. I’ll be gathering some supplies to give it a go!
ReplyDeleteFab post and projects, TFS
ReplyDeleteKathyk
Fabulous! Such a fantastic effect!
ReplyDeleteThank you!!!
ReplyDeleteWhat a great tutorial. Will definitely have to play with the glazes.
ReplyDeleteYou really are an inspiration, love this technique, thank you
ReplyDeleteOh wow 😍
ReplyDeleteThis is amazing! They're like beautiful, metal garden sculptures. I can't wait to use some on my industrial-type of projects. Thanks Emma!
ReplyDeleteThese are so cool. You are so great at color combinations… thanks for sharing!
ReplyDeleteOh I love these so much thank you for the tips and tricks and details
ReplyDeleteFantastic tutorial Emma. I love them and will try your techniques, so inspiring.
ReplyDeleteWhat a lot of spectacular pieces of insects. I love the beetle in green. Thanks for leading us step by step through the process. I will give it a try!
ReplyDeleteLove this effect so thanks for the tutorial. I can see more embossing glazes in my future!!
ReplyDeleteWhat a wonderful effect you have achieved. Thank you so much for taking the time to list all those glaze colours.
ReplyDeleteThese look amazing Emma, TFS the colours and tutorial, Cathy x
ReplyDeleteI've watched Tim mix the powders for this effect, but didn't think about doing each layer of powder separately. You're always next level, Emma. :-) Thanks for sharing!
ReplyDeleteThese are just wonderful! Thank you for sharing your creativity :)
ReplyDeleteNice article, we offer a comprehensive range of services encompassing website development services in Delhi NCR
ReplyDeleteWow, this is such a cool step through your amazing process of enamelling these bugs! Mind blown Emma!! These look AMAZING! Loving your step through, such a cool process and an amazing result. Sensational!! xoxo
ReplyDeleteI love all of these! Thanks for the step by step tutorial. I've been looking for inspiration to use this set that I purchased over a year ago and now I have it! Can't wait to get started.
ReplyDeleteThis is a great tutorial and I followed it and made quite a few of these bugs. The instructions are wonderful.
ReplyDeleteI did not have what you used to attach the layers of the bugs to each other and could not find any glue that would hold them in place because the glaze is so slick.
What I ended up doing was putting tiny amounts of clear embossing ink in between the layers sprinkled with tiny amounts of clear embossing powder and then I melted that with my heat gun. That worked really well to keep the layers of the bugs together!
The plural of antenna does not have an apostrophe.
ReplyDeleteMy apologies Carol, it was a genuine mistake that I didn’t notice but I hope you enjoyed the post…
DeleteWhat a wonderful tutorial and beautiful results! Thank you. I have not yet used embossing powders, but this is so inspiring, I'm all about learning now. LindaSue
ReplyDeleteWow! I just came across this on Pinterest and I had no idea you could get these effects. Thank you! I’m going to give it a go.
ReplyDeleteThese are wonderful, love the look!
ReplyDelete