
Hello friends...
It's time for the brand new Simon Says Stamp Monday Challenge and this week our theme is all about INSECTS AND BIRDS and we can't wait to see how you interpret the theme by using one or maybe even combining both of these in your projects.
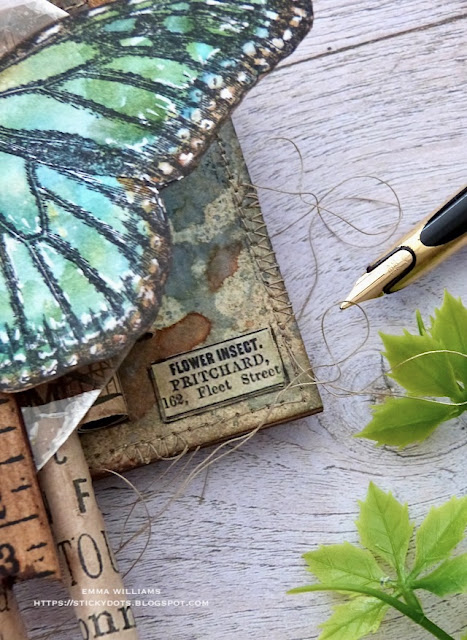
For my make, I created a Size 8 Etcetera tag and used products from Tim Holtz and Stampers Anonymous to add dimension, layers and details on this piece which was all inspired by that beautiful butterfly.


To begin with I started with the background and used a Size 8 Distress Tag, working with it horizontally for a change.

To create the layers on the tag, I began by spritzing Distress Resist Spray through the Floral Mini Layering stencil from Set 25. Once the spray is dry, I then spritzed the tag with Stormy Sky, Antique Linen, and a hint of Prize Ribbon and Ground Espresso Distress Spray Stains and added a little misted water over the top.
Allow for the inks to thoroughly dry before moving onto the next stage, and taking the same Floral Stencil, I placed this over the top of the inked tag and applied Translucent Grit Paste through the stencil. Whilst the paste is still wet, and working quickly I sprinkled Distress Glazes over the top of the paste. I used Fossilised Amber and Peeled Paint Glazes and applied them to the yellow onto the flowers and the green onto the foliage. Tap away the excess powder and then set to one side so that the paste can dry.
Whilst this was happening I stamped and watercolored my butterfly, which is from the Stampers Anonymous Specimen Stamp Set by Tim Holtz. I stamped the outline with Black Soot Archival Ink and watercolored the image with Distress Re-Inkers in shades of blues and greens. I dried the image and then added highlights of white pen over the artwork before I fussy cut around the outline.

The paste and powders on the tag should now be ready for the next stage and taking a heat tool, I heat embossed the glazes until they become molten and have an enamelled effect. TOP TIP: DO NOT OVERHEAT THE GLAZES/PASTE, keep moving the heat gun onto the next area once the glaze has melted.
To add some more layers and interest onto the tag surface, I inked up the script stamp from the Tiny Toadstools stamp set and just randomly stamped the writing over areas of the tag before I machine stitched a border round the the edge and then attached the tag to a Size 8 Etcetera Tag using Matte Collage Medium.

At this stage, I added some more detail to the tag and used a Specimen Remnant Rub, no.903 in the top left hand corner and the word Specimen in the bottom left corner.

I also added some metal offcuts to the tag, which I had leftover from a previous project. These are basically offcuts of Metallic Kraft Stash Card that I embossed using the 3D Foundry Folder and then inked with Alcohol Inks to create the rusty tones on the surface. I then cut them into strips and wrapped two strips around the edges of my tag ~ one in the top right hand corner...

...and one around the left hand side of the tag. I then added a Machinery Head to this piece, altering the metal with Crackling Campfire, Antiqued Bronze and Black Soot Distress Paints which once again creates the rusty appearance.

In the bottom right hand corner, I adhered a Curator Snippets Ephemera piece.
Now to create the paper rolls for the butterfly to sit on!

For this I used papers from the Backdrops set. This is such a great way to use all those offcuts of paper and I just roll them around a pencil to form the rolls. I made 7 roll of various lengths and then used Matte Collage Medium to attach them side by side to create the platform for the butterfly. I also applied a coat of the medium over the top and once this was dry, I used Walnut Stain Distress Crayon and Distress Ink, to age the paper.

I attached the rolls to the tag, placing them on the right hand side and then wrapped some red cotton thread around the ends.

Over the top of the paper rolls, I attached a piece of Mica Sheet which will create a solid, flat base.

The stamped butterfly is now ready to mount onto the paper rolls but before I attached this, I took a Ruler Finding and broke both ends of the ruler to form the jagged edges.

I then inked the wood with Walnut Stain Distress Ink. I just dragged the ink across the surface and then used a baby wipe to blend the colour. Once dry, I adhered the butterfly into place and then stuck the ruler onto the Mica Sheet.
We're nearly there and all that's left is to add the Optical Lens which hangs down from the tag.
I inked the metal with a little Rust and Pitch Black Alcohol Ink and then attached it to a Swivel Clasp, again altered with a little more of the Alcohol Inks.
I wrapped some more of that red cotton around the handle of the Optical Lens and inked the glass with some Mushroom Alcohol Ink to give that final vintage touch....

...before I attached the completed swivel clasp through the hole in tag.
So that's my make finished for this week...

...and as always, I hope you love what I've made, and enjoyed all the techniques I've used. If you make anything, or if you've been inspired by anything that you've seen here on my blog ~ then please, let me know by tagging me on social media or leaving a comment here and I will be right over to take a look!
Don't forget that every week, one lucky random participant has the chance to win a $25 gift voucher from Simon Says Stamp and you can join in up to 5 times, which means you could have 5 chances to win. You have until next Monday at 8am Ohio time. 1pm UK time, 2 pm CET to join in and good luck....


Recipe for project:


Such a cool make...love the paper rolls used as a base...marvelous idea!
ReplyDeleteSo pretty Emma. The right color and that larger butterfly are wonderful. I love the idea of using the tag on its side!
ReplyDelete