
Hello friends and Happy 2021!
Hope you all had a wonderful and safe Christmas! It was definitely different to other years where we've had family gatherings and spent time with loved ones but even though it was quiet, it was definitely a special day!
So as we close the door on 2020, we say hello to a brand new year and this week's Monday Challenge at Simon Says Stamp see's us celebrating all things new with our challenge ~ USE A NEW/OR UNUSED PRODUCT! The DT are also showcasing Brutus Monroe products within our projects, which is not something you need to do to play along but if you have any of their products in your craft stash, then we'd love to see what you do with them.
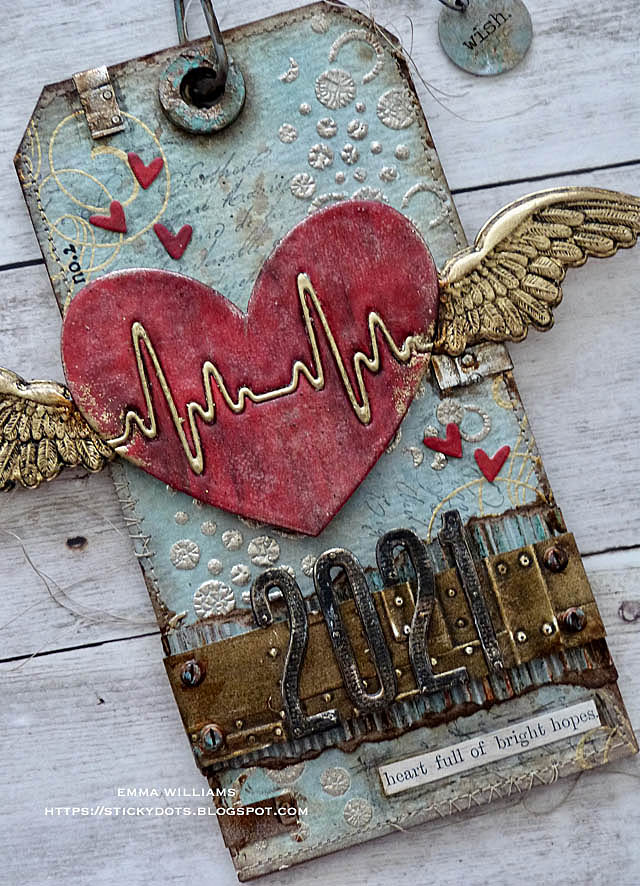
For my project, I chose to use a brand new Brutus Monroe stencil to create a background for my tag, which is all about a brand new year, one that I think we all hope will bring us all health, happiness and maybe even a small return to normality!

Here we go...it's time to start the first SSS challenge of 2021!


I started by creating a background for my tag and I wanted to use watercolour card for this particular project and I cut the card into a Size 8 tag shape. You can get a die for this, but I haven't got one so I just cut around the outline of a Mixed Media Heavystock tag in my stash.
I then inked the tag with a combination of Speckled Egg, Ice Spruce, Pumice Stone and Frayed Burlap Distress Spray Stains. I misted the stains over the tag which I'd dampened with a light misting of water, I also spritzed more water over the inks to blend them together.
After heating drying the tag, I added some stamping to the background. I used the script and music score stamp from the Poinsettia stamp set and stamped directly onto the tag with Black Soot Archival Ink. I also used the flourish stamp and stamped the image around the edge of the tag using clear embossing ink and Ultra Fine Gilded embossing powder by Brutus Monroe.
Now for my new product and I used the Bubbles stencil from Brutus Monroe and applied Distress Crackle Paste through the stencil, applying it to the top right and bottom left hand corner.

Working quickly whilst the paste is still wet, I sprinkled Liquid Platinum Embossing Powder over the top, tapped away the excess and then set to one side, allowing the paste to crackle and do it's thing. And once that has happened, I then heat embossed the powdered covered crackle, being careful not to overheat the paste.

After machine stitching a border around the edge, I adhered it onto a Size 8 Etcetera Tag, using Matte Collage Medium and added the hole reinforcer piece, which I'd crackled and painted with Evergreen Bough and a touch of Walnut Stain Distress paint.
Moving on, it's time to make my heart...

For this I used the Sizzix Heartbeat Thinlits die by Tim Holtz and a panel of white heavystock card. This die actually cuts into the card but I wanted to have a stand alone heart. So to create this, I began by die cutting the heart as normal and then just used the pieces that fall out of the die cut. I also removed the heartbeat rhythm line from inside the die cut, before putting the waste to one side to use later.
Taking the two heart sections, I painted these with a combination of Candied Apple and Black Soot Distress Paint, applying a layer of Candied Apple first and then dry brushing a layer of Black Soot over the top to deepen and intensify the colour.
Once happy, I then applied the Distress Embossing Dabber over the top of each of the painted heart sections, sprinkled with Brutus Monroe Icicle Ultra Fine embossing powder and then heat embossed each piece.
I repeated this process a further couple of times to create an enamelled effect to the heart.

Taking the heartbeat line, I applied the dabber to the line and embossed this with Brutus Monroe Gilded Ultra Fine embossing powder.
Now to piece my heart back together and I used the heart section that I placed to one side and I needed to create a solid heart shape to mount my pieces on to and this is where the waste heart die cut comes into play, I used this as a stencil to trace around the heart onto a piece of card before cutting around the pencil outline to give me one solid heart.
I then pieced my painted heart sections and the heartbeat line onto the solid heart that I cut, giving me one complete red heart, the thickness of chipboard.
To add some detail and shading to the heart, I just dabbed around the edge of the die cut with my embossing dabber before applying some gold embossing powder and heat embossing to create more of a vintage feel.

To finish the heart, I added some Black Soot Distress Paint, and using a minimal amount on a paintbrush, I brushed the paint over the top and working quickly before it dried, I wiped away the excess, just allowing the paint to sit in all the 'nooks and crannies' on the die cut.
For the wings, I used the Winged 3D Embossing Die and cut one set of wings from gold metallic kraft stash. I applied some Black Soot Distress Paint over the top of the wings, and as before, I wiped away the excess so that it just accentuated the die cut.

To elongate the wings so that they are behind the heart, I snipped them into half and reattached each one behind my heart shape.

Attach the heart to the tag using foam pads.
Beneath the heart, I added a piece of torn corrugated card, which I painted with a combination of Tumbled Glass, Evergreen Bough, Ground Espresso and Black Soot Distress Paints before adding some Vintage Gold Alchemy Gilding Wax over the top. I inked the torn edges with Walnut Stain Distress Ink and attached across the bottom section of the tag.

The embossed metal was actually left over from a separate project, but this is just a piece of metallic 3 kraft stash embossed using the 3D Foundry Texture Fade. I then used a combination of Black Soot, Antiqued Bronze, and Ground Espresso to colour the metal.
I attached the strip of metal across the tag, placing it over the top of the corrugated card and wrapping it around the sides before adding some Hardware Heads to either side. These are painted with Distress Paints to create more of rusty finish.

After die cutting the numbers, 2021 and cutting each number three times from black card using the Alphanumeric Classic lower case Thinlits die ~ I layered the die cuts over the top of one another to create the look of chipboard letters. I then used a little of the Alchemy Gilding Wax over the top and attached them onto my metal strip using matte collage medium.

I added a few die cut hearts, cut from red card using the Falling Hearts die and all found in my leftovers box and attached these to the background and also placed some smaller strips of the embossed metal, wrapping them around the edges of the tag.
We're nearly there and all that's left is the finishing touches!
I added a Clippings Sticker to tell the story ~ "heart full of bright hopes"...

...and then added a Swivel Clasp into the hole at the top of the tag, complete with a Typed Token, "hope", both of which I altered with Distress Paints to create more of a vintage, rusty feel to the metal work.

So that's it from me for today and I hope you love this tag and the ideas and inspiration I've shown in my post.
Don't forget that every week, one lucky random participant has the chance to win a $25 gift voucher from Simon Says Stamp and you can join in up to 5 times, which means you could have 5 chances to win. You have until Monday 8am Ohio time. 1pm UK time, 2 pm CET to join in and good luck....


Stunning Emma. I always love seeing your awesome makes. Especially this one. xxx
ReplyDeleteOMG...the details the details !!! Emma you still wear the title Product Queen. This is making!! 🤗💕
ReplyDeleteOops chemo eyes *amazing !
ReplyDeleteFabulous!
ReplyDeleteAbsolutely love your tag...so creative and artistic!!!
ReplyDeleteThis tag is wonderful!
ReplyDeleteThanks for taking the time to write up such detailed instructions. I find it so fascinating.
ReplyDeleteAbsolutely stunning and very inspiring!! So much details and techniques!!
ReplyDeleteLove your makes... thanks for sharing!
ReplyDeleteYes, we have to hang on to hope!
ReplyDeleteWhat a beautiful tag to celebrate the New Year! The design is amazing and I loved seeing how it all came together 😀. All the best for 2021, let's hope it's a better year for everyone! Happy Friday and weekend! Hugs, Jo x
ReplyDelete