Another week has flown by and it's been a particular busy one here as I've been locked away in the craft room making some super secret makes for Tim Holtz, that I can't show you just yet but are coming soon! But in between all these makes, I've also created my latest project for the Simon Says Stamp Monday Challenge and this week our theme is all about making anything but NOT A CARD!
For my project, I decided to use my favourite shape, a tag and inspired by so many Halloween makes that are appearing on social media at the moment, I created a piece full of mystery that uses the new Masquerade die set from Tim's Chapter 3 Sizzix release, together with a few of my left over bits and pieces from last year's Halloween idea-ology (I'm sure we all have those in our collections, right?!?!) and combining them all with some of Tim's regular idea-ology products!
So, I invite you to the Masquerade Ball, a place that isn't quite all that it seems and hope you love the project I made!
To begin with I took two Etcetera tags, small and medium size and covered the small tag with some of my Halloween Wallpaper from last year and covered the medium sized tag using some paper from the Etcetera Paper Stash, all adhered into place using Matte Collage Medium. The paper in the 8" paper pad isn't quite long enough to cover the entire length of the tag, so to cover the bottom section, I used a strip of Halloween Wallpaper and placed this along the bottom of the tag. Apply a coat of medium over the top of each tag, I used a blend of the clear medium and the Vintage Collage Medium, and then allow to dry.
Once the medium is dry, I then added some Crackle Paste around the edges, and also randomly over the surface of the tag. You know when the paste is dry when the lovely crackles appear and once that happens, I applied my Gathered Twigs Distress Crayon over the top and used a damp water brush to push the colour into the crackles. Use a kitchen towel to wipe away any excess colour or blend it over the surface of the tag with your fingers.
Adhere the smaller tag onto the centre of the medium sized tag using Matte Collage Medium and then, using a splatter brush and Black Soot Distress Paint, gently flick the paint across the two surfaces.
Moving onto the scene ~ I wanted to create a really layered piece, packed full of dimension and drama and so I took a small Vignette Panel and adhered another panel of the Halloween Wallpaper Stash over the top. I then took one of the Keepsake Ephemera pieces and attached this to a baseboard frame before attaching the frame to my covered vignette panel. You can see how I built up the layers and the dimension this gives, in the photo below.
Obviously, there is an aperture in the frame ~ so to overcome this, I placed some foam pads onto the back to build up this area and therefore create some support to the piece once it's been adhered onto the vignette panel.
Obviously, there is an aperture in the frame ~ so to overcome this, I placed some foam pads onto the back to build up this area and therefore create some support to the piece once it's been adhered onto the vignette panel.
Once the panel is set in place, I then attached some Botanical Layer pieces, again supporting them with foam pads to create varying layers of dimension. I then added some moss in-between the layers.
Below the panels, I placed some Scallop Etcetera Trims ~ these are the largest length trims in the pack but I used two different widths. I painted the wider trim using a combination of Ground Espresso, Antiqued Bronze and Black Soot Distress paints and then painted the narrower trim with Old Paper, Picket Fence and Pumice Stone Paints before layering them and attaching them beneath the panels.
Now to create the masks and I used the large mask die to cut two pieces of Mixed Media Heavystock Card which I layered together to create one substantial die cut. Which I painted with Black Soot Distress Paint. I also cut one of the smaller sized masks from black card which I added to a Paper Doll, colour tinted with Distress Marker Pens.
I just love that you have all these different sized masks to use on the paper dolls, it's like being a child again and dressing up all my toys ~ how much fun is this going to be for Halloween and Christmas! I attached my paper doll to the right of the vignette panel.
I just love that you have all these different sized masks to use on the paper dolls, it's like being a child again and dressing up all my toys ~ how much fun is this going to be for Halloween and Christmas! I attached my paper doll to the right of the vignette panel.
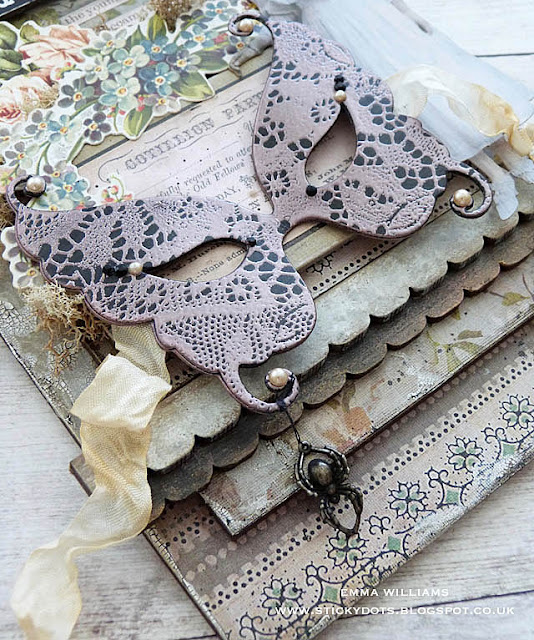
Taking the larger mask, I then inked up the Lace Stamp with clear embossing powder and stamped directly over the top of the die cut. Sprinkle with Rose Gold Embossing Powder and heat emboss until molten. At this stage, I also slightly shaped the mask whilst the powder was still warm. I then added some pearls and black adhesive gems to the mask.
For the ribbons on either side, I cut a piece of Crinkle Ribbon from my stash, and dyed it with Antique Linen Distress Spray. Once the ribbon was dry, I then attached a piece to either side of the mask.
I then attached my mask to the project, allowing the ribbons to flow out from either side but attaching them with small amounts of Matte Collage Medium, just so they're secure.
As a finishing touch to the mask I added a spider hanging down on a piece of thread, something that was inspired by a recent fun trip to the Dior exhibition at the V&A ~ if you can see this exhibition, it's worth it!
To complete the piece, I attached a Halloween Quote Chip, Masquerade and some Halloween Clippings Stickers, 'the young girl became possessed', both taken from last year's stash!
I then attached a number '31' clippings sticker to the top of my larger tag and finally attached one of the resin skulls, again from last year, to the top of the smaller tag, placing it where the hole reinforcer piece would be attached.
So, that completes this week's project ~ a tag that if you're not into those black, dark pieces that we associate with Halloween, then this is something a bit different for you to make and be inspired by! Hope you love it...
Have fun creating your projects and don't forget, you can find more inspiration from my talented teamies over on the challenge blog and every week, one lucky random participant has the chance to win a $50 gift voucher from Simon Says Stamp. You have until Monday 8am Ohio time. 1pm UK time, 2 pm CET to join in and good luck....
Thank you so much for taking the time to stop by today and hope to see you again soon, love Emma xxx
Recipe for project:
Tim Holtz/Sizzix: Masquerade
Tim Holtz/Stampers Anonymous: Medium Etcetera Tag, Small Etcetera Tag, Scallop Etcetera Trims, Ornate and Lace Stamp Set
Distress Paint: Old Paper, Pumice Stone, Picket Fence, Ground Espresso, Black Soot, Antiqued Bronze
Distress Spray Stain: Antique Linen
Tim Holtz/Stampers Anonymous: Medium Etcetera Tag, Small Etcetera Tag, Scallop Etcetera Trims, Ornate and Lace Stamp Set
Distress Paint: Old Paper, Pumice Stone, Picket Fence, Ground Espresso, Black Soot, Antiqued Bronze
Distress Spray Stain: Antique Linen
Idea-ology: Halloween Quote Chips, Resin Skulls, Vignette Panels, Halloween Clippings Stickers, Paper Dolls, Botanical Layers, Crinkle Ribbon, Halloween Adornments, Keepsake Ephemera , Baseboard Frames
Mediums: Matte Collage Medium, Vintage Collage Medium, Texture Crackle Paste, Rose Gold Embossing Powder, Versamark Ink Pad
Surfaces: Mixed Media Heavystock, Etcetera Paper Stash, Halloween Wallpaper
Studio Katia Onyx Crystals
Little Things From Lucy's Cards Pearls
Tim Holtz Media Glass Mat
Surfaces: Mixed Media Heavystock, Etcetera Paper Stash, Halloween Wallpaper
Studio Katia Onyx Crystals
Little Things From Lucy's Cards Pearls
Tim Holtz Media Glass Mat


Emma, you have captured the essence of the masquerade! The mask is exquisite and your layered tag is gorgeous! I always look forward to seeing what you share each week, consistently a feast for the eyes! xx
ReplyDeleteJust so amazing ( background, yummy ) ... such fun detail ... mask ,the placement of ribbon and the colors... a gorgeous masquerade!! #productqueenonduty #giddyqueenwaltzingthrough
ReplyDeleteWonderful piece! That mask is stunning and love how the girl has one too! You have me thinking of the movie, The Labyrinth, now, Emma!
ReplyDeleteEmma, You really have showcased the mask with style and class. Its absolutley gorgeous and is set amongst so much more fabulous creativity. Your projects are in a league of their own .
ReplyDeleteBig hugs x
Emma....SOOOO creative! I love the lace mask, and the vintage florals with the slightly macabre theme! Bravo!
ReplyDelete