
Hello again friends...
How is it already the 10th December? There is still so much to do to get ready for Christmas but I'm going to keep calm and carry on ~ my tree is up and the house is all decorated, cards are written and ready to go and I just need to now think about food for the big day and get the final presents, then wrap them all up!
But back to my post and today, is the start of a brand new Monday challenge at Simon Says Stamp and this week our theme is called ~ WARM WINTER WISHES and we would love for you to join us and share your wintery projects!
I created an icy Etcetera tag that is all about Peace and Joy at Christmas. As always, I've packed it full of dimension and lots of layers to build up the main focal point of the heart and wings which sit upon an Icy Flake.

So, let's begin the brand new challenge and here's how I created my project...


Once I was happy and my card was dry, I attached some torn tissue tape to the central area of the background and then scraped some gesso over the top ~ you don't really see this on the finished tag but it does just give some more layers on the background, which is effective. I then applied a panel of Grit Paste thought the Layering Stencil placing them down the centre. To create some sparkle, which is so hard to pick up on camera but I promise you it is there, I then sprinkled some Rock Candy Dry Glitter over the top of the wet paste.
When the paste is set and dry, I cut the card to the shape of the tag, machine stitched a border around the edge and then attached it onto the tag, using Matte Collage Medium.
To complete the background I applied Pumice Stone Distress Crayon around the edges and then added some shimmer using Vintage Metallic Foil Sheets in silver. For this I just dabbed a Collage Stick onto the edges, allowed it to become tacky and then placing the shiny side uppermost, press the foil sheet onto the glue, ripping it away to reveal the shimmer.
Using the music score background from the Christmas Ephemera, inked to make a little more worn around the edges, I matted this onto silver metallic kraft card, followed by a layer of hessian. I then mounted the panel using foam pads onto the centre of the tag and added four small Hex Fasteners to each corner.


Once the paste was dry, I then applied Rock Candy Crackle Paste over the top of this and again waited for it to dry. I ran the Pumice Stone Crayon around the edge to just highlight the tips and take away the whiteness before adding some more shimmer using some of that Vintage Foil Tape Sheet, again applied in exactly the same way as I did to the edges of the tag.
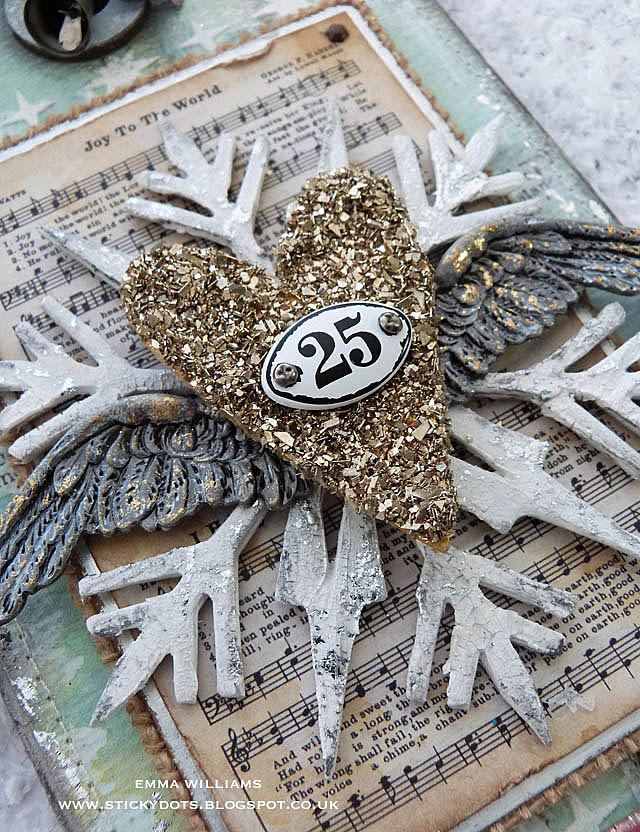
I then placed these beneath a glittered die cut heart. The heart is cut from chipboard, painted gold and then I applied a layer of collage medium over the top and sprinkled with gold glass glitter. You need to allow this to thoroughly dry out, probably over night before attaching it to your project.


You can see the dimension in this piece in the photo below....


I hope you've enjoyed the creative process behind this tag and love the finished piece just as much as I loved creating it and sharing it with you all.
Don't forget, you can find more inspiration from my talented teamies over on the challenge blog and every week, one lucky random participant has the chance to win a $50 gift voucher from Simon Says Stamp. You have until Monday 8am Ohio time. 1pm UK time, 2 pm CET to join in and good luck....


See you very soon, love Emma xxx
Recipe for project:
Distress Spray Stain: Antique Linen, Iced Spruce


Another fabulous piece! That chunky glitter is amazing, Jo x
ReplyDeleteOh so fabulous! Another glorious Christmas project! I love the color, the layers are to die for, and the sentiment is perfect. I love the touch of red combined with cracked pistachio, white and silver. I don't know how you do it, but every week the project is better than the last. Thanks for sharing your inspiration and process. And now, I want that die, too!
ReplyDeleteGorgeous tag Emma! I love the colours and sparkle and how you layer the elements is awesome! absiolutely stunning!! :-)
ReplyDeletehope you have a great week!
Luv
Lols x x x
I wish I was so well organised! the trip to the UK has really put me behind schedule! I haven't written any cards and only have one gift bought!! :-/ I need to get a wiggle on! ;-)
Perfection!❤️🌲❤️
ReplyDeleteBeautiful! Subtle and elegant.
ReplyDeleteI feel the love ... so beautifully done... that color combo for background is yummy ( you KNOW I Pin It )... so many cool techniques #ProductQueenInTheHouse #GiddyQueenOnDuty <3
ReplyDeleteGlorious icy colours in that background - it looks amazing - and all your layers top it off to perfection.
ReplyDeleteAlison x
Your tag is amazing Emma, love the layers and especially the snowflake ❄️❄️❄️♥️
ReplyDeleteFAVE ALERT! FAVE ALERT! Totally and utterly STUNNING! Emma . This one just makes me heart so happy ! Thank you .
ReplyDeleteRespect to you for being 'good to go' with your Christmas prep - I still have so much to do which is so unlike me as usually I'm all done by the middle of November. To say I've hit panic mode is an understatement , lol .
big hugs x
Gorgeous tag, Emma! Love the icy colors and touches of gold and the flying heart! The red peace is the perfect counterpoint! Maura xxx
ReplyDelete