
Hello everyone! Can you believe how fast these weeks are flying? It's crazy to think that we're already in the third week of June and at the moment, Christmas has arrived here in the craft room! Yes, can you believe I've already started working on my first Christmas commissions...eek, we haven't even had summer yet!!!
Anyway, back to today and as always on a Monday, it's time for a brand new challenge over on the Simon Says Stamp Monday Challenge Blog and this week, the theme is PATTERNED PAPERS! Now, if you're like me, patterned papers are usually for stroking and looking at, BUT....there are so many beautiful papers out there and hopefully you will be brave enough to break into that stash and use them and we can't wait to see what you create!
As for my project, well...I was spoilt for choice but decided to use one of my favourite all time paper collections from Tim Holtz ~ Dapper and I went with the theme of the papers and chose to alter a box and create my own little tailor's shop! There's plenty of photos to show all the detail and I hope you'll enjoy this visit...


...and here's how I created this project!

To begin with I took an old chocolate box which was perfect for what I needed as it had the lid attached to create a side opening. I covered the entire box with a coat of black gesso and allowed this to dry before dry brushing individual layers of Faded Jeans, Antiqued Bronze, Black Soot and Ground Espresso Distress Paint over the surface. Allow each of the layers of paint to blend with the previous layer creating a beautiful textured effect to the surface. To complete the box, I used my fingertip to apply Tarnished Brass Distress Paint around the edges, as I wanted to create a worn, vintage look to the overall project.

Once all the paintwork was dry, I then chose a selection of patterned papers from the Dapper Paper stash. I measured and cut each panel of paper to fit onto my box, inked the edges with Frayed Burlap Distress Ink and then attached them to the inside and outside of the painted box.

On the inside of the box, I also measured and cut a piece of linen from the Textile Surfaces pack. The linen is self adhesive and all you need to do is peel of the back and apply to your project ~ I inked the edges before attaching my piece to the back wall.

At this stage, I also added a small box inside to create the look of a drawer section. I created this box from a piece of card, then painted it with Antique Linen, Frayed Burlap and Ground Espresso Distress Paints to create the look of faux woodgrain. I also added a metal label pull, complete with Big Chat sticker.

Next stage was to decorate the front cover and for this, I began by using the large Stitched Rectangle die to die cut some canvas paper and applied a coat of Old Paper Distress Paint over the top. Once dry, I added some more colour using Set 3 of the Distress Crayons and then used a piece of kitchen towel to dab Pumice Stone Distress Ink ~ this created a worn look to the paper which I loved. I then used the Dapper Die to die cut black and a dark pink felt, (this die is fantastic as you can use both the negative and positive pieces that are cut. For my project I used the inner sections). I stuck my felt die cut pieces onto the painted panel, inked around the edges and then matted it onto burlap before attaching the completed panel to the front of my box.

Apply enamel dots to the top left and right hand corners of the panel and then I added Gilded Rub Ons to the bottom corners.
As a finishing touch to the front section, I added a Quote Band which I altered with Copper Alcohol Ink and added some blue twine.

To complete the box, I added two Prima metal plaque studs down the spine.

I also added a small metal embellishment, again altered with copper alcohol ink to the top of my box. this was to represent a bell as every good tailor shop needs a bell so that you can enter.

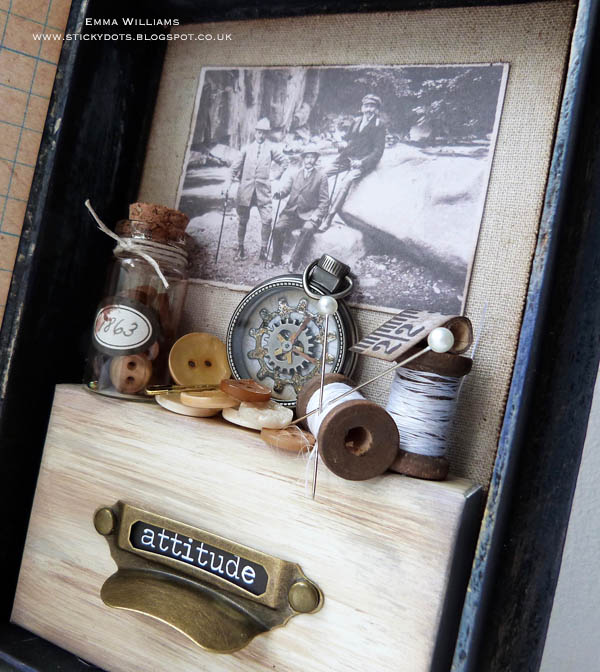


To complete this side of the box, I attached a wonderful image to the back wall that can be found in one of the Tim Holtz Ephemera sets (so sorry, mine are all a bit mixed up and I couldn't tell you which one it is).


I also attached some pieces of Eclectic Elements fabric, which I attached to a couple of small hanger charms, hung on a hitch fastener.

I absolutely loved creating this project and I hope you enjoyed the creative process!
As always, if you need any further inspiration for this challenge, then you need look no further than our blog to see all the wonderful creations from all the very talented Design Team members and every week, one lucky random participant has the chance to win a $50 gift voucher from Simon Says Stamp. You have until Monday 8am Ohio time. 1pm UK time, 2 pm CET to join in and good luck....


Thank you so much for all your visits today and hope you all have a great week ahead
See you again soon...love Emma xx
Products used:
Tim Holtz Sizzix Dies: Dapper, Thinlits Gears
Distress Paint: Black Soot, Tarnished Brass, Antiqued Bronze, Ground Espresso, Faded Jeans, Antique Linen
Distress Crayons Set 3
Distress Crayons Set 3
Distress Ink: Walnut Stain, Frayed Burlap
Idea-ology: Mini Pocket Watch Findings, Corked Vials, Dapper Design Tape, Gilded Accents Remnant Rubs, Quote Band, Big Chat Stickers, Thrift Shop Ephemera Pack, Label Pulls, Mini Sprocket Gears, Hanger Clips, Hitch Fastener
Surfaces: Ranger Manila Card, Dapper Paper Stash, Textile Surfaces, Textured Surfaces, Melange Eclectic Elements
Blending Tool
Alcohol Ink Applicator
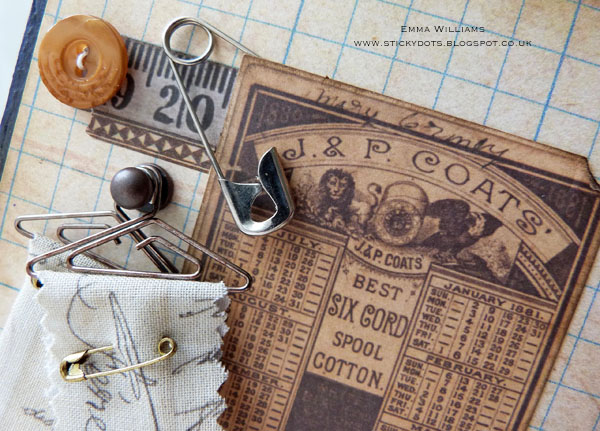
Cotton spools, Decorative Pins, Box and safety pins all from my own stash
Alcohol Ink Applicator
Cotton spools, Decorative Pins, Box and safety pins all from my own stash


Oh my goodness, this is AWESOME!!! I just love everything about this, the cover is fabulous but then you open it to reveal a Victorian mens outfitters shop! GORGEOUS! :-)
ReplyDeleteluv
Lols x x x
this is fabulous! i love your vintage tailor made world (perfect fit!) Vicki
ReplyDeleteOh Emma, oh my goodness this is amazing. I love ♥ it.The details are just fantastic. xx
ReplyDeletelove the front but the surprise on the inside is so good! What a great idea to turn the box over and make it a faux drawer! Love the collage on the back of the cover too!
ReplyDeleteEmma, what a genius project! The cover is wonderful with all the texture and then on the inside, eye popping pleasure. There is so much to look at and delight in! Truly amazing!
ReplyDeleteHugs,
Cathie ♥
You have left me utterly speechless! Emma- consider my jaw well n truly on the floor ! This is one absolutely knockout Project! Your creativity is above and beyond and your attention to detail is sublime! You can bet I LOVE your tailors shop hugely and I can only thank you for inviting me in and showing me round . it has been an absolute pleasure . big hugs xx
ReplyDeleteWoW! What an amazing masterpiece! LOVE it all!
ReplyDeleteFabulously tailored box! Love it! Now I have to get some of that Dapper paper. ;)
ReplyDeleteThe entrance drew me in and I had a fantastic look around your shop. My favorite thing,I think, is the fabric on the hangars. And the hitch fastener they are hanging on. Just the right touch! Fabulous!
ReplyDeleteThe entrance drew me in and I had a fantastic look around your shop. My favorite thing,I think, is the fabric on the hangars. And the hitch fastener they are hanging on. Just the right touch! Fabulous!
ReplyDeleteoh wow! it's like moving back in time. fabulous. just love every detail that was assembled with such great attention, hugs xx
ReplyDeleteAll right, Emma, my jaw is hanging! I adore this piece! I thought the top looked nice, but when you opened it to show the inside, oh my!! I love what you did to create this beautiful box!! hugs, maura
ReplyDeleteWhat an absolutely clever piece! I wouldn't never in a million years thought to combine manly images with sewing notions, but once again you have made the impossible seem totally fresh and brilliant! LOVE how this turned out, especially the little vignette of spools and measuring tape.
ReplyDeleteAnother brilliant project, Emma! I don't know how you keep coming up with them.
ReplyDeleteSuper cool project, Emma! LOVE how you die cut the tie in felt :)
ReplyDelete*mwah*
Steph
Simon Says Stamp!
What a splendidly dapper chap on the cover, and what a delightful assemblage reveal on the inside. Love all the sewing detailed objects - especially that twine-tied vial and the fabulous fabric hanging on the clothes hangers!
ReplyDeleteAlison x
This project is so cool! Emma. Such a brilliant creation! All the details inside are fantastic! :)
ReplyDeleteOh my gosh, Emma, this is outstanding. The cover alone is so creative, but then the inside puts it over the top.
ReplyDeleteWhat a surprise! I'd never guess this was a chocolate box! I really thought the box was wooden, lol! I know I am repeating that your colors matching is just perfct and absolutely fabulous. Thank you for sharing this and inspiring that much! Hugs, Marzena
ReplyDeleteYour project is outstanding! the front is fantastic and inside is superb! it's so full of details that I want to see more and more, I have to find every little masterpiece in this work: they are so much here! ! Fabulous! BArbara
ReplyDeletegreat project !!!
ReplyDeleteThis is such an amazing project, Emma! Love the gentleman on top and the inside is just as pretty as the cover! Wow! Hugs, Sandra
ReplyDelete